The top-left looks like it might be an equivalent replacement but that bottom left one just looks like a great big fat power diode. I've never been clear on why this circuit has Schottky diodes (or if it particularly needs them) when the equivalent circuit on the other generations of power modules use normal diodes or bridge rectifiers.If you haven't spotted my board has a couple of different components installed.
View attachment 13430
Pinball info
You are using an out of date browser. It may not display this or other websites correctly.
You should upgrade or use an alternative browser.
You should upgrade or use an alternative browser.
In Progress 1983 Bally GOLD BALL - Further Adventures in Budget Restoration
- Thread starter Nedreud
- Start date
January 2015
PLAYFIELD CLEAN-UP
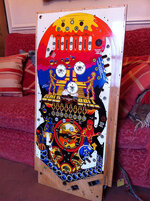
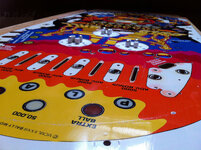
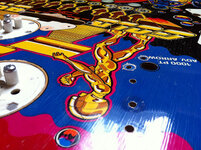
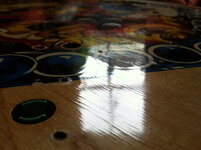
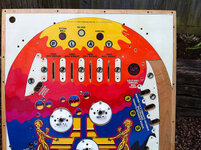
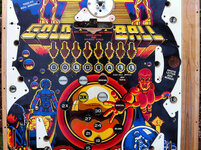
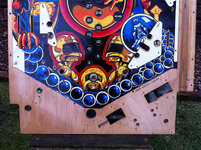
Spent the weekend busy myself with Magic Eraser (melamine foam) and isopropyl alcohol (isopropanal) to clean-up the GB playfield as best as possible. I think it's come up great considering it's got some pretty bad planking due to water damage down the left-hadn side. I didn't go too crackers, it's still a bit grubby in the middle, but I think anything further and I'll start stripping of the paint. After I was done with the ME+IPA I put on three heavy coats of Mill Wax. And when I say "heavy" I mean I almost spread it on with a trowel
Ultimately this is going to need, and will get, a proper restoration with airbrush, etc., but for now I'm going to protect it with a home-made playfield protector using a sheet of 0.75mm Lexan polycarbonate.
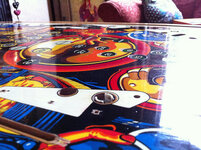
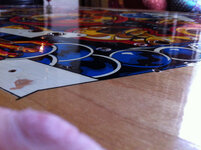
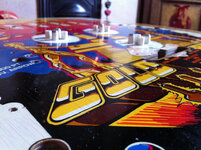
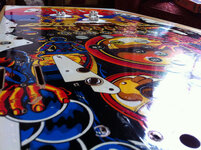


Last edited:
That's cleaned up really well 

January 2015
CABINET CLEAN-UP
I almost feel as though I'm on a roll now! I was going to make a start on the Lexan playfield protector tonight, but I got side-tracked looking the gold ball outhole switch for @astyy and then I removed the whole gold ball trough as it protrudes slightly through the playfield. I decided to un-solder both the coil and switch, to get them out of the way.
Once I'd done that I thought I'd get a few reference photos of the mains wiring for @astyy and one thing led to another and the next thing I knew I was scrubbing the corners of the cabinet with an old toothbrush and sucking up all the grot with the vacuum cleaner.
Beforehand (spot the chips of glass in the back corner - this box had a smashed playfield glass as some point):
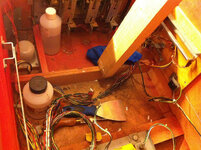
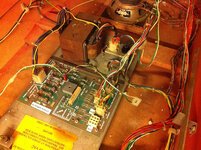
And looking much, much better afterwards:
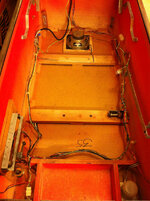
Generally the wiring is very tidy. I had to resolder the connections onto the knocker (it wasn't working and one wire was hanging by a single strand) and added few extra cable ties nearby. I need to replace the black flex coming into the cabinet as the sheath is damaged, it's too short, too old and the wrong colour coding. Also need to run a proper strip of earth braid up to the backbox and run it via the back leg plates to earth those too (there's a temporary earth wire running up to the backbox as the original earth braid was in a shocking mess).
I also took the opportunity to remove the shoddy US service outlet. This thing is a potential death trap. I understand why it's there for commercial purposes, but:
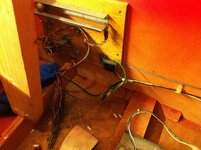
Now you don't:
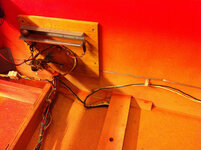
Sorry about the headache-inducing orange photos - fluorescent lighting, iPhone 4 and pinky/orange primer!
CABINET CLEAN-UP
I almost feel as though I'm on a roll now! I was going to make a start on the Lexan playfield protector tonight, but I got side-tracked looking the gold ball outhole switch for @astyy and then I removed the whole gold ball trough as it protrudes slightly through the playfield. I decided to un-solder both the coil and switch, to get them out of the way.
Once I'd done that I thought I'd get a few reference photos of the mains wiring for @astyy and one thing led to another and the next thing I knew I was scrubbing the corners of the cabinet with an old toothbrush and sucking up all the grot with the vacuum cleaner.
Beforehand (spot the chips of glass in the back corner - this box had a smashed playfield glass as some point):


And looking much, much better afterwards:

Generally the wiring is very tidy. I had to resolder the connections onto the knocker (it wasn't working and one wire was hanging by a single strand) and added few extra cable ties nearby. I need to replace the black flex coming into the cabinet as the sheath is damaged, it's too short, too old and the wrong colour coding. Also need to run a proper strip of earth braid up to the backbox and run it via the back leg plates to earth those too (there's a temporary earth wire running up to the backbox as the original earth braid was in a shocking mess).
I also took the opportunity to remove the shoddy US service outlet. This thing is a potential death trap. I understand why it's there for commercial purposes, but:
- It's on the "hot" side of the power switch so it's constantly LIVE unless the game is UNPLUGGED.
- Is only rated for 110VAC.
- Is a ropey design from a different era from a different country with considerably lower electrical safety standards. In other words it's dangerous and would never pass modern day standards.
- I don't have anything to plug in it and would never work on a live machine anyway.

Now you don't:

Sorry about the headache-inducing orange photos - fluorescent lighting, iPhone 4 and pinky/orange primer!
Nice work. I was intending bypassing the service socket and removing its leads but leaving it for that authentic look (don't know why). How did you join the cables here it's hidden in the photo?
Also, I'm missing the plastic cup over the mains switch which seems a bit dodgy with all the terminals exposed - is this part available? Nothing turned up on a quick Google but I may be using the wrong terms.
Also, I'm missing the plastic cup over the mains switch which seems a bit dodgy with all the terminals exposed - is this part available? Nothing turned up on a quick Google but I may be using the wrong terms.
After removing the wires I joined them back together with the "toothpaste cap" connectors. I've only ever seen these on my VECTOR and GOLD BALL pinball machines. They really are shoddy little bits of ****e. Inside the plastic cap is a tiny little coil of wire, like a tight spring. It may even be slight conical, so that as you twist the cap onto the bare wire ends it bites into them and screws on. You need to trim the wire ends to the right length so that there's enough for the cap to get hold of but not so much that any is exposed once tight. Personally I don't like them. They're cheap and nasty, and I suspect they were used because they were fast to fit, much like using pneumatic staples for the playfield edges even though it's pre-drilled for screws. All about cutting the cost of production. I'm going to remove the need for them entirely by running completely new pieces of 13A wire.
The caps are hidden in last photo as they're tucked under the cross-brace.
My PARAGON doesn't have the "plastic cup" over the power switch, only GOLD BALL and VECTOR. I guess this was some kind of concession to safety as the switch is right next to the coin box. But in PARAGON the wires and switch terminals are covered with clear tubing insulation. I don't see why you couldn't do this on your GB? Use either heatshrink or clear fish-tank air-line tubing. I replaced the switch on GB - I thought the original was a bit ropey and it was only rated for 110V
I took your advice and have added a DPST switch to my RS order for the outhole microswitch.
So once you get this fitted you can run new 13A cable direct from it to the power switch and re-route the earth to the backbox without RF filter, service outlet etc.
So once you get this fitted you can run new 13A cable direct from it to the power switch and re-route the earth to the backbox without RF filter, service outlet etc.
February 2015
HOMEMADE PLAYFIELD PROTECTOR
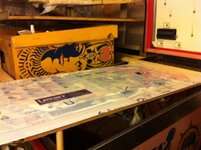
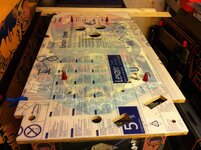
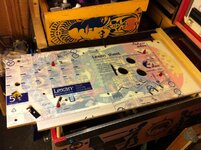
Finally managed to get started on my crazy idea to make a playfield protector until I restore the playfield properly. After removing the pop bumper bodies I used a mini sanding cylinder on the Dremel to cleanup the insides of all through playfield holes (except those with flush mounting #555 lamp holders - I'm not removing these as they're stapled and soldered on the underside).
Next I laid the Lexan on the playfield alinging the top and left sides. I clamped it using some little plastic clips and identified 4 star posts that I would fit as anchors to hold hold the Lexan. I carefully drilled 4 holes and fitted the star posts. Now that the Lexan was firmly clamped in place I used my cool new Dremel Cutting Kit #565 to remove the excess on the bottom and right sides. The cutting bit from the kit is brilliant. The long flutes force swarf down and as the tip is blunt it can run along the edge of the playfield acting as a guide without cutting the wood.
Next was the fun part: cutting holes. Although the cutter has a blank tip it is easy to work into the Lexan as it gets hot quickly when pressed and then melts its way through. As this is done where there's going to be a hole it doesn't have to be neat but actually it's easy to do neatly, even starting the thin slots for wire rollover switches.
So far I've done all major holes. Next I need to use some standard drill bits to do all the small screw and wire guide holes. Then finally the holes with flush #555 lamp holders. To do these I'll l have to remove the protector and position each location over an empty hole.
Here's a few photos. Once I'm done I might write up a separate How To tech-tip.


February 2015
HOMEMADE PLAYFIELD PROTECTOR PT.2
Spent about hour and a half on the playfield protector this evening. Little things this time. First task was finish off a couple of cuts in the area under apron. There are 4 holes that are only half the depth of the playfield - these are for bolt heads on the underside of the outhole kicker. There is also a shallow trough, again only half the depth of the playfield thickness, that is part of the rectangular hole for the outhole kicke mechanism. To do these I switched to a tiny 2mm routing head for the Dremel. I had to be careful as this one had no smooth guide on the tip and would cut into the wood if not careful! So glad I didn't try and use this bit for the rest of the holes as it was a bugger to use.
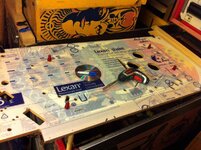
Next job was to mark and drill pilot holes for all the fixings. They seem to disappear under the white protective layer of the Lexan so I spent a while marking them all with a Sharpie. I then used a 3mm HSS bit in the Dremel to drill them all. I kept the mini cutting head on the Dremel as it allowed me to set the depth of the drill bit to ensure it was only just going through the Lexan. Once that was done I switched back to the cutting bit and opened up some of the larger 1/4" holes.
Final task was to mark all the holes that have flush mounted #555 lamp holders in them. There are 14 altogether. To do this I slightly enlarged the hole in an old CD to 5/8" and used it as a template to mark the holes with a Sharpie. I'll need to take the Lexan off the playfield to cut these last holes because removing the lamp holders from the holes would a difficult and mildly destruction job as they are stapled to the underside. Often the staples are then embedded into the solder where the unsheathed GI wires have been attached. When I cut them I'll do it by drilling a 5/8" hole in a scrap of plywood and then slipping this underneath.
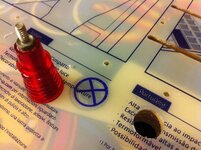
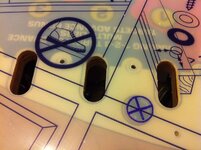
Photo above shows how typically far-off the registration is between holes and the silk screening. As you can imagine I'm itching to get the cover layers off the Lexan and see it sparkle, but I must be patient! So far it's looking good and no disasters.
HOMEMADE PLAYFIELD PROTECTOR PT.2
Spent about hour and a half on the playfield protector this evening. Little things this time. First task was finish off a couple of cuts in the area under apron. There are 4 holes that are only half the depth of the playfield - these are for bolt heads on the underside of the outhole kicker. There is also a shallow trough, again only half the depth of the playfield thickness, that is part of the rectangular hole for the outhole kicke mechanism. To do these I switched to a tiny 2mm routing head for the Dremel. I had to be careful as this one had no smooth guide on the tip and would cut into the wood if not careful! So glad I didn't try and use this bit for the rest of the holes as it was a bugger to use.

Next job was to mark and drill pilot holes for all the fixings. They seem to disappear under the white protective layer of the Lexan so I spent a while marking them all with a Sharpie. I then used a 3mm HSS bit in the Dremel to drill them all. I kept the mini cutting head on the Dremel as it allowed me to set the depth of the drill bit to ensure it was only just going through the Lexan. Once that was done I switched back to the cutting bit and opened up some of the larger 1/4" holes.
Final task was to mark all the holes that have flush mounted #555 lamp holders in them. There are 14 altogether. To do this I slightly enlarged the hole in an old CD to 5/8" and used it as a template to mark the holes with a Sharpie. I'll need to take the Lexan off the playfield to cut these last holes because removing the lamp holders from the holes would a difficult and mildly destruction job as they are stapled to the underside. Often the staples are then embedded into the solder where the unsheathed GI wires have been attached. When I cut them I'll do it by drilling a 5/8" hole in a scrap of plywood and then slipping this underneath.


Photo above shows how typically far-off the registration is between holes and the silk screening. As you can imagine I'm itching to get the cover layers off the Lexan and see it sparkle, but I must be patient! So far it's looking good and no disasters.
Last edited:
February 2015
HOMEMADE PLAYFIELD PROTECTOR PT.3
Found another couple of hours tonight and have nearly finished the protector. Just one more cutout for the upper star rollover. But it's gone 2am and I don't want to make silly mistakes with a scalpel.
The 14 holes for the GI are done. I drilled a 5/8" hole in an off cut of sheet pine and used that as a mobile guide underneath the Lexan. After flipping the protector over I also remove all the bits of swarf still stuck to the holes.
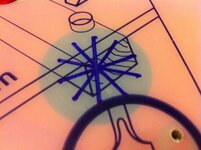
So, the really tricky part of this protector is what to do with the two star rollovers? I couldn't just cut a big round hole as a slow ball would inevitably get caught up. I practiced on a scrap of Lexan but the general plan was to cut slots for each "arm" of the star. Here's the first rollover marked up with Sharpie:
Using a straight 2mm Dremel routing bit I cut each "arm" from the tip to the centre using a steel ruler as guide to keep the cuts straight. The tiny 2mm router doesn't cut as nice as the larger fluted bits and leaves a lot of attached swarf:
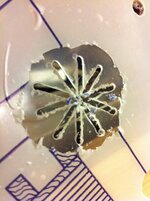
Looks terrible but most of the crap is the protective layer all chewed up. After some very careful work with a brand new 10A Swann Morten scalpel blade I got it looking like this:
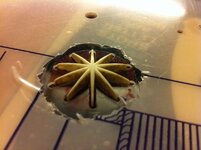
Excuse the disgustingly dirty star (note it isn't fully inserted) which will get the full ultrasonic bleach treatment, but I'm generally pretty pleased with the result! I've not seen this done on any commercial playfield protectors because they all seem to be for DMD-era games and star rollovers were Rather passé by then.
HOMEMADE PLAYFIELD PROTECTOR PT.3
Found another couple of hours tonight and have nearly finished the protector. Just one more cutout for the upper star rollover. But it's gone 2am and I don't want to make silly mistakes with a scalpel.
The 14 holes for the GI are done. I drilled a 5/8" hole in an off cut of sheet pine and used that as a mobile guide underneath the Lexan. After flipping the protector over I also remove all the bits of swarf still stuck to the holes.
So, the really tricky part of this protector is what to do with the two star rollovers? I couldn't just cut a big round hole as a slow ball would inevitably get caught up. I practiced on a scrap of Lexan but the general plan was to cut slots for each "arm" of the star. Here's the first rollover marked up with Sharpie:

Using a straight 2mm Dremel routing bit I cut each "arm" from the tip to the centre using a steel ruler as guide to keep the cuts straight. The tiny 2mm router doesn't cut as nice as the larger fluted bits and leaves a lot of attached swarf:

Looks terrible but most of the crap is the protective layer all chewed up. After some very careful work with a brand new 10A Swann Morten scalpel blade I got it looking like this:

Excuse the disgustingly dirty star (note it isn't fully inserted) which will get the full ultrasonic bleach treatment, but I'm generally pretty pleased with the result! I've not seen this done on any commercial playfield protectors because they all seem to be for DMD-era games and star rollovers were Rather passé by then.
I've not seen this done on any commercial playfield protectors because they all seem to be for DMD-era games and star rollovers were Rather passé by then.
They certainly were. The last Williams game I can recall using them was High Speed; one in each 'orbit' lane, possibly to score the Freeway values.
Thinking again, maybe the introduction of factory-fitted mylar at the beginning of the System 11 era was behind the disappearance of the star-type rollover button. It would've brought in two additional complications, first to cut the mylar and then align it.
And I've also just realised that, in fact, the button inserts would have to be precisely set (not only North/South/East/West but also rotationally) during manufacture of the playfield.
Last edited:
Erm high speed isn't a dmd game Jay...
WCS94 and TOTAN have rollover buttons, not stars, but serve same purpose.
Must be Popadiuks (sp?) thing
Are rollover buttons just that? Looks like a round button? Anyone got a good photo? I wish I had round buttons to cut out - doing the star rollover is a labour of love!
Roll over stars and buttons are donkeys years old they are used in old em games.
Your gold ball has the same rolling ball tilt mechanism in it as my vector
Do these things actually add much to the game ? The ball is missing in my vector, but I have tested the electrics and they work. All the other tilt mechanisms are present and correct in my vector
Is it worth reinstalling this ball ? It looked a bit unnecessary to me
Thanks
Do these things actually add much to the game ? The ball is missing in my vector, but I have tested the electrics and they work. All the other tilt mechanisms are present and correct in my vector
Is it worth reinstalling this ball ? It looked a bit unnecessary to me
Thanks
It's just there to stop cheating isn't it?
If someone tries lifting the front of the table to level or reverse the angle on the playfield then the ball rolls up the track and creates a circuit which is then detected by the game.
I presume they were later replaced by the tilt bobs that seen to be more commonly used for the same purpose. Of course the benefit of a tilt bob is that it can detect movement in all directions and generally in less time.
The effort and expertise you guys put into these shops and write up in the logs is impressive. Re. the stars I checked on my playfield and the mylar is cut short before it reaches them.So, the really tricky part of this protector is what to do with the two star rollovers?
How do you intend cleaning this protector once it's fitted? I need to research how best to clean the mylar but your log is motivating me to remove it at some point.
Your gold ball has the same rolling ball tilt mechanism in it as my vector
This is working on mine and I don't get it - surely the tilt bob will kick in before the rolling mechanism, but perhaps one is Tile and one is Slam which produce different behaviours
Hi. Games like vector have a tilt bob too. This is what I could not understand, as this thing seems superfluous to requirements. My vector has a wood panel on the cabinet side with three tilts on it
1. Tilt bob - kills the ball
2. Rolling ball tilt - kills the ball
3. Trembler slam tilt - kills the game
It then has two more
Playfield trembler tilt - kills the ball
Door trembler slam tilt - kills the game
Seems overkill to me
1. Tilt bob - kills the ball
2. Rolling ball tilt - kills the ball
3. Trembler slam tilt - kills the game
It then has two more
Playfield trembler tilt - kills the ball
Door trembler slam tilt - kills the game
Seems overkill to me
Agreed I've just checked the Gold Ball switch matrix the Tilt bob and Rolling ball and one playfield Trembler are all for Tilt, then two more on the cabinet and door for Slam (which puts the machine to sleep for a while). I'd have to lift the front of the machine right up to activate the ball mech and the bob would have gone well before.
All three of my Bally's have the tilt bob, rolling back and slam (I call them "wobble") switches. Never taken particular note of which is which in the switch matrix other than several are common. The "wobble" switches are designed to detect repeated shaking of the whole cabinet, that's why they kill the game. You would be doing that kind of shaking during play. The one on the coin door is particularly good at detecting kicks!
I am surprised the rolling ball mech only kills the current ball as the tilt bob would have activated long beforehand. The rolling ball is to detect when the front of the game his been lifted to prevent draining. Definitely a game killer in my opinion!
I am surprised the rolling ball mech only kills the current ball as the tilt bob would have activated long beforehand. The rolling ball is to detect when the front of the game his been lifted to prevent draining. Definitely a game killer in my opinion!
I'd have to lift the front of the machine right up to activate the (roll-tilt) ball mech and the bob would have gone well before.
Part of setting up a machine for commercial use was to adjust the cage (or track) for the roll tilt so that the ball rolled to the far end with very little cabinet lift in effect. This would prevent the addition of too many beermats, etc under the front adjusting feet. The pendulum tilt wouldn't pick that up until there were a lot.
Williams dropped the roll-tilt early in the System 11 era (Fire! onwards) and the playfield tilt slightly later (Black Knight 2000 had the wiring, but not the switch).
I also vaguely remember a 60's game, maybe Buckaroo, having a mercury tilt switch rather than a roll tilt.
Slam (which puts the machine to sleep for a while).
On a solid-state Bally game, the delay is while the program runs the Mpu self-test, but on 70's Bally electro/mechanical games the time delay depends on the warm-up time of a #455 'flashing' lamp; it lights up when the slam tilt operates, and the machine comes back on (in Game Over mode) when the bi-metal part of the filament goes open circuit.
February 2015
HOMEMADE PLAYFIELD PROTECTOR PT.4
Finally finished the playfield protector today!
After painstakingly cutting out the second star rollover I did the 14 holes for the GI lamps. Because the #555 lamp holders are flush with the playfield surface I couldn't cut them in place, so I got an offcut of plywood and drilled a 5/8-inch hole through it which was then position under the markings I'd made earlier and cut with the Dremel mini-router as usual. Talking of cutting I finally found the cable for my Sony camera so I could download all the photos and a video I took of the cutting:
Last cut today was for the shooter lane. I had wanted to heat mould this but my experiments hadn't been particularly successful so I decided to follow suit with the commercial protectors and cut a long parabolic slot. This was by far the hardest cut of all as it's very slightly curved and right on the edge. But after careful marking and using the edge of the playfield as a guide I managed to constantly adjust the position whilst running the Dremel along.
So, here it is! The completed protector!
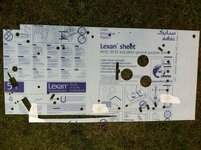
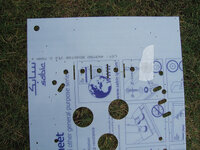
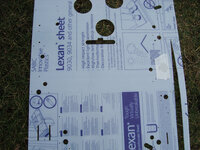
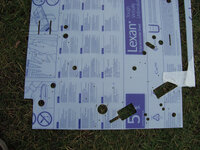
I did have one minor boob:
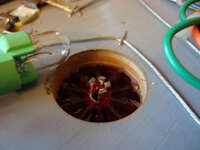
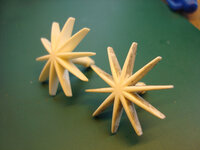
Yep! Snapped off one of the five little pegs that retain the star in the rollover whilst removing it! Not sure how really. I think it was weak. But nothing a little ARALDITE can't fixed (I'm not at the insert replacing stage just yet):
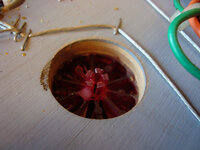
The star inserts themselves also cleaned up a treat with a wash of isopropyl alcohol and scrub with Novus #1. Here's one before and one after:
HOMEMADE PLAYFIELD PROTECTOR PT.4
Finally finished the playfield protector today!
After painstakingly cutting out the second star rollover I did the 14 holes for the GI lamps. Because the #555 lamp holders are flush with the playfield surface I couldn't cut them in place, so I got an offcut of plywood and drilled a 5/8-inch hole through it which was then position under the markings I'd made earlier and cut with the Dremel mini-router as usual. Talking of cutting I finally found the cable for my Sony camera so I could download all the photos and a video I took of the cutting:
Last cut today was for the shooter lane. I had wanted to heat mould this but my experiments hadn't been particularly successful so I decided to follow suit with the commercial protectors and cut a long parabolic slot. This was by far the hardest cut of all as it's very slightly curved and right on the edge. But after careful marking and using the edge of the playfield as a guide I managed to constantly adjust the position whilst running the Dremel along.
So, here it is! The completed protector!


I did have one minor boob:

Yep! Snapped off one of the five little pegs that retain the star in the rollover whilst removing it!

The star inserts themselves also cleaned up a treat with a wash of isopropyl alcohol and scrub with Novus #1. Here's one before and one after:

As always there are loads and loads and loads and loads more photos on Flickr: https://www.flickr.com/photos/peterduerden/sets/72157645868034086/
Great work @Nedreud - can you run me a quick copy off please now you have the template 
@Jay Walker I'm interested in these switches and am going to experiment further. I've just studied the RTFM and indeed it says the roll cage should be adjusted once sited. Regarding SLAM it says the machine goes dead and a time delay occurs to 'discourage unnecessary abuse' before powering back up to a Game Over state.
Seen as most of the time I've owned it it's not playable both of these modes are somewhat redundant but I'll get there in the end.
Quick update. Sprayed the wooden side rails for the edges of the playfield with the last of my ancient can of Halfords Satin Black paint. It was intended for recolouring old-style black bumpers on cars (I bought it to do them on an old Fiesta with metal bumpers) but it has a lovely satin sheen that looks great on pinball bits like the PSU cover and air vents.
Hopefully fit the new Lexan protector tomorrow and start repopulating the playfield!
Hopefully fit the new Lexan protector tomorrow and start repopulating the playfield!


