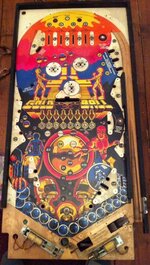
So it is! Not seen a BP before. Very slick looking pin. Same designer as GOLD BALL and same minimalistic cost-cutting component count on the underside of the playfield. The backglass screams "We were aiming for the Raiders Of The Lost Ark licence but didn't get it". I like the art; same guy did VECTOR.Looks quite similar to my Black Pyramid
Pinball info
You are using an out of date browser. It may not display this or other websites correctly.
You should upgrade or use an alternative browser.
You should upgrade or use an alternative browser.
In Progress 1983 Bally GOLD BALL - Further Adventures in Budget Restoration
- Thread starter Nedreud
- Start date
Very slick looking pin.
err, you havent seen many pins have you
I have it nearly all working now and its not too bad i guess. been on the lookout for a backglass for it although I fear it might cost more than the machine is worth, saying that I got the machine free from an arcade that was shutting down, it was in three or four pieces when I got it but hammered it all back together and jelly crimped about 50 wires that had been sheared when they kicked the head off the machine (im guessing)
quite like the wee moving target thing in the middle of the playfield, does goldballs one move at all ?
Similar location but different toy. GOLD BALL uses three stand-up targets in a row but the outer two are connected together by a screen-printed plastic "bridge". The outer targets are common and operate the same switch, #28. The centre target has a gold metal button, or "BULLS EYE" as the manual refers to it, that passed through a hole in the middle of the bridging plastic. This is switch #29. Hit the outer targets advances the lit arrow above the G-O-L-D-B-A-L-L inserts. Hitting the "BULLS EYE" spots the current letter and advances the arrow.quite like the wee moving target thing in the middle of the playfield, does goldballs one move at all ?
On almost every GOLD BALL I've looked at on the internet the bridge plastic is broken or missing. It gets a real hammering! Bit of a design flaw really. Going to try and make my own repro out of some super tough polycarbonate.
No, seriously I really like the look of BLACK PYRAMID! I'm a sucker for the less popular "naff" titles of the late 70s and early 80s. Some real gems and lot cheaper, especially if you're willing to take on a project.
I also replaced/fixed all the dead lamps this lunch time. The "3" and "6" THOUSAND inserts aren't working (and watching this video it looks like "9" has gone again) so I suspect a couple of dead driver transistors on the LAMP COMBO board, but everything else is good. Not sure about the white 50,000 insert right at the top as it appears to be on all the time?
I notice from the manual that this game's got Phase A/Phase B feature lamps, allowing each of the 30 lamp Scr's on the combo board to drive two lamps. The schematics don't come up particularly large, but I can't see 'Top Lanes 50k' among the loads listed. If the 50,000 lamp is a feature lamp, I'd expect to have another lamp always On as well, with the relevant Scr damaged.
Incidentally, the manual states that 6 displays are used for 4 player games, with 4 being used by the 2 player variant. That doesn't really gel with Bally's cost saving ethos at the time. Another typo? Possibly an extra display was deleted?
Thanks @Jay Walker. I'd been thinking about this in the back of my mind. That might explain why both the "3" and "6" THOUSAND inserts are dead if they have a common SCR. But if 30 SCRs can control 60 lamps because A and B are 180 degrees out of phase then surely there must be some kind of phase detection? Need to look more closely at the schematics.
One of my jobs is to do a high res scan of the schematics and upload then to IPDB because the current manual is next to useless it's so blurry. The original isn't very well printed and contains lots of errors, like the display counts and incorrect pin-outs. I don't understand why the did 2- and 4-player versions? Surely that's more work and they only sold 1,750.
The bit I haven't got to testing yet are the pair of large TRIACs used the flash the GI in attract mode (apparently). One of them has been bypassed with some underrated wire so I suspect it's dead. If there'a a photo in my GOLD BALL album on Flickr of the cabinet inner you can see them bolted to the PSU chassis.
January 2015
STAR POSTS
Time to start stripping this playfield to stop me from playing it! Plastics back off and gave it a quick vacuum whilst brushing grot out of corners with a toothbrush. Then I pulled off all the rubbers. What a pile of perished cr@p:
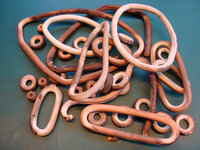
Then I took a bunch of photos of the star posts to "remind" myself which size goes where and with what type of screw post. So now the playfield looks like this:
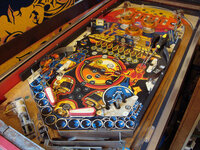
And I have a bag of star posts that a friend has kindly offered to pop in his dishwasher! Thanks @Hiro996
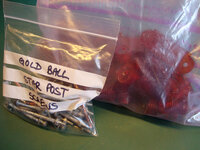
I've also just noticed I completely missed a small plastic right next to the left flipper!
STAR POSTS
Time to start stripping this playfield to stop me from playing it! Plastics back off and gave it a quick vacuum whilst brushing grot out of corners with a toothbrush. Then I pulled off all the rubbers. What a pile of perished cr@p:

Then I took a bunch of photos of the star posts to "remind" myself which size goes where and with what type of screw post. So now the playfield looks like this:

And I have a bag of star posts that a friend has kindly offered to pop in his dishwasher! Thanks @Hiro996

I've also just noticed I completely missed a small plastic right next to the left flipper!
January 2015
PLAYFIELD RESTORATION
I also had a little test clean and polish. For the first time I tried the trick I read about over on Pinside by Vid of using "Magic Eraser" (my brand are Duzzit Sponge Eraser and are £1 for 4 from The Range), aka melamine foam, and isopropyl alcohol. Works really well! Cuts straight through the grot and then through the dirt that's been engrained into the paint and balls swirls. Very impressed. After scrubbing with the Duzzit I just wiped it down with more alcohol which evaporates dry very quickly. I then slapped on a coat of MILL WAX to give it some shine and protection.
Turned out great:
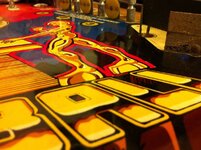
I'd also bought an A6 sized sample of some clear 0.75mm Lexan polycarbonate sheet. This is the same stuff, just a different brand, as the Makrolon used by Playfield Protectors. Here's what it looks like on the bit I just polished from the bottom of the photograph up the metal post and covering the word "BALL":
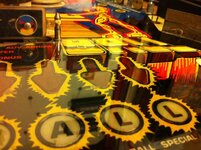
I'm very pleased with that! Obviously the whole playfield needs cleaning properly and needs a lot of tiny little touch-ups, most notably the black around the edges of inserts, etc., but in anticipation of a successful result I have ordered a full sheet of 0.75mm x 1250mm x 520mm, which is perfect because the playfield is 1070mm x 520mm! And it only cost £15.40 including delivery. The plan, unlike the commercial playfield protectors, is to cover the entire playfield and fit all the hardware back on top whilst only cutting holes for switches, lamps, pop bumpers, targets, roll-overs and shooter trough.
And if it's a disaster I just take it off and bin it, losing only £15, unlike arsing up clear coat which could ruin the playfield forever.
We shall see...
PLAYFIELD RESTORATION
I also had a little test clean and polish. For the first time I tried the trick I read about over on Pinside by Vid of using "Magic Eraser" (my brand are Duzzit Sponge Eraser and are £1 for 4 from The Range), aka melamine foam, and isopropyl alcohol. Works really well! Cuts straight through the grot and then through the dirt that's been engrained into the paint and balls swirls. Very impressed. After scrubbing with the Duzzit I just wiped it down with more alcohol which evaporates dry very quickly. I then slapped on a coat of MILL WAX to give it some shine and protection.
Turned out great:

I'd also bought an A6 sized sample of some clear 0.75mm Lexan polycarbonate sheet. This is the same stuff, just a different brand, as the Makrolon used by Playfield Protectors. Here's what it looks like on the bit I just polished from the bottom of the photograph up the metal post and covering the word "BALL":

I'm very pleased with that! Obviously the whole playfield needs cleaning properly and needs a lot of tiny little touch-ups, most notably the black around the edges of inserts, etc., but in anticipation of a successful result I have ordered a full sheet of 0.75mm x 1250mm x 520mm, which is perfect because the playfield is 1070mm x 520mm! And it only cost £15.40 including delivery. The plan, unlike the commercial playfield protectors, is to cover the entire playfield and fit all the hardware back on top whilst only cutting holes for switches, lamps, pop bumpers, targets, roll-overs and shooter trough.
And if it's a disaster I just take it off and bin it, losing only £15, unlike arsing up clear coat which could ruin the playfield forever.
We shall see...
Last edited:
January 2015
PLAYFIELD RESTORATION
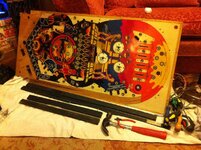
Managed to get the playfield in the house again over the weekend! Pulled off the wooden edges (why the f*** are they held on with the largest, most evil staples yet the playfield edges are still pre-drilled and countersunk for screws?). Unsoldered the wires for the gold ball gate and outhole kicker solenoids so that they could be removed too. Also pulled all the wire-form guides off. Unlike PARAGON these had winged instead of knurled ends but didn't seem to cause any damage on the way out.
Continued cleaning with Magic Eraser and isopropyl alcohol. It's slow going...
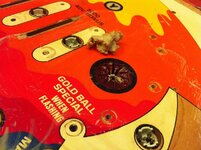


Be careful with that ME, I hear one rub too many and you are down to the wood before you know it.
I'm quite surprised how tough the playfield is actually. You'd have to really be going hell for leather with your eyes closed to get down to the wood without noticing! I've been going very gently and have started right at the top corner under the arch plastics and where the shooter lane enters the playfield (furthest away from the players perspective so any whoopsies are less noticeable). So far, so good. They only bit where I over did it was cleaning off the bad black dirt line where ball follows the top orbit (you can it clearly in the first photo above as it passes over the P-L-A-Y inserts in the yellow area). I scrubbed a bit too vigorously on the orange area and it just started to show a little of the yellow underneath.Be careful with that ME, I hear one rub too many and you are down to the wood before you know it.
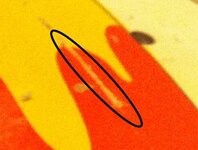
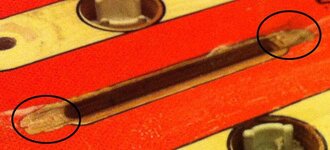
It won't be a problem as I need to fill some slight dimples/depressions with P.38 filler before spraying new colour paint. The only repair I'm not looking forwarding to is dealing with the mess at each end of the slots for the roll-over lanes:
Are you going to work on the cabinet art? Mine is in similar condition to yours and faded pink that I can live with and prefer, looking at the photos in your original post where the legs are removed I can't believe it was ever that PINK.
Inside the backbox there's evidence it was an even more shocking, possibly fluorescent, pink originally! Red is the worst paint for colour stability and early fluorescents are also terrible, so red/pink fluorescent paint from the 80s is about as bad as it gets for paint that fades! I'm going to keep it original for the time being. I want to get the playfield cleaned up and covered with polycarbonate sheet so I can put it back together and have another playable game. The full restoration will come in time, and yes, I think one day I will do a full restore of the cabinet and return it to it's original eye-burning shocking pinkAre you going to work on the cabinet art? Mine is in similar condition to yours and faded pink that I can live with and prefer, looking at the photos in your original post where the legs are removed I can't believe it was ever that PINK.
January 2015
MYLAR REMOVAL
The playfield has 3 Mylar rings around the pop bumpers (2 full, 1 partial) that have started to peel. As I'm going to be covering with Makrolon/Lexan polycarbonate sheet it needs to go.
I've never removed Mylar before so read up a few How Tos. There are two basic methods: freeze it or heat it. Freezing seems more common but heat possibly removes more of the adhesive. I haven't got any freeze spray so it's a hot air gun paint stripper for me.
As it turns out it was incredibly easy. Maybe it's just this Mylar but it only took a quick warm-up on the LOW heat setting and it easily went soft and peeled off. There was some very minor paint loss around the top-left pop bumper but this is where there is some bad planking and paint peel/curling due to water damage. The paint is very delicate in a strip about 3-4" wide that runs from top to bottom of the playfield, and I'm going to have to tread very carefully as I clean this area.
And for my next experiment I tried an unusual method that I found on YouTube for removing the remaining adhesive using IPA (isopropyl alcohol) and flour. Yes! Plain flour. Most How Tos suggest using "Goo Gone", an adhesive remover, but I haven't got any so thought I'd try the flour. Basically, you wet the gunge with IPA and then sprinkle on a little plain flour. Rub it in with you fingers and it starts to form balls of floury goo which can just be brushed off:
I found this did a pretty good job and sorted out the bulk of the goop. But there was still a thin residue of stickiness. So I sprinkled on a little more flour and then used a clean cotton muslin cloth dipped in IPA to rub off the rest. The muslin quickly got clogged with sticky flour so it was important to keep turning it and wetting it with more IPA, but it did a grand job. All-in-all, minus arsing around taking photos and videos, the job took 10 minutes:
Last edited:
Looking good Peter. Be interested to see how the lexan cover works out.
I've got some minor damage on R&B that i'm looking to have touched up - and once that's done I might consider doing the same as you if it works out well. A bit less risky than taking a clearcoat can to it.
I've got some minor damage on R&B that i'm looking to have touched up - and once that's done I might consider doing the same as you if it works out well. A bit less risky than taking a clearcoat can to it.
That's exactly my thinking. At the moment I'm not going in for a total playfield restoration. I've read the Vid tutorials over on Pinside.com and understand what to do and feel confident that it's all within my skills (done a lot of model making and painting in my time, a lot of similar skills/techniques). The main barrier is time. It takes a lot of time to do that level of restoration. Many would also doubt my sanity for a GOLD BALL too! And I may have sourced a better condition spare playfieldA bit less risky than taking a clearcoat can to it.
At the present I'm going for the "maintained original" look and feel. Yes, I want the playfield to look it's best but I'm quite happy for it to look 30+ years old and be worn. But I don't want it to get any worse and I want it to play better - no meandering balls round cupped inserts or slow balls getting stuck in divots, etc. I think the Lexan is the perfect solution for this approach. Protects what's there whilst being able to leave it looking original, yet should play like a brand new game.
And if the whole thing sucks or I mess it up... nothing lost. I can try something else.
The Lexan is 0.75mm thick, exactly the same as that used by Playfield Protectors. It's quite flexible - it came rolled up in the post! See my post on The "Today I Recieved" Thread. It sprung open as soon as I undid the packaging and only had a slight curve to it. I've left it out on the dining table for a couple of hours to warm up and it's now completely flat.@Nedreud How thick is the lexan sheet? Is it rigid or flexible?
I think you'd have to go to at least 2mm for the Lexan to be considered rigid. You could probably still roll-up 2mm sheet but it would end up being several feet in diameter unlike the 0.75mm that was no more than 4-5" diameter. I used some 2mm to create a new safety cover for the +190VDC section on the regulator board.
For use on a playfield you could probably get away with using 1mm if you wanted it slightly more rigid, but you might start to have issues with star roll-overs. They might need adjusting so they sit slightly higher. Wires switches can easily be adjusted by bending.
Is 0.75mm going to be thick and rigid enough to completely eliminate issues with severely cupped inserts? I'm going to guess not, but I'm going to stick my neck out say I think it will be an improvement and at worst won't make any difference. We'll all find out soon... going to spend tonight finishing the ME+IPA cleaning and then starting fitting the Lexan...
eliminate issues with severely cupped inserts?
If you're going to cover the whole pf with this then I guess you'll be screwing posts etc through it? I wonder whether that will keep it stretched tight enough to take out any pf indentations, cupped inserts etc....it might give you a nice flat pf
That's the plan @ronsplooter! We shall see...
January 2015
PLAYFIELD PROTECTOR TESTS
So I got my new Cutting Tool #565 attachment for my Dremel. This is like a non-plungeable router and holds the Dremel perpendicular to the work:
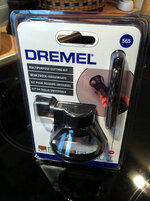
I had an A6 sized sample of 0.75mm Lexan so decided to try some test cuts. I clamped the Lexan in the outhole area and had a go at cutting the large round hole for the gold ball drain and the rectangular for the outhole kicker/ramp. I have to say I'm really pleased with the results! A little messy yes (the flutes on the cutting bit force the waste down so going to have to remove mechs below each hole or they get totally filled with plastic dust) but quick and easy to do. The cutting bit is plain round at the end so can run around the inside of the holes as a guide without cutting the wood itself. Awesome!
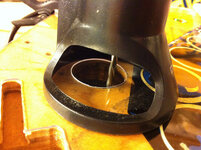
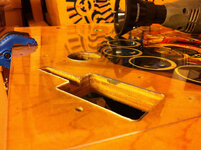
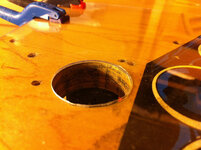
PLAYFIELD PROTECTOR TESTS
So I got my new Cutting Tool #565 attachment for my Dremel. This is like a non-plungeable router and holds the Dremel perpendicular to the work:

I had an A6 sized sample of 0.75mm Lexan so decided to try some test cuts. I clamped the Lexan in the outhole area and had a go at cutting the large round hole for the gold ball drain and the rectangular for the outhole kicker/ramp. I have to say I'm really pleased with the results! A little messy yes (the flutes on the cutting bit force the waste down so going to have to remove mechs below each hole or they get totally filled with plastic dust) but quick and easy to do. The cutting bit is plain round at the end so can run around the inside of the holes as a guide without cutting the wood itself. Awesome!


Don't do it man. 2 things are going to happen here.
Firstly, once you've put a fair number of games on the machine, dirt will have found its way under that lexan sheet and over time you will end up with a dirty playfield you cannot wipe clean without stripping the whole thing down again and lifting the sheet.
Secondly, once it gets dirty enough and because the lexan is not adhered to the playfield what you effectly end up with is a large sheet of sandpaper sitting on the artwork. Vibrations and ball movement will eventually sand that artwork down for you.
Instead of all that faff, why not just head over to the nearest car spray painting shop and give the guy there some beer money to spray your playfield with a thin coat of clear from the 'leftovers' on his next job? Key word being thin for that coat of clear.
Hi @PeteB!
Thanks for yours thoughts about the Lexan. I'd had similar thoughts but my concerns are minimal for two reasons. Firstly, reviews/tests of the commercial playfield protectors are good and I have friend who has a couple fitted. So far, so good, no issues with dirt underneath. Because mine is going to cover the playfield edge-to-edge I think there will be even less chance of any issues. Secondly, this is a temporary measure. Not temporary as in just a couple of weeks but temporary because I want it playable and not make it any worse until I eventually do a proper restoration (airbrush repaint, un-cupping inserts, water-slide decals and full clear coat, etc.). I really should finish my PARAGON first which is a full-on total restoration but I got side-tracked getting GOLD BALL running again and then realising it wasn't going to be much effort to have a second fully playable game.
I had a quick look at your Flickr. Did you ever finish the restoration of that CENTAUR II? The photos are very familiar and I'm absolutely certain this was for sale on eBay probably sometime during 2013 when I was looking for my first pin. Went for around £600? I'd love a CENTAUR II. That kooky EBD / MMPM style cabinet is so cool!
Thanks for yours thoughts about the Lexan. I'd had similar thoughts but my concerns are minimal for two reasons. Firstly, reviews/tests of the commercial playfield protectors are good and I have friend who has a couple fitted. So far, so good, no issues with dirt underneath. Because mine is going to cover the playfield edge-to-edge I think there will be even less chance of any issues. Secondly, this is a temporary measure. Not temporary as in just a couple of weeks
I had a quick look at your Flickr. Did you ever finish the restoration of that CENTAUR II? The photos are very familiar and I'm absolutely certain this was for sale on eBay probably sometime during 2013 when I was looking for my first pin. Went for around £600? I'd love a CENTAUR II. That kooky EBD / MMPM style cabinet is so cool!
Hey, @astyy! The steel offcuts arrived this morning (I'll refrain from posting in the "Today I Received" thread again 
Both bits looks very nice and either would do a fine job, I'm sure.
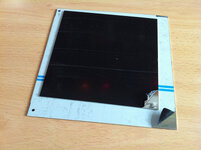
The smaller sheet is 1.2mm x 125mm x 125mm of "Mirror Polished" steel which cost £3.50 delivered from eBay. Underneath it is a generously over-sized piece of 1.5mm x 150mm x 150mm (was supposed to be 125 x 125) "Bright" steel which was only £0.99 delivered, again from eBay.
The difference in shininess is minimal but you can tell the difference. Either would look great as the "Bright" is still almost mirror-like. You can just about tell there is a slight "brushed" finish to the "Bright" whereas the "Mirror Polished" is... well... mirror-like!
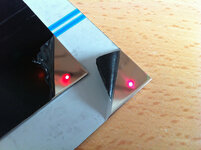
In fact, the "Mirror Polished" is so reflective my iPhone camera was able to focus on the fairy lights overhead in the reflection! It couldn't manage this on the "Bright". I'm really undecided which to use? It has to be said the 1.5mm "Bright" does feel beefier and would probably last longer after repeated hammering by pinballs. The 1.2mm will be slightly easier to work on. Mmm... I guess I'll have to make a prototype using both! Most important will be to get a rounded and smooth edge so that the pinball doesn't get scratched.
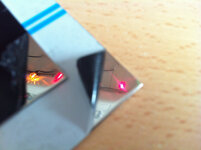
Both bits looks very nice and either would do a fine job, I'm sure.

The smaller sheet is 1.2mm x 125mm x 125mm of "Mirror Polished" steel which cost £3.50 delivered from eBay. Underneath it is a generously over-sized piece of 1.5mm x 150mm x 150mm (was supposed to be 125 x 125) "Bright" steel which was only £0.99 delivered, again from eBay.
The difference in shininess is minimal but you can tell the difference. Either would look great as the "Bright" is still almost mirror-like. You can just about tell there is a slight "brushed" finish to the "Bright" whereas the "Mirror Polished" is... well... mirror-like!

In fact, the "Mirror Polished" is so reflective my iPhone camera was able to focus on the fairy lights overhead in the reflection! It couldn't manage this on the "Bright". I'm really undecided which to use? It has to be said the 1.5mm "Bright" does feel beefier and would probably last longer after repeated hammering by pinballs. The 1.2mm will be slightly easier to work on. Mmm... I guess I'll have to make a prototype using both! Most important will be to get a rounded and smooth edge so that the pinball doesn't get scratched.

Hey @Nedreud looks cool. I'm not really qualified to comment - I probably would have used an old biscuit tin lid with the Tartan facing downwards as a professional touch.
As mentioned the part was stressed on mine to fit the posts but I guess you can drill these to suit so shouldn't be an issue.
Based on my machine thread, I can tell the photo glimpses of it are tempting you, perhaps when this prototype part is ready it's time for the visit. I had a few games last night and it was playing well (in between reset problems!).
Hi @PeteBBecause mine is going to cover the playfield edge-to-edge I think there will be even less chance of any issues. Secondly, this is a temporary measure. Not temporary as in just a couple of weeksbut temporary because I want it playable and not make it any worse until I eventually do a proper restoration
Ok well thats fair enough I suppose.
I had a quick look at your Flickr. Did you ever finish the restoration of that CENTAUR II? The photos are very familiar and I'm absolutely certain this was for sale on eBay probably sometime during 2013 when I was looking for my first pin. Went for around £600? I'd love a CENTAUR II. That kooky EBD / MMPM style cabinet is so cool!
No, the Centaur II was bought as a parts machine for a Centaur I restored. It was too far gone to save with the cabinet having water damage, most of the boards had battery damage and the backglass was ruined. You can't buy II backglasses, only the first one is available. I sold it in 2012 to another guy who was doing the same thing, so it must have been passed around again.
I still need to upload pics of my actuall Centaur restore, as well as quite a few other machines.
Incidentally, the manual states that 6 displays are used for 4 player games, with 4 being used by the 2 player variant. That doesn't really gel with Bally's cost saving ethos at the time. Another typo? Possibly an extra display was deleted?
One of my jobs is to do a high res scan of the schematics and upload then to IPDB because the current manual is next to useless it's so blurry. The original isn't very well printed and contains lots of errors, like the display counts and incorrect pin-outs. I don't understand why they did 2- and 4-player versions? Surely that's more work and they only sold 1,750.
It seems to be a typo.
Again going by Ipdb, I've worked out that the details about 2 Player/4 Player variants (and use of an extra display) actually refer to 'Grand Slam', which was built in both formats and had an additional display for what seems to be a 'scoreboard' feature on the backglass.
Even though Grand Slam was produced in December 1983 (4 player) and Gold Ball in October, the 'Project' dates for them are June and August respectively, so the details of modules used, having been written for G/Slam, were probably overlooked for GB.
Incidentally, I thought Bally were mean in only allowing GB one slingshot, but it was lucky; G/Slam didn't get any, and the 'standard' locations, where you'd expect to find them, even have the same switch number.
Last edited:
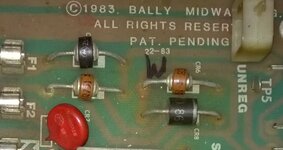
For anyone interested, these are the unusual, and now obsolete, Mr751 Schottky fast recovery high surge diodes that I was trying to find equivalent replacements for:
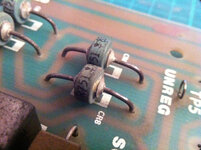
If you haven't spotted my board has a couple of different components installed.
