Pinball info
You are using an out of date browser. It may not display this or other websites correctly.
You should upgrade or use an alternative browser.
You should upgrade or use an alternative browser.
In Progress 1983 Bally GOLD BALL - Further Adventures in Budget Restoration
- Thread starter Nedreud
- Start date
07-OCT-2015
BACKGLASS PRESERVATION WITH KRYLON TRIPLE THICK
This was the most nerve racking pinball job I have ever done. You are really working against the clock!
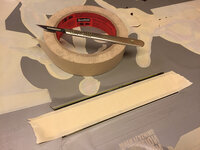
Covering the score display windows with masking tape:
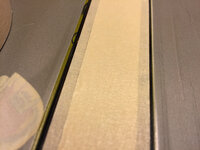
1mm gap left between paint and masking tape in score displays so that the Krylon Triple Thick overlaps and holds the paint to the glass along the edges:
Score display windows all masked:
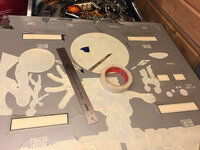
Kryon Triple Thick applied and covered with cling film. OMG, this was tense work. The cling film is just sucked onto the wet Krylon and once on does not want to come off! The backlgass paint has already started to soften a little so any attempt to reposition the cling film and the paint lifts or moves it especially along the edges and where it's bubbled:
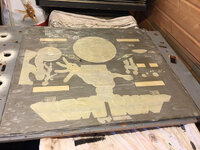
Backglass was then placed on top of my old PARAGON playfield and then topped with the widebody backglass from PARAGON which is big enough to completely cover the backglass. I then put on two more standard playfield glasses and chucked on a few sheets of MDF for good measure to weight it all down and press out the air bubbles! Fingers crossed...
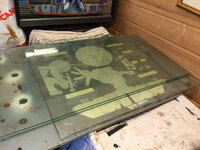
BACKGLASS PRESERVATION WITH KRYLON TRIPLE THICK
This was the most nerve racking pinball job I have ever done. You are really working against the clock!
Covering the score display windows with masking tape:

1mm gap left between paint and masking tape in score displays so that the Krylon Triple Thick overlaps and holds the paint to the glass along the edges:

Score display windows all masked:

Kryon Triple Thick applied and covered with cling film. OMG, this was tense work. The cling film is just sucked onto the wet Krylon and once on does not want to come off! The backlgass paint has already started to soften a little so any attempt to reposition the cling film and the paint lifts or moves it especially along the edges and where it's bubbled:

Backglass was then placed on top of my old PARAGON playfield and then topped with the widebody backglass from PARAGON which is big enough to completely cover the backglass. I then put on two more standard playfield glasses and chucked on a few sheets of MDF for good measure to weight it all down and press out the air bubbles! Fingers crossed...

Good work now leave for 2 weeks.  We're leaving for NLP in 2 sleeps!
Peter i love your presentation in your posts, you do good work sir
Thanks, Dan  I wouldn't be much of a web developer if I couldn't write a post that wasn't at least presentable
Good job Peter  That should look good once it's had chance to dry.
 That should look good once it's had chance to dry.
It can't look much worse! Really this backglass is toast. Just look at the flake on the bottom edge in the 3rd photo above. Basically, the bottom 4-6" of the paint is completely disconnected from the glass and is just hanging off. As you can see major chunks are missing. I can't really do anything with it except try to stop it from getting worse.Good job PeterThat should look good once it's had chance to dry.
But the chances of getting a decent replacement are remote due to low production run and general low popularity. I'm only aware of 3 in the UK.
Who knows?!?!?!? The way it currently looks it appears as though the cling film has chemically bonded with the KTT. I'll be amazed if it ever comes off!Will it dry in time for NLP though

Worst case scenario is the cling film stays on. You're not going to see it anyway and it's transparent so will let light through. Actually, gently cooking in the warm heat of a pinball machine left on for an entire weekend should dry it out nicely!
07-Oct-2015
REPLACING THE POWER CABLE
Out with the old! In with the new! Although this is good quality rubber cable it's rather old and has US-style colour-coded cores. It's also a bit short. The new cable is good for 15A, nice and tough, and is a pleasing electric blue which matches the game rather nicely I think.
The power cables in this era of Bally games are all hard-wired. There's no IEC socket on the back. There's a slot cut in the neck between cabinet and backbox that the cable sits in. It's rather difficult to push or pull the cable in and out. Easiest to drop the backbox and do it.
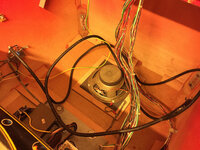
Reference shot of original cable. White is Live, Green is Earth and Black is Neutral as connected in the 13A plug at the other end. But look at the filter: directly below white is a very dark blue wire and below the black is brown. So, although not uber-critical this has been wires the wrong way round (or the plug connected the wrong way round).
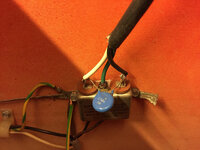
New cable fitted. Lovely Blue, Brown and Green/Yellow in rather flashy blue outer covering! Note that the brown and blue input wires correctly align with the brown and blue output wires on the filter.
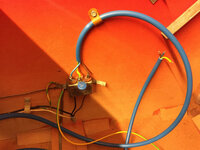
Continuity and resistance tested. All working as before. Except now the cable reaches the socket without an extension cable!
REPLACING THE POWER CABLE
Out with the old! In with the new! Although this is good quality rubber cable it's rather old and has US-style colour-coded cores. It's also a bit short. The new cable is good for 15A, nice and tough, and is a pleasing electric blue which matches the game rather nicely I think.
The power cables in this era of Bally games are all hard-wired. There's no IEC socket on the back. There's a slot cut in the neck between cabinet and backbox that the cable sits in. It's rather difficult to push or pull the cable in and out. Easiest to drop the backbox and do it.

Reference shot of original cable. White is Live, Green is Earth and Black is Neutral as connected in the 13A plug at the other end. But look at the filter: directly below white is a very dark blue wire and below the black is brown. So, although not uber-critical this has been wires the wrong way round (or the plug connected the wrong way round).

New cable fitted. Lovely Blue, Brown and Green/Yellow in rather flashy blue outer covering! Note that the brown and blue input wires correctly align with the brown and blue output wires on the filter.

Continuity and resistance tested. All working as before. Except now the cable reaches the socket without an extension cable!
Hi, Peter,
Original installations had a knot tied in the cable, so that pulling the cable from outside the machine wouldn't be able to strain the connections at the line filter. But I've read that doing this can lose a couple of volts.
Original installations had a knot tied in the cable, so that pulling the cable from outside the machine wouldn't be able to strain the connections at the line filter. But I've read that doing this can lose a couple of volts.
a tight fitting gromet or even a cable tie does the same job
Z
zuhi
Hello Nedreud!
I sent you a pm about gold ball! Here mine's pf.
Please reply.
Tanks.Laszlo

I sent you a pm about gold ball! Here mine's pf.
Please reply.
Tanks.Laszlo
Z
zuhi
I uploaded the image to an other location because it disappeared from the prev. post.
Dear Nedreud!
I'm restoring a gold ball machine, and i would like to ask some help from you!
Please confirm me, the machine original colors is red blue end gold, this pinky color is just sunfaded. Mine looks same to except the covered areas (like behind the legs etc) which confuse me.
Also i would like to ask please take a close and sharp front picture from the spinner or scan it, to i can redraw its graphic to fix up mine by using your picture as a guide.
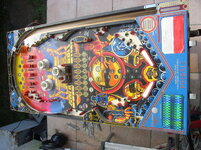
Also please if you can scan the plyafield plastic set with a scanner ~300dpior more! or try to take a few top view picture from each plastic. I"m not need all. Just a few, I'm attached a picture from my play field. Ohh mine also missing the metal plate too at the fist bumper.
Can you help in this to i can restore mine?
Will wait for your kind reply!
Best Regards:Laszlo zuhieu@gmail.com
ps i also own a space hawk too

Last edited by a moderator:
Hi, Peter,
Original installations had a knot tied in the cable, so that pulling the cable from outside the machine wouldn't be able to strain the connections at the line filter. But I've read that doing this can lose a couple of volts.
a tight fitting gromet or even a cable tie does the same job
The new cable is way too stiff to tie a knot and not too keen on that idea. As you can see in the photo I've re-used the P-clip above the filter which is doing a fine job of clamping the cable tight. You's really have to yank it hard to pull it out at which point no cable tie or knot it going to save the day! As this is going to live a quiet life at home this will do just fine
Hi László!
Sorry I haven't replied, I will do! We're all super busy getting ready for a big (biggest?) pinball and video game show this weekend in the UK.
Have to say your playfield looks in great shape, much better than mine. Carry on as you are. Strip it down, clean and polish everything and put it all back together! You can find loads of hints and tips specific to GOLD BALL in my shop log: http://www.pinballinfo.com/communit...rther-adventures-in-budget-restoration.14097/
Regards,
Peter
Z
zuhi
Yes i know it! i will reading trough it but I'm not done yet. But i already saved your restoration progress images to i have a guide if i stuck somewhere.
Sadly i have to find a transformer for it, but i do not know which games are using this type. AS-3017-15 or complete A2 unit as AS-2877-13 A360-00274-0001 I found a psu pcb in France a few days ago (its on the way to me). It was 35€+shipping
If you want i can share my gold ball story here or in e-mail.
Good luck with the show and backglass work fingers crossed too.
Sadly i have to find a transformer for it, but i do not know which games are using this type.
If you want i can share my gold ball story here or in e-mail.
Good luck with the show and backglass work fingers crossed too.
@zuhi - write up your own "shop log" on here. Always good to have a future reference for others and when you get stuck you can ask questions.
Nearly 900 GOLD BALL photos on my Flickr: https://www.flickr.com/photos/peterduerden/sets/72157645868034086 Lots and lots and lots and lots of reference photos of everything as I took it apart!
Transformer on GOLD BALL is a bit different. To the best of my knowledge, this transformer was only used in GOLD BALL, and possibly GRAND SLAM (which also used the same unusual AS-2518-147 LAMP/SOLENOID/REGULATOR COMBO board). The transformer part number is E-122-170 or as you mentioned AS-3071-15. The entire power supply module is part number AS-2877-13 which uses the AS-2518-131 RECTIFIER BOARD. The main difference with the transformer is instead of a single AC voltage for the switched illumination (commonly 7.8-9.4VAC) it has a centre-tapped (CT) 20VAC output. This is critical for GOLD BALL as it has a dual-phase system so that the 30 lamp driver SCRs can actually switch up to 60 lamps!
For more info see PinWiki: http://www.pinwiki.com/wiki/index.php?title=Bally/Stern#Transformers
Z
zuhi
Thanks for the reply. I know gold ball is so unique and not he easyset projects. But the result will be unique too! (Looks like i own a few rare, unique, but problem project machines (Gottlieb Super Orbit, ~900 made) Bell Space Hawks (850 made and copy not big brand vary parts) Williams comet, system9. And the Bally GB. Looks like the High speed and six m man, not as problemmers ... yet.
About the power of GB. It using 2518-151 later games use 2518-54 but the output connectors are same and mainly the panel is, just has two input plugs instead one. (54 has more legs to input i know) BUT, its not possible to use that type transformer on gb with a retrofitted plug? Because that transf. is more common. and i miss the whole unit from the cab. except the psu panel what i already found (mentioned above).
About the power of GB. It using 2518-151 later games use 2518-54 but the output connectors are same and mainly the panel is, just has two input plugs instead one. (54 has more legs to input i know) BUT, its not possible to use that type transformer on gb with a retrofitted plug? Because that transf. is more common.
27-Sep-2016
IMPROVING THE SLINGSHOT
I've never been terribly impressed with the slingshot on GOLD BALL. It's one of the later "linear" types, which I assume was brought in around the time of the re-designed "linear" flippers. Personally, I don't have a problem with the linear flippers, which are fitted to both my GOLD BALL and VECTOR, but I'm undecided about the linear slingshots:
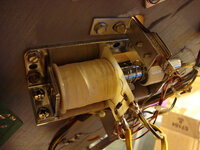
I'd had a problem with none of the momentary solenoids working this week whilst prepping the game for NLP2016, but once that was resolved I turned my attention to the slingshot (GB only has 1!) as it was pathetically weak and occasionally sticking. Some quick fettling slightly improved things, but not much, and I couldn't feel an obvious point at which it was sticking. It seemed to move freely and then it would stick open. I then reversed the coil which did improve things but I wanted a slingshot that rocketed the ball to moon, not gently swished it vaguely towards the other side!
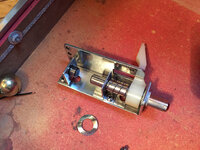
That's when I decided to borrow one of the old-style "bell-crank" slighshots from my unfinished PARAGON restoration. So, bye-bye linear slingshot:
And hello old-style vertical slignshot:
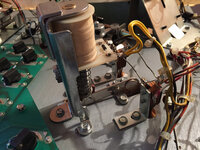
The coil is the same so was simply swapped over, no soldering required. I used my PARAGON playfield as a general guide for where to mount the pivoted "bell-crank" arm and vertical coil bracket, but pretty lined it up by eye and operated the crank by hand until the position felt good and the motion smooth. I was able to reuse one screw hole but all the rest were tapped new.
And the difference? WOW!!! These are MUCH better slingshots. After adjusting the sensitivity of both switches it's exactly what I wanted. The balls flies across high to the opposite wall instead of a low lazy arc to the opposite passive slingshot (unpowered, there's no mech). Game play from the slingshot is now as frantic as the pop bumpers, which are truly mental!
Very happy!
IMPROVING THE SLINGSHOT
I've never been terribly impressed with the slingshot on GOLD BALL. It's one of the later "linear" types, which I assume was brought in around the time of the re-designed "linear" flippers. Personally, I don't have a problem with the linear flippers, which are fitted to both my GOLD BALL and VECTOR, but I'm undecided about the linear slingshots:

I'd had a problem with none of the momentary solenoids working this week whilst prepping the game for NLP2016, but once that was resolved I turned my attention to the slingshot (GB only has 1!) as it was pathetically weak and occasionally sticking. Some quick fettling slightly improved things, but not much, and I couldn't feel an obvious point at which it was sticking. It seemed to move freely and then it would stick open. I then reversed the coil which did improve things but I wanted a slingshot that rocketed the ball to moon, not gently swished it vaguely towards the other side!
That's when I decided to borrow one of the old-style "bell-crank" slighshots from my unfinished PARAGON restoration. So, bye-bye linear slingshot:

And hello old-style vertical slignshot:

The coil is the same so was simply swapped over, no soldering required. I used my PARAGON playfield as a general guide for where to mount the pivoted "bell-crank" arm and vertical coil bracket, but pretty lined it up by eye and operated the crank by hand until the position felt good and the motion smooth. I was able to reuse one screw hole but all the rest were tapped new.
And the difference? WOW!!!
Very happy!
Looking sweet Pete!!!
Cheers
kev
Cheers
kev
Thanks @newdos! The playfield is looking really nice. Just a few minor improvements to make. Only major improvement would be a new playfield or major touch up, but I'm going to overhaul the cabinet first. Powder coat the legs, polish all the steel and respray the stencil art. It's never going to be a minter this one as I doubt I'll ever find a perfect playfield or backglass but it's nice to leave a little of the original patina and just fix the worst bits.
27-Jun-2017
MINOR FIXES
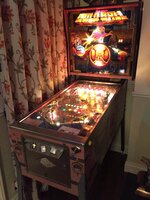
After a long hiatus I'm back on pinball, mainly due to the fact the missus said I could have a pin indoors as she'd taken over half my summerhouse office with an aviary for a rescued crow! So, here she is, GOLD BALL, sat in the corner of the dining room. Not an ideal location directly under a south-facing window, but beggars can't be choosers. It's probably impossible for it to fade anymore than it already is, but as I work in here too I often pull the curtain closed when the midday sun shines straight in.
The machine hasn't been used since it returned from PLAY-EXPO last October and it had a few gremlins. Firstly, none of solenoids except the flippers were working. Some vague memory surfaced that I'd pulled the under-playfield 1A Slow Blow fuse to use on MR & MRS PAC-MAN whilst I was trying to fix the solenoid expander problems on that. Sure enough, I popped up the playfield and holder was empty. But... after popping in a 3/4A SB (I don't have any spare 1A) the MPU controlled momentary coils still weren't firing (not many on GOLD BALL: 3 pops, 1 slingshot, 2 kickers and 1 knocker). The 3/4A fuse hadn't blown (unlikely with so few coils and as it's really there to prevent a stuck coil from overheating or kill a critical short circuit). At this stage I suspected a dodgy connection on the MPU or DRIVER board headers. They're IDC on GB. God, I hate IDC connectors...
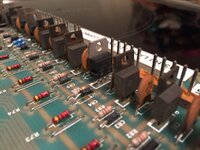
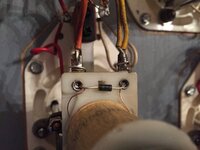
Eventually I found and fixed the problem (follow the guide for Locked-On Coils): solenoid drive transistor Q37 was closed circuit (dead) which was firing the left pop bumper continuously, which was blowing the under-playfield slow blow fuse in about 1-2 seconds. Replaced Q37 with a brand new TIP102 and replaced associated diode CR4 with new 1N4007:
Also put new 1N4007 on the affected pop bumper coil as these can be the cause of the problem if defective:
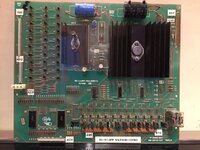
For anyone remotely interested, GOLD BALL has the unique COMBO SOLENOID LAMP DRIVER BOARD AS-2518-147. This has the usual +5VDC and +190VDC regulator section (the big heat sinks and capacitors at the top) but contains reduced lamp driver (left-hand side) and solenoid driver (bottom-right side) sections all-in-one. The only other game this was used on was GRAND SLAM. My next task is to replace all the Q coil transistors with fresh TIP102s as I've noticed several a bit naff when tested by grounding the metal tab.
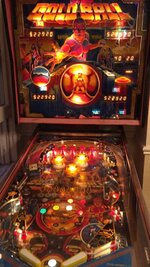
After a quick hoover inside the cabinet and on both sides of the playfield, plus a squirt of Windolene of the glass it's all good to go and it getting plenty of action already!
MINOR FIXES
After a long hiatus I'm back on pinball, mainly due to the fact the missus said I could have a pin indoors as she'd taken over half my summerhouse office with an aviary for a rescued crow! So, here she is, GOLD BALL, sat in the corner of the dining room. Not an ideal location directly under a south-facing window, but beggars can't be choosers. It's probably impossible for it to fade anymore than it already is, but as I work in here too I often pull the curtain closed when the midday sun shines straight in.

The machine hasn't been used since it returned from PLAY-EXPO last October and it had a few gremlins. Firstly, none of solenoids except the flippers were working. Some vague memory surfaced that I'd pulled the under-playfield 1A Slow Blow fuse to use on MR & MRS PAC-MAN whilst I was trying to fix the solenoid expander problems on that. Sure enough, I popped up the playfield and holder was empty. But... after popping in a 3/4A SB (I don't have any spare 1A) the MPU controlled momentary coils still weren't firing (not many on GOLD BALL: 3 pops, 1 slingshot, 2 kickers and 1 knocker). The 3/4A fuse hadn't blown (unlikely with so few coils and as it's really there to prevent a stuck coil from overheating or kill a critical short circuit). At this stage I suspected a dodgy connection on the MPU or DRIVER board headers. They're IDC on GB. God, I hate IDC connectors...
Eventually I found and fixed the problem (follow the guide for Locked-On Coils): solenoid drive transistor Q37 was closed circuit (dead) which was firing the left pop bumper continuously, which was blowing the under-playfield slow blow fuse in about 1-2 seconds. Replaced Q37 with a brand new TIP102 and replaced associated diode CR4 with new 1N4007:

Also put new 1N4007 on the affected pop bumper coil as these can be the cause of the problem if defective:

For anyone remotely interested, GOLD BALL has the unique COMBO SOLENOID LAMP DRIVER BOARD AS-2518-147. This has the usual +5VDC and +190VDC regulator section (the big heat sinks and capacitors at the top) but contains reduced lamp driver (left-hand side) and solenoid driver (bottom-right side) sections all-in-one. The only other game this was used on was GRAND SLAM. My next task is to replace all the Q coil transistors with fresh TIP102s as I've noticed several a bit naff when tested by grounding the metal tab.

After a quick hoover inside the cabinet and on both sides of the playfield, plus a squirt of Windolene of the glass it's all good to go and it getting plenty of action already!

While you have the driver board ouf of the machine you might as well do the ground updates.
Just like the older version of driver boards, this board also can use the upgrade.
I've made a nice list of what to do and posted (by Zitt) all info on the Pinwiki.
http://www.pinwiki.com/wiki/index.p...S-2518-147_Combo_Solenoid.2FLamp_Driver_Board
I had a Grand Slam to work with for this info.
Just like the older version of driver boards, this board also can use the upgrade.
I've made a nice list of what to do and posted (by Zitt) all info on the Pinwiki.
http://www.pinwiki.com/wiki/index.p...S-2518-147_Combo_Solenoid.2FLamp_Driver_Board
I had a Grand Slam to work with for this info.
Super! Thank you @Inkochnito  I too have been updating Pinwiki with GOLD BALL specific information as and when I find it, such as the board numbers and transformer data.

