What's new
Pinball info

Register a free account today to become a member! Once signed in, you'll be able to participate on this site by adding your own topics and posts, as well as connect with other members through your own private inbox!

In Progress Rocky & Bullwinkle Shop Log

1) If there is signs of wear, paint lift or wood, I would always be very careful of using the Treasure Cove kit attached to a fast rotating drill bit. At best it will leave lots of fluff attached to the wood, at worst it will lift more lacquer. You can still use the polish to clean it and you could rub it down with very fine sand paper and re-lacquer it but that depends on how much it will effect the game and how bad it looks.
2) I manipulate the wax in the palm of my hands until it is melted and then rub it straight onto the target. I then use a cloth ensure there is a good cover but still using my fingers and palms to rub it in. Then I go and have some food and come back in an hour to use a soft dry cloth to buff it up.
 
Thanks Geoff,

I've actually masked off the shooter lane for now and was planning on giving it some seperate attention at a later date. It's not affecting the gameplay hugely and I figured it's something I can actually take as a seperate job. I think for now i'll leave it well alone.

Thanks for the suggestions on the waxing - I think i'll give your approach a go and see how I get on.
 
No problems Steve.

I've refitted any fastenings that went to posts so that they didn't go missing. Fittings that were removed I carefully taped together so I know what goes with what.

Lots of photos too so I can recall and reverse the order when putting it back together.

To be fair it will only be stripped for a day or two. Need it back together so i can play. Forgot to get some wax so will need to order that tomorrow. Might as well wax it before putting it all back together.

Meccano pulleys in the post today so should be with you weds/thurs - hope they are a good fix :)
 
Thanks Steve. Will post an update once I've got the connector on the motor. Still need to track down a torsion spring.

Tonight I've managed to:

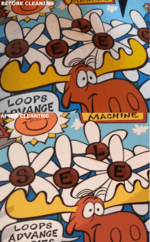
Clean the Playfield with the Treasure Cove kit. The results aren't quite as impressive as those they've shown on their site but this is a game which is 20 years old and more importantly the Playfield isn't clear coated so I was loathe to be too agressive with it. The ground in dirt that was really noticeable on the white daisies has gone as has all of the ball track marks. Overall I'm pretty happy with the results.

Waxed the Playfield. It didn't seem to have made the surface especially smooth initially but then I set to work buffing it up with a microfibre cloth and it seems much better now. Guess we will find out once we get a game on the go.

Put the steel guide bars back onto the Playfield.

Put the slingshot assemblies and the target assemblies back up on the Playfield.

Reattached the wooden sides on the Playfield. These were polished up whilst I had them off.

Replaced the old GI bulbs and flashers with LEDs. A contentious one maybe but think they suit the cartoon theme of the game.

Removed the rubbers from the flippers, cleaned the flippers and then re-rubbers them in red.

Hopefully tomorrow I will get the Playfield guides polished up and back on the table. The it's a case of rebuilding the rest of the Playfield. First task will be to get the posts in place, rerubbering them as I go.
 
The lighting in my back room is terrible so I didn't take any photos of what was done yesterday. So here's some from this morning, seeing as I know how much people on here like pictures. ;)

First up i've done a little comparison of an area of the table both before and after polishing/waxing. You can see the grime is gone and it's a lot cleaner. Nice :-) The only thing that is still a little noticable is the outline of some of the mylar on the main playfield and between the pop bumpers, but again as the playfield isn't clearcoated i'm a little reluctant to be too agressive in those areas. I doubt it will even be that noticable once the table is back together.

BeforeAndAfter.png

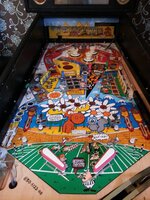
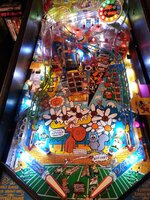
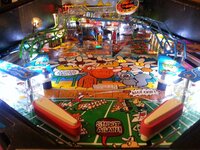
And here's the current state of the table as of this morning. The flippers aren't hooked up yet. Coil sleeves should arrive today so i'm hoping tonight to get a few of them swapped out and start getting bits back onto the playfield.

20130731_065433.jpg
20130731_065446.jpg
20130731_065542.jpg
20130731_065555.jpg
 
More bits turned up today. I've got a load more nyloc nuts (might as well replace the old crappy ones with new) as well as the coil sleeves and some ramp entry screws (one of the ramps had no screws at all). Also got the meccano wheels from Steve C which seem to be the perfect size. Only slight issue is the center hole is too small for the spindle of the motor. It's only by 1-2mm so i'm hoping I can drill out the hole to make it a little larger.

Hurry up tonight damnit - I want to get on with putting it back together.
 
Possibly, although to be fair it's in pretty good nick for a 20 year old playfield.

There's a tiny nick just near the pop bumpers and a small mark on Bullwinkles nose. Other than that and the usual wear around Aesops Hole it's pretty good.

It doesn't need everything stripped for me to do that so i'm focussing on getting the table back together and I can deal with that seperately at a later date.
 
Last night I started looking at re-attaching the metal guides that run around the perimeter of the pinball table. It's quite surprising how much wear a pinball working it's way around the edge causes and I noted a very visible line where the ball had repeatedly gone along the edge. Alas my OCD go the better of me and I ended up using a fine-grade aluminium oxide paper to send the line out and then a good polishing with autosol and scotch pad. The result was a nice shiny guide with no visible line in it now.

I'll post some pictures shortly.

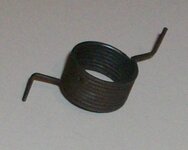
In other news a kind soul at Pinside currently has their Nell Assembly dismantled so they've sent me a photo of the spring along with some measurements which i've now sent over to a couple of spring dealers. Hopefully they might manage to find me a suitable replacement. Fingers crossed :-)
 
He's only posted a picture of the spring so far - but i've now asked for him to photograph each component individually. Be really handy for future reference.

Here's the spring:

nellspring.jpg

I've asked for a picture of it resting on it's side too so that I can see the angle difference between the entry and exit point.

Dimensions given so far are as follows:

Wire Width: 1mm exact.
Number of Coils: 8 plus another estimated 220 degrees worth of a 9th coil.
Coil Diameter (excluding wire widths): 19mm exact (21mm including wire widths).
Arm extensions from outside wire coil: 9mm exact (includes 90-degree bend at end of extension).
90-degree arm extension lengths above 1st extensions: 10mm exact.

A little progress at least. I've got the 2" meccano wheels too now - just need to drill the middle out as they're a millimeter or two too small. The increased wheel size should make the belt tight now.
 
A little progress at least. I've got the 2" meccano wheels too now - just need to drill the middle out as they're a millimeter or two too small. The increased wheel size should make the belt tight now.

Didn't know that spindle size on motor was different to meccano otherwise I could have sent you a couple of old damaged pulleys as well so you could have practised drilling out on them. :) With meccano it's one size fits all i.e. every pulley, gear, sprocket, etc has the same diameter boss so have loads of different lengths of spindle rods if you ever need any.
 
I didn't realise either Steve.

The previous meccano wheel fitted fine but it came with the table when I bought it so no idea if Dan (or someone else) had drilled the center out already. I'm assuming it's been drilled because as you say I expect all meccano pieces use common dimensions (having a building 'toy' which doesn't would seem a bit crazy).

I'm speaking to a local Spring Manufacturers at the moment to see if they could manufacture me a replacement - and if so how many body parts i'd have to sell to afford it. Hopefully they'll either take pity on me and do it 'el cheapo' or they might actually charge a reasonable price in the first place. Fingers crossed.
 
Oooof, the spring maker only sells them in pairs for some reason.

£57 for two. :eek:

Oh, and they need more measurements and ideally for them to be annotated onto a photo of the spring before they can go ahead.
 
Let's call having one made 'plan b'. I'm hoping another supplier I have will be able to source me a stock spring - i'll be absolutely stunned if it really is a special order.

So, continuing with the rebuild I managed to get a few hours in last night. I was rather shocked to look at my watch to find it was 1am. Looks like today is going to be a looooong day.

I had an hour to kill last night before we headed out visiting so I took the time to switch out the coil sleeves on the coils that are housed under the apron. Once they were done I put the apron back in place as hopefully I won't need to be in there again. I've also replaced the coil sleeve in the hat trick diverter and got that back on the playfield. Before I stripped it the diverter wasn't quite aligned correctly and it didn't quite open far enough so you'd often not get the ball into the lane properly. I took a little time when refitting to get it as close to the side rail as possible, but without having it actually make contact. I really don't want a nice groove smashing into the metalwork. Seems to work just fine now. :-)

All of the metalwork is now polished and back on the table (apart from one piece from a pop bumper). It's not quite mirror finished but it sure as hell looks a lot better than it did before. Gone are the track lines which were worn into the metal from the ball constantly rolling against them
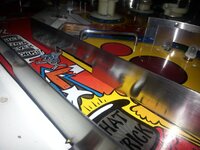
20130731_212906.jpg

Someone told me that when it comes to reference photos for a pinball you can never have too many. Well I now know that to be totally true as I took what I considered to be LOTS of reference photos only to find myself scratching my head and asking questions when it came time to put the posts back onto the playfield. I mean there's only 3 different types of post, so how hard can it be right?

Well in actual fact there were a couple of 'special' posts which were different heights and of course some of them had special fittings to allow multi-layer plastics to be installed. Thankfully my reference images were largely sufficient but I have spotted this morning a post with an extended thread which i've put in the wrong place. Thankfully the plastics haven't been screwed down yet and the ramps aren't on so it's an easy fix to move it.

So yeah, last night was spent repopulating the playfield posts (polishing the metal ones with scotch pads and autosol as I went). I've also re-rubbered the posts in white and fitted the new white rubbers along the way. All of the playfield posts are now back in place as is the Spin & Win tower. Here's how it's looking this morning.
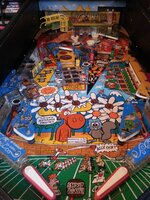
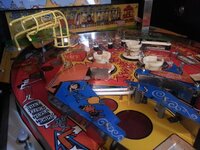
20130802_065742.jpg
20130802_065733.jpg

You can see on the TNT plastic that one of the posts is protruding a lot more than the others. Well actually that post needs taking out and moving over to the left side of that lane because there's a hex bar which goes in there to support the ramp which goes above. I needed to take the yellow wireform off again anyway as it's not been cleaned yet. Ideally I want to get it shot-blasted and re-powdercoated but funds are low right now so that will be a job for another day. In the meantime i'll at least strip it from the table and give it a damn good cleaning.

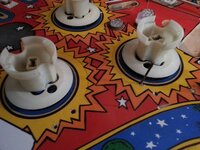
I've got a few more LEDs due today so once they arrive I should be able to stick them in the pop bumpers and get the covers back on those too.

I've got replacement coil sleeves for all of the rest of the coils on the table but i'm getting massive withdrawal symptoms so the plan right now is to change the sleeve in the ramp diverter (because the plunger for that is already out) and then focus on getting the table back together. I've also changed the sleeves on the flipper coils. Well, technically i've changed one of them. The other one came out easily enough but the new one was giving me massive grief. I got it about half way in and it wedged solid - wouldn't go in and wouldn't come out - so I ended up using a pair of pliers to extract it (in 2 pieces) :-( For the time being i've had to clean up the old sleeve and refit it but I need to look at getting a new one. Is it common for coil sleeves to be so tight?

Hopefully i'll get the ramps fitted tonight and should be in a position to fire up the game to see if it's still working. Fingers crossed eh? ;)
 
Balls - just when it was going so well :(

Hooking up one of the ramps tonight and as I lifted the playfield I snagged one of the triggers. I managed to yank the thing with some force, in fact so much so that the arm pinged off and the housing seperated away from the base slightly.

Pushed it all back together and reconnected the trigger but it's not registering in the test menu and there's no little 'click' like you'd usually expect.

So it appears it deaded :(

Are these standard between DE/Bally/Williams tables? Any clues where I can nab another one sharpish? I'm getting withdrawal symptoms here......

Or is it repairable? Not sure I dare to open the housing up.
 
Another issue I noted whilst in the switch test menu this morning was that the left flipper appears to have developed a bit of a 'flutter' on occasions.

Holding the left flipper button down usually engages the flipper but if you hold it down then sometimes the flipper doesn't hold in place. It flips off and then back on again.

Similarly you sometimes get double and triple flips from a single press.

I'm a bit confused over EOS because i'm sure i've read somewhat that these DE machines don't use EOS switches but the manual schematics seem to suggest they do. If that's the case can someone give me an idiots guide to how that even works? It is something to do with the flipper button mechanism? So far as I can make out that's made of a series of flexible metalic strips and pressure the button presses them together, but how does the EOS work in this implementation?

I've read online that in the past the EOS segment used to located near the flippers as it was a HV circuit, but since they changed that to low voltage they relocated the entire assembly to be near the flipper buttons. Is that correct?

Appreciate any suggestions people might have on this one. The tables not up and running yet due to my stupid mistake with the switch but it would be great to cross another issue off the list.
 
Everything is back together on the table now. All that's left to do is:

1. Order and fit the replacement micro-switch. I ended up robbing the one off the spin & win ramp so it's pretty easy for me to solder the new switch in place and then thread the cable back through the playfield before connecting it to the gate.

2. Fix and issue with the red target. It's not registering but if you pull the plastic away slightly and let it go then it registers so i'm guessing the post just needs adjusting.

3. Confirm the issue with the flipper. Interestingly I played a few games tonight and the problem was evident at first but after a few games it seemed to stop doing it, so maybe there isn't an issue after all.

4. I'm missing a couple of 3" 6-32 screws for the lane return guides so I need to source some of those.

5. Give the glass a damned good clean. It's filthy so need to give it a really good going over before putting it back in place and re-fitting the lockdown bar.

Table seems to play much faster now and everything just has a lot more 'zip' to it. I still need to swap out some of the coil sleeves but I can do them one by one over the coming days.

Next job is to start looking at the Nell Log Assembly. And I still need to pick up a Cliffy Protector; unfortunately it's been an expensive couple of weeks so it might have to wait just a little bit longer. I hadn't originally budgeted for fitting the playfield GI with LEDs or re-rubbering the table but it seemed sensible to do it whilst it was in bits.

I've also noted a couple of broken plastics that I want to replace and a post which seems to have had the top snapped off it. The WABAC ramp is also bashed to hell and i'd like to replace it but at > $100 it's not cheap. Perhaps a job for a few months time when my wallet has recovered.

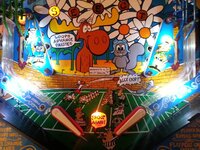
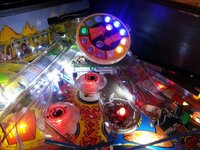
Here's some pictures of it. :)

20130804_204221.jpg 20130804_204138.jpg 20130804_204203.jpg 20130804_204146.jpg
 
Last edited:
They were but they seem to have dropped slightly. Think I need to lift them a few mm.
 
Flippers now aligned correctly and the red target fault seems to have cleared itself.

Now one of the slingshots keeps triggering when the ball isn't near it - so I guess that needs adjusting. Any tips on the best way to do this? How do I go about it exactly?

Thanks
 
Yup got it. Pull the rubber from the back to the front so it's fatter at the front.

Seems to have done the job. There seems to be a larger gap between the contacts on one side than there is on the other which means that side is less sensitive. Any way to bring those contacts closer together?
 
Ta. Guessing it'd be easier to do that if I drop the entire assembly down below the playfield? Kinda fiddly getting in there to bend them otherwise.
 
Really confused now. Trying to reattach my Nell Assembly. The front side has a hex post on it. No problems there.

But the right and left sides are supported by brackets of different heights and I can't figure for the life of my how they go. The schematic shows the shorter one on the right, but it seems the bases for both go to a location at the same height. Makes no sense.

Can anyone who's got one confirm how the brackets go please?

Edit: Ignore this. It seems it's meant to be mounted on a slant so the brackets are deliberately different sizes. Got it fitted now.
 
Last edited:
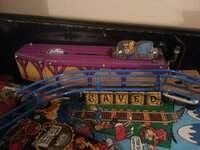
So tonights job was to get my partially working Nell Log Assembly back in place.

I managed to totally screw up the molex pins - that'll teach me to try putting them on using the wrong tool for the job. As a result i've knackered the pins and the connectors I had, but I manage to get a 'heath-robinson' style work-around in place which at least means it's working. I'll grab the crimp tool, the connectors and some more pins when i've got a bit more money available.

There was much head scratching (as mentioned above) due to the difference in bracket sizes but it would seem that it IS meant to be mounted at an angle and sure enough once fitted it looks fine.

I still need to source a spring and fit the plastic gear which moves Nell towards the saw blade. Worst case i'm going to have to fork out the £60 to have one custom made but i'm going to hang fire a little longer just in case another supplier has one of the right dimensions in stock. I also need to sort out the method by which the saw blade sits on the spindle. There were some nyliners fitted onto the shaft but it makes such a tight fit that there's too much friction and the belt won't turn the blade. I've found the part on Marcos (http://www.marcospecialties.com/pinball-parts/545-5237-00) and the ones i've got look correct so maybe it's just how they were fitted? Or maybe it's something else - need to figure that one out. For now i've left them off. It should be fine until I at least get the spring and gear for the log sorted.

So here we have it. Nell back in her rightful place.

20130805_224952.jpg

And a video showing her working. I forgot how quickly the SAVED targets reset and it caught me a little unawares the first time. ;) Oh, apologies for anyone blinded by the video. I guess this shows just how super-bright the frosted LEDs i've used for the GI are. Have to say that from the normal play position they're just fine.

 
it's great to see you getting closer than i ever did with Nell. i'm not sure i'd be too keen on going down the route of making a custom spring though, as not only is there no guarantee it'll work (you don't have the original plastic gears, for one thing) but also what if it snaps immediately. plus that's a crazy price for a spring.

i hate to say it, but what i'd do is buy the next one that comes up on ebay that's a reasonable price and has the Nell mechanism intact, take it off, then sell it on ebay again. it's the process by which many turn their nice games into lovely ones - Matt Adams (tattyadams on youtube) is currently on his 9th WhoDunnit by this Frankensteining method.
 
Back
Top Bottom