What's new
Pinball info

Register a free account today to become a member! Once signed in, you'll be able to participate on this site by adding your own topics and posts, as well as connect with other members through your own private inbox!

In Progress Rocky & Bullwinkle Shop Log

Thanks Geoff. I'll give that a try - i'll have to do it by hand though as i've got no dremel here (although really tempted to pick one up now).

Aaaand, another question that hopefully another R&B owner can help me with.

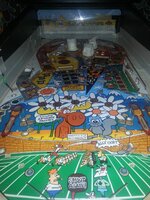
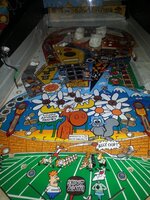
I found what I can only describe as 'nails' lodged into the playfield. One is near the pop bumpers and the other two are in the slingshot boundaries. No idea why they are there or if they are meant to be. Any ideas people? I could perhaps understand the one near the pop bumper as maybe it's to stop the ball coming to rest there. But the ones on the slingshots are going to be behind the rubber anyway so really can't see the point in in them being there.
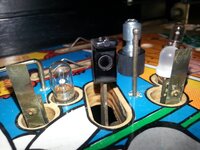
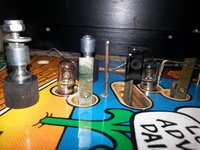
20130724_080411.jpg
20130724_080418.jpg
20130724_080426.jpg

Edit: A little searching online shows some other images from other peoples tables. The pins near the slingshots appear to be on them all but I have no idea for what purpose. Still not 100% sure about the one located near the pop bumper.
 
The one near the pop looks like it's replaced a mounting screw for the pop - Take a look underneath and see where it goes or if it serves a purpose at all :)
 
Haha, curse my luck.

I figured whilst I had the playfield stripped I might as well swap out the upper-playfield GI for LEDs. Put my order in today thinking I'd have them replaced and all back together by the end of the weekend.

Erm, except I didn't notice that the vendor is away from today until 12th August. So it looks like i'll either be leaving it in bits until then, or at the very least leaving the plastics off where possible so I can swap them out in a few weeks when they arrive.
 
Hmmm, had a quick try with the Treasure Cove kit tonight. Have to say it's cleaned up the grime that was on the main area of the playfield but so far it's not really got that shiny shiny finish I was hoping for.

I have no clue if this table has ever been cleaned so maybe I just need to go over it again.

Any suggestions or recommendations for using the kit would be welcomed. I watched the DVD and followed their method but my results aren't quite so good. I don't know if it being a DE table has any bearing on it or if it's just that I need to polish for longer. Still a big improvement over the grubby state it was in.

Edit: I used the yellow foam insert for the 3 and 2 compound and the black for the final run with Powercut 1. I've now read that you can do a final wipedown and then buff to a sheen using the wool pad so maybe I need to give that a try. I've got a day off tomorrow so in the afternoon I might repeat the process again now that i've got a lot of the grime off the table.
 
Thanks Geoff. Taking it slow and steady as I realise this won't be clearcoated.

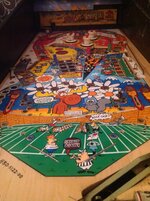
Here's a sample of how it's looking. To be fair it could be an issue with the lighting in the room as the flash from my S3 really bounces back off the playfield.

Need to give the playfield a good wipeover and possibly a hoover too as there looks to be a lot of particulates around. That won't help much with the cleaning. Will also try giving it a buff with the wool pad whilst I wait for my wax to turn up. Maybe i'm just being picky, the wife says she thinks it looks much cleaner and shinier.

20130724_192014.jpg

It's definately cleaned it up though. The whites of the daisy petals are now actually white with no grubby mottling to them and there was a clear line of dirt where the ball had been running down the lane return guides. Both of those are gone now. I didn't do much work on the left and right lanes as those need me to use the 2" kit and I only tried that briefly. Think I need to give them a little more of a going over.
 
Yeah I read that Paul. Keep the speed to a reasonable level and don't stay in one spot as it can cause burn marks. Also don't apply pressure to the drill and let it do the work?

Apparently although the compound is an abrasive it works well because the foam pads ensure that not too much pressure is applied. So the worst thing you can do is actually push down on the drill whilst you're using it.

Should find it easier tomorrow as well during the daytime when the light in the back room is a bit better. Thanks for the suggestions guys.
 
Thanks Geoff. I'll give that a try - i'll have to do it by hand though as i've got no dremel here (although really tempted to pick one up now).

Aaaand, another question that hopefully another R&B owner can help me with.

I found what I can only describe as 'nails' lodged into the playfield. One is near the pop bumpers and the other two are in the slingshot boundaries. No idea why they are there or if they are meant to be. Any ideas people? I could perhaps understand the one near the pop bumper as maybe it's to stop the ball coming to rest there. But the ones on the slingshots are going to be behind the rubber anyway so really can't see the point in in them being there.
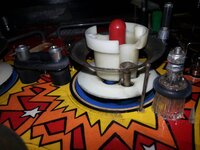
Edit: A little searching online shows some other images from other peoples tables. The pins near the slingshots appear to be on them all but I have no idea for what purpose. Still not 100% sure about the one located near the pop bumper.

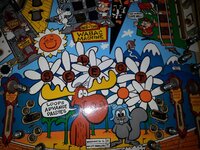
The pins are to stop a pinball or pinballs getting trapped in there or in that particular spot. You frequently find them on some games and there are games without them that really need them (GNR for one)... fine if you know it's happened but otherwise it can turn in to a game of a hunt the missing pinball....! :D
 
Thanks for confirming that. So long as they're meant to be there then all is well and good. :-)
 
And it turns out my 'quick clean' won't be quite so quick.

I was thinking about the effort it's taken to strip the table down. It's not been a problem and i've enjoyed doing it but I figured with the effort expended it seemed stupid to have to repeat the process again anytime soon.

So that being the case i've gone through the pieces stripped and sorted them out. I've also stripped the metalic pieces from the pop bumpers and the wooden edging that runs down the sides of the table. The edging had managed to get a few spots of cleaning compound on it so i've stripped it so I can give it a good clean before re-attaching it. When I do the proper clean i'll mask off the inside of the cabinet with masking tape to avoid any similar mess.

There's also a fair amount of other metalwork i've taken off the table, what with the various guide strips and the diverter gates. So I figured I might as well take some time to give them a damned good cleanup too.

I'm going to get that lot polished up over the next few days before giving the playfield a good going over with the Treasure Cove kit. Hopefully by the time i've got to that point my wax will have turned up so I can wax it and then start putting it all back together.
 
I may well end up doing that Rudi. The LEDs I ordered for the upper playfield GI won't arrive now until the middle of August. So i'm really tempted to just leave the table in bits until then.

Of course the downside is i'm getting withdrawal symptoms, but i'm sure the table will play a lot better once it's had an overhaul.
 
Only bit that gives me 'the fear' is removing the Pop Bumpers. Paul had a right horror story about the 3 hours it took him to get them on his WW.

I looked at removing them from the playfield this morning but obviously they have bulb holders in. It looks like just a couple of wires need desoldering and then they should unscrew and lift off. Then it's just the very bottom to strip.
 
Yes there is.

Theres a hole just below the pop bumpers to the left and the subway then runs to Aesops Hole where a VUK ejects it.

Is the subway where the black ****e usually accumulates?
 
So at the very least it's worth stripping the subway and VUK assemblies and cleaning those.

I need to drop the coil sleeves out and see what sizes are being used so I can get an order put in with Andy.
 
Jet Bumper removal is considered a pita. The bulb holders have ribbon strip wires that are stapled to the table, getting the staples back in on a populated field is a pain. You have to take the ribbons off to remove the body of the pop bumpers.
Definitely remove the subway and clean any metal parts the ball will touch, I didn't do this properly on my first strip and it all got mucky again very quickly.
 
Yes there is.

Theres a hole just below the pop bumpers to the left and the subway then runs to Aesops Hole where a VUK ejects it.

Is the subway where the black ****e usually accumulates?

Not just subways mine was covered and I have none. If there's a solenoid there will b black dust on the of simples
 
Ok, so the race is on. It turns out that a family gathering we were meant to be going to next weekend is now being hosted here. So the wife thinks it would be good to have the Pinball back up and running as we'll have a fair few kids here (and by kids I meant 10+). Apart from that my brothers are retro gaming nuts so i'm sure they'd like a game or two.

So i've got a week to get it all cleaned and back together.

Quick noob question here. I want to get an order in with Andy N for replacement coil sleeves. Is the sleeve usually specific to the coil type (i.e. if I search the part code of the coil online will I find a suitable sleeve) or is it dependent on where the sleeve is used (i.e. differs between a VUK coil and a slingshot coil). If that's not the way it works is my only option to drop the sleeves out of each of them to find out what's needed?

I spent time last night taking a load more reference photos and i've stripped some more posts from the playfield. In reality almost everything apart from the pop bumpers will have been stripped when it comes to cleaning. I'm going to get a toothbrush on the go to clean around the pop bumpers.

I'm also going to order some replacement rubbers in red and white and also some LEDs for the playfield GI. The original ones I ordered won't be here in time so i'll contact the seller and see if I can do some swaps to replacement the insert bulbs instead.
 
Coil sleeves have different lengths and lips. Andy may be able to help if you tell him the coil size but the manual should also say the parts and the coil sleeve part number. I then search those part numbers and Macro or another site usually tell you the size required.
 
Thanks Geoff.

Maybe a little overkill on my part but I actually started dropping the coil sleeves out last night and photographing them against a ruler. I've annotated the photos on the iPad using Skitch.

I'll cross-match the pictures against the manual just to be sure I get the right coil sleeves, because I realise it's equally possible an incorrect part could have been used in the past. I'll hopefully get an order with Andy N put in in the next day or so. Playfield is now almost entirely stripped, apart from the pop bumpers, the B-O-M-B targets, the slingshots and the SAVED targets. The plan is to unscrew and drop the slingshots and B-O-M-B targets below the playfield prior to cleaning. The pop bumpers will stay in place and I can just drop the SAVED drop-targets manually.

All being well i'll be doing the cleaning tonight and hopefully my wax should turn up today so I can wax it as well.

Then the process of cleaning and refitting each part begins.

With regards the plastics - is the best thing for cleaning those Novus?

Oh, and pictures. Here's how it's looking after a bit more stripping.

strippedsomemore.JPG
 
Well, i'm quite amazed at just how long it's taken to reach this point. But finally the table is stripped and ready for polishing. Everything is now cleared from the playfield apart from the non-removable metal bars, the pop bumpers and three nails/pins which are hammered in place.

I've wiped the surface over with a surface cleaner and dried it off, filled the bulb holders in with towling to stop the polish getting into them and then masked off the outside edges of the playfield to stop polish splattering everywhere. Any holes where the ball is likely to travel have also been blocked off and i've already stripped and cleaned the subway.

I've also finished stripping and checking the coils and have now put an order in for replacements.

Tomorrow nights job is to clean it and hopefully (time permitting) wax it. Then the rebuild can start.

20130729_203657.jpg
 
All those metal bars will pop right out. Tap a triangular wedge in from the side or use the crowbar end of a hammer, gently and with something under the hammer end to cushion it.

Seems a shame to come this far and leave anything on but the pop bumpers.

Nice job and great thread, btw

ImageUploadedByTapatalk1375137250.767934.jpg
 
Thanks Dan. I figured they should be removable but I didn't know how strongly they'd be held in place or if they'd damage anything being removed.

I've now managed to safely extract them all. Should make cleaning much easier now as nearly the whole table can be done with the 4" kit. I'll only need the 2" kit for between the pop bumpers.

20130730_071245.jpg

So, all ready for tonight. I'm hoping to get it cleaned and waxed and then get the stuff i've dropped under the table back in position, ready for starting the full rebuild tomorrow night.

A few questions I have though please:

1. The shooter lane is a little worn on this table so does anyone have recommendations on what to do here? Should I use the Treasure Cove kit on that area (my instincts say not)?

2. What's the recommendations on waxing? The Carnauba Wax i've got is a solid block so I believe I can moisten a cloth and then use that to apply. Then after leaving a while use a dry cloth to buff it up? Any other suggestions would be welcomed.
 
Back
Top Bottom