I can machine the back for you to your measurements, but you would have to get it to me.
Pinball info
You are using an out of date browser. It may not display this or other websites correctly.
You should upgrade or use an alternative browser.
You should upgrade or use an alternative browser.
In Progress Rocky & Bullwinkle Shop Log
- Thread starter Wiredworm
- Start date
Thanks for the offer Daz - i'll keep that in mind.
A mate of mine at work's brother is a joiner so he's seeing if he can help out. If not we have a maintenance team at work who might well have a router they can loan me.
I'll obvious keep you informed.
A mate of mine at work's brother is a joiner so he's seeing if he can help out. If not we have a maintenance team at work who might well have a router they can loan me.
I'll obvious keep you informed.
it's fun this in't it 
Well i'm still enjoying it - but I have to say it's far more complicated than I first anticipated. I guess with the back corner being so well hidden i'd never really analysed what was wrong. I originally thought it just needed some filler and that'd be it done, but having taken the MDF off the back it's clear it needs a bit more.
I presume the damage is as a result of it being stored on it's end in damp/wet conditions but it'll be nice when it's finally all patched up, sanded and prepped ready for respraying.
I presume the damage is as a result of it being stored on it's end in damp/wet conditions but it'll be nice when it's finally all patched up, sanded and prepped ready for respraying.
yeah, i didn't necessarily mean *that* 
i remember when i first bought it in 2011 i thought what a good price that is (450), i wonder what's wrong with it ... then when it arrived and had to be laid down on it's tummy as it had no bum to sit on (and i first met Martin) i questioned my own sanity for 10 seconds and then admired the beauty of the playfield for an hour.... and the next day in full daylight i remember saying something along the lines of 'well, it doesn't need a back end, but i wonder how those back legs will attach' .... and i think Stan and Stormy pointed me towards B&Q
no, i meant it's fun finding ways to fix stuff.


I'm having a blast with it. I dread to think how much money i've ploughed into it since it arrived - but that said i've also played it a hell of a lot and it's been great fun. I've got no plans to move it on so I don't have any issue with investing some time and money into it.
Oh, and I forgot to mention that whilst stripping the back box I found that the bridge rectifier fuses were over-rated, although not by much. 10A fuses were fitted but 8A are listed as being required on the sticker in the cab.
Decals printed and shipped. Should arrive with me next week but i'm on holiday so will have to collect them from the Post Office when I get back.
Getting a little excited about the prospect of finally getting the cabinet back in good order. It's not going to be quick because I plan on taking my time and doing a good job of it, but hopefully there will be more posts in here over the coming weeks as things get back on track. Super excited now.
Getting a little excited about the prospect of finally getting the cabinet back in good order. It's not going to be quick because I plan on taking my time and doing a good job of it, but hopefully there will be more posts in here over the coming weeks as things get back on track. Super excited now.
Soooo, arrived back from holiday to find a lovely letter from Parcelforce. I need to stump up the import taxes before they'll deliver.
So that's another £70 on top of what i've already paid. The robbing b'stards!! Hopefully if I pay today I might actually get the decals early next week and then I can make a start on the cabinet restoration.
That means the decals will have cost me close to £300 by the time i've paid the taxes. Pretty steep but I guess it's going to be worth it if it makes the cabinet all sparkly and nice. I really really need to take a lot of time and care with it now; i'll be so fecked off if I fit the decals and there's the slightest sign of bumps or imperfections underneath them.
Did you find a doner (keb)cab?
No doner cab yet - so I will probably end up sanding this one down and having a crack at patching it up. If it all goes too pear-shaped then i'll have to enlist the help of a cabinet maker to bail me out of the crap, but hopefully it'll all go smoothly.
I think before doing anything it would probably make sense to sand the cabinet down. Once that's done I can look at rebuilding the bits that are missing. If anything needs glueing in place then it's going to adhere much better to bare wood.
No pictures of the decals yet as I need to get them to settle a little. Right now they're still fairly curly as they've been rolled up for transit. I've laid the side decals on the cab and put some weights and a blanket on top so once they're straightened out a bit more i'll post some pictures.
The guy who sold me them (Doug Spata) very kindly included a couple of nice surprises. Aside from a letter giving me a few tips on installing them he also sent me some lovely instruction cards and a plastic wedge which I presume is to be used when applying the decals. There is also a sheet of stickers but i've no clue where they are designed to be used.
I think before I get to the point of trying to fit the decals i'll also be investing in some clamps and a few other bits and pieces to make sure they go on as neatly as possible. An exacto knife seems to be a necessity as it'll allow me to slowly trim off the backing bit by bit as i'm lowering the decals into place. One nice thing is that there is a fair bit of run-off in the design so once fitted they can be trimmed back.
Given the run-off I don't know if it's still advisable to spray the edges of the cab where the decals are due to be applied? Either way I still need to source a suitable blue paint to paint the inside of the cab (even if I just do the section above the playfield) and of course the back, top, interior and base of the backbox.
Anyway, here's the additional pressies.
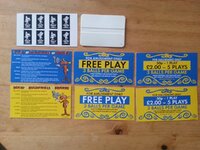

The black stickers go on the illuminated coin shoots.
Unless they are for drop targets
Oh I didn't look that close lol
Well the decals have been under a variety of weights over the last few days. They were rolled up for delivery and it was making it nearly impossible to get a good look at them, and even harder to take any photos.
So here they are. I'm really really annoyed with myself because I managed to accidentally fold under one part of the front decal whilst putting the weights on it. As a result of this i've put a lovely nice fold right down one side of the decal. That's why the front decal isn't shown below. I'm hoping that now i've flattened it out and put weights back on it that it hasn't sustained any serious damage.
Are there any recommendations on how to store these? Am I just best to roll them back up and put them in the carton and get them out to flatten them again once i'm ready to apply them?
Anyway here, they are. Excuse the muted lighting. I didnt' want to use a flash because it would have caused a lot of glare.
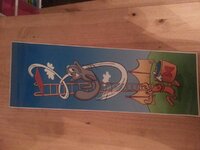
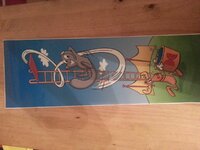
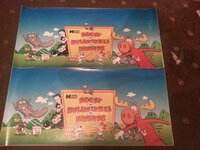


Are there any recommendations on how to store these? Am I just best to roll them back up and put them in the carton and get them out to flatten them again once i'm ready to apply them?
Yup - Exactly that - Then 48 hours before applying take them out and flatten again so they are ready to go
Cheers Paul. Having them laid out in the open is giving me 'the fear' in case one of the kids or grandkids comes across them and decides to have some fun. I'll get the wrinkle removed from the front decal and then stick the lot back in the box they came in.
You should be all right with the wrinkle. Most of the fold is probably being held in the stiffer backing paper. The vinyl itself is very flexible, so unless the actual printed surface is damaged you won't see it once it's stuck on.
As for storage I'd be inclined to keep them flat, but it's a balance between that and safety! Definitely warm them up indoors when you actually come to apply them and lay them out flat for a couple of days. DO NOT be tempted to roll them the other way to try and flatten them! This will cause wrinkles in the vinyl as it will come away from the backing paper!
As for storage I'd be inclined to keep them flat, but it's a balance between that and safety! Definitely warm them up indoors when you actually come to apply them and lay them out flat for a couple of days. DO NOT be tempted to roll them the other way to try and flatten them! This will cause wrinkles in the vinyl as it will come away from the backing paper!
Cheers Peter.
The larger decals and front decals are now rolled back up again as I just don't have the room to leave them layed out flat. And yes, you heard me right I did say front DECALS, as in plural. I'd totally forgotten that Doug shipped me two decals for the front. One is printed on black-out vinyl and it's this one which got a nasty crease down it. The other isn't on black-out vinyl but given that i'm respraying the cab then that shouldn't matter.
I've left the back box decals out as they're smaller so easier for me to leave laid out somewhere. They're also going to be used sooner than the larger cab decals.
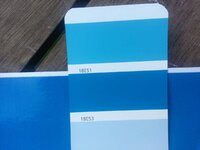
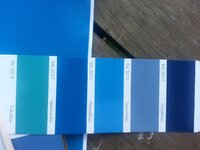
This morning I took one of the decals outside to try to get a colour match using the charts Davey D provided me with. I figured it would be easier to do the matching outside under natural light.
First match was using the British Standard Swatch. Looks like 18E53 is the closest match.
And using the RAL chart it would seem that RAL5017 (Traffic Blue) is the closest match. This wasn't one of the RAL colours listed when I did my original matching but that could well be because the decals use a slightly darker shade of blue than the original cab. I guess in this case it's more important to match the paint to the decal than to the original cab colour.
The larger decals and front decals are now rolled back up again as I just don't have the room to leave them layed out flat. And yes, you heard me right I did say front DECALS, as in plural. I'd totally forgotten that Doug shipped me two decals for the front. One is printed on black-out vinyl and it's this one which got a nasty crease down it. The other isn't on black-out vinyl but given that i'm respraying the cab then that shouldn't matter.
I've left the back box decals out as they're smaller so easier for me to leave laid out somewhere. They're also going to be used sooner than the larger cab decals.
This morning I took one of the decals outside to try to get a colour match using the charts Davey D provided me with. I figured it would be easier to do the matching outside under natural light.
First match was using the British Standard Swatch. Looks like 18E53 is the closest match.

And using the RAL chart it would seem that RAL5017 (Traffic Blue) is the closest match. This wasn't one of the RAL colours listed when I did my original matching but that could well be because the decals use a slightly darker shade of blue than the original cab. I guess in this case it's more important to match the paint to the decal than to the original cab colour.

lol - good luck there - I did exactly the same on Wh2o - after a week of paint drying it was 1-2 shades different... 
The RAL swatch looks like its closer.
Heh, thanks for giving me so much faith Paul. ;-)
Did you end up changing it or was it 'close enough' to go ahead with the decals?
Was close enough. Looking at it now, it's probably ended up where it started - however within a couple of hours it was perfect, a few days later it looked well off, and now looks close again...
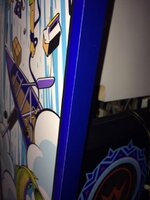
Paint shades - i'll never get it
Maybe worth me sanding down and just respraying one side first then to see if it's a close enough match or not?
The decals use a gradient fill for the sky so to be honest any shade of blue that matches something in the gradient would probably work as it's just intended to be a complementary colour as opposed to an exact match.
The decals use a gradient fill for the sky so to be honest any shade of blue that matches something in the gradient would probably work as it's just intended to be a complementary colour as opposed to an exact match.
So today I finally got around to making a start on sanding down the back box ready for filling and respraying.
I carted the backbox outside as I knew the sanding was going to generate a huge amount of dust. First up I started by having a quick look at the state of the back box and what filling or glueing was likely to be required once the majority of the artwork had been removed.
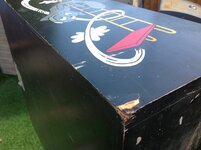
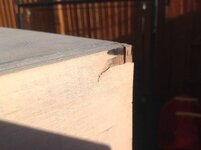
There was a little bit of lifting on this corner but nothing too major. I've now glued this and it's currently upstairs with clamps on it. Once that's done i'll run some filler over it before sanding back with some higher grade sanding disks.
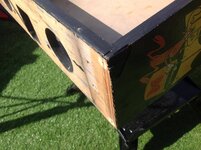
There's a fairly large chunk out of the corner at the bottom too. No big deal and certainly nothing that a bit of filler can't sort out.
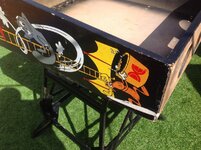
More dings and scrapes on the corners. From what i've seen from Paul and others on here these are pretty typical for most Pins.
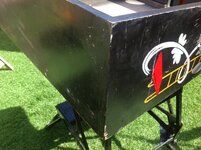
Once i'd done a bit of an inspection I made a start on sanding back the artwork using a low grade sanding pad. Initially I started with 80 grit and whilst it was removing the artwork it took a fairly considerable amount of time; I think the first side was almost 45 minutes. This could be because I believe these Data East Pins don't use decals but the artwork is actually screen-printed onto the cab itself.
One issue I did find with the cheap sanding disks off eBay is that the velcro on the back of them seems to deterioriate very rapidly. The actual sanding surface was still very coarse but in many cases after just a few minutes the pad would fly off the sander and after that it wouldn't stick again. At first I thought it might have been my 'budget' sander but i've since been out and got some more disks from a local DIY store and these adhere much better. Bit of a false economy for me maybe going the eBay route.
Anyway, I did the rest of the woodwork using a mixture of 40 and 60 grit pads and the majority of the large areas are now done. I need to get the detail sander out to finish off the inside of the backbox as many of the areas are too tight to get into with the regular Orbital Sander. I think all told it took about 3 hours to get to this stage, but it didn't help that the weather kept taking a turn for the worse meaning I had to stop and quickly pack everything away.
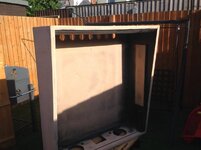
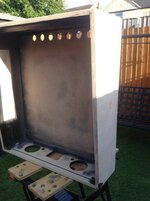
There's still some remnants of the original black paint but i've not worried about that to much because i'm still not done with the sanding. The plan now is to get the detail sander in there to finish off the tight spots. Once that's done i'll be doing the filling and then i'll resand using some of the higher grit disks. This should hopefully remove the last of the black paint in readiness for respraying, although my guess is that it's less important to remove all the paint and a lot more important to focus on making sure all sides of the backbox have a extremely smooth finish to them.
Anyway, we're on the way now. No clue when i'll get round to the next stage. There isn't much time for sanding in the evenings so it might be next weekend before I get to do any more. Nice to have made a start though.
I carted the backbox outside as I knew the sanding was going to generate a huge amount of dust. First up I started by having a quick look at the state of the back box and what filling or glueing was likely to be required once the majority of the artwork had been removed.

There was a little bit of lifting on this corner but nothing too major. I've now glued this and it's currently upstairs with clamps on it. Once that's done i'll run some filler over it before sanding back with some higher grade sanding disks.

There's a fairly large chunk out of the corner at the bottom too. No big deal and certainly nothing that a bit of filler can't sort out.

More dings and scrapes on the corners. From what i've seen from Paul and others on here these are pretty typical for most Pins.

Once i'd done a bit of an inspection I made a start on sanding back the artwork using a low grade sanding pad. Initially I started with 80 grit and whilst it was removing the artwork it took a fairly considerable amount of time; I think the first side was almost 45 minutes. This could be because I believe these Data East Pins don't use decals but the artwork is actually screen-printed onto the cab itself.
One issue I did find with the cheap sanding disks off eBay is that the velcro on the back of them seems to deterioriate very rapidly. The actual sanding surface was still very coarse but in many cases after just a few minutes the pad would fly off the sander and after that it wouldn't stick again. At first I thought it might have been my 'budget' sander but i've since been out and got some more disks from a local DIY store and these adhere much better. Bit of a false economy for me maybe going the eBay route.
Anyway, I did the rest of the woodwork using a mixture of 40 and 60 grit pads and the majority of the large areas are now done. I need to get the detail sander out to finish off the inside of the backbox as many of the areas are too tight to get into with the regular Orbital Sander. I think all told it took about 3 hours to get to this stage, but it didn't help that the weather kept taking a turn for the worse meaning I had to stop and quickly pack everything away.


There's still some remnants of the original black paint but i've not worried about that to much because i'm still not done with the sanding. The plan now is to get the detail sander in there to finish off the tight spots. Once that's done i'll be doing the filling and then i'll resand using some of the higher grit disks. This should hopefully remove the last of the black paint in readiness for respraying, although my guess is that it's less important to remove all the paint and a lot more important to focus on making sure all sides of the backbox have a extremely smooth finish to them.
Anyway, we're on the way now. No clue when i'll get round to the next stage. There isn't much time for sanding in the evenings so it might be next weekend before I get to do any more. Nice to have made a start though.
Looks good, and that damaged corner should be easy to fix. 3 hrs is a lot of sanding for such a small box. When it comes to the main cabinet you really want to be using a belt sander... it will be soo much quicker, and easier. I bet you got through a lot of sanding pads from all the old paint sticking, and clogging the pads?
With regards to the filling, i would probably be inclined to use car bodywork filler instead of wood filler.
We normally keep a few hundred litres of BS 18e53 in stock. If you bring a jar, or other small container over, i can get a bit for you to try on your cabinet for a true colour test. The colour of Primer that you use can also make a slight difference in final colour tone.
