What's a better birthday gift than letting you attend the Pinball Party ?
Pinball info
You are using an out of date browser. It may not display this or other websites correctly.
You should upgrade or use an alternative browser.
You should upgrade or use an alternative browser.
In Progress Rocky & Bullwinkle Shop Log
- Thread starter Wiredworm
- Start date
I know - but being my 40th makes it special and very much a family occasion. I have to forfeit my addiction on this occasion, especially when I know how much trouble and time she's gone to in arranging the birthday bash. I'll hopefully make it along next year.
Last edited:
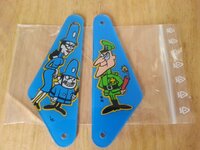
Well i've managed to secure a couple of replacement plastics. One is the right slingshot cover as mine has a chunk missing out of the bottom. The other is the one which goes below the Nell Assembly as mine has a fairly big crack in it.
These won't be getting fitted until i've got protectors or fender washers available to ensure they don't take any more damage. When I do the playfield strip i'm going to use some Novus to polish them all up and getting them looking as nice as possible.
These won't be getting fitted until i've got protectors or fender washers available to ensure they don't take any more damage. When I do the playfield strip i'm going to use some Novus to polish them all up and getting them looking as nice as possible.
Bit gutted that I missed out on a replacement shooter cover. Like a dope I missed the deadline for bidding and it went to someone else.
I have a repro that I made myself for now, but i'd love to get a NOS or original one back on there. The quest to find one continues.
In the meantime i'll grab a set of novus polishes in readiness for the next strip down. I'm going to do it properly next time around. ;-)
I have a repro that I made myself for now, but i'd love to get a NOS or original one back on there. The quest to find one continues.
In the meantime i'll grab a set of novus polishes in readiness for the next strip down. I'm going to do it properly next time around. ;-)
I might have managed to source a replacement shooter cover for my R&B. Just waiting to hear back on that one.
In the meantime I found that Best of Pinball had a repro WABAC ramp in stock. Those things are like gold dust so i've grabbed it so I can swap my battered one out at some point. Nice. It's cost me £100 to get it and have it shipped to the UK but I figured it wasn't likely to hang around.
In the meantime I found that Best of Pinball had a repro WABAC ramp in stock. Those things are like gold dust so i've grabbed it so I can swap my battered one out at some point. Nice. It's cost me £100 to get it and have it shipped to the UK but I figured it wasn't likely to hang around.
Already got them and fitted them Macro. I figured they were worth having on to stop the damage getting any worse.
Still need to find a replacement for the other ramp too, but that one is going to be an even tougher challenge.
Still need to find a replacement for the other ramp too, but that one is going to be an even tougher challenge.
Ramp turned up a week or two back. Lovely.
Also got a replacement shooter cover today - not a repro but an original which a guy in the US kindly sold on to me (I say sold but what he charged only just covered the postage).
Also got a replacement shooter cover today - not a repro but an original which a guy in the US kindly sold on to me (I say sold but what he charged only just covered the postage).
I wasn't happy with the replacement right slingshot cover I got. It's got a fair bit of paint missing where it's been scratched.
Just picked up a NOS set from the PinWitch in Germany. Bit pricey at 28 euroes including the shipping but never mind.
Reckon i'm going to grab a protector set and the cord cup I need from Marcos in readiness for the next strip down and rebuild.
The machine will be moving upstairs imminently as we need room in the back for the kitchen refit. The good news is that the wife has cleared the room and we've disposed of the bed in there. So it's no longer a 'guest' room but just a 'spare' room. That means I might actually have enough room up there to do some work on the machine.
These turned up the other day. All ready for the playfield strip and rebuild. When I strip down the plastics i'm going to check them to see which others might also need replacing. A casual glance suggests most of mine are in pretty good nick, but any that are damaged will get swapped out.
Cord cup and plastic protectors from Marcos are on their way. I also grabbed the S-A-V-E-D decals and some new white drop targets just in case those are needed.
Also en-route shortly will be the cabinet braid. Once i've got the decals sorted then i'll just need to source a sander and stapler and I should have most of the stuff I need to do the cabinet strip down and rebuild.
Cord cup and plastic protectors from Marcos are on their way. I also grabbed the S-A-V-E-D decals and some new white drop targets just in case those are needed.

Also en-route shortly will be the cabinet braid. Once i've got the decals sorted then i'll just need to source a sander and stapler and I should have most of the stuff I need to do the cabinet strip down and rebuild.
Right, the family BBQ happened yesterday and now that it's out of the way the plan to get the cab all sorted is underway.
Today i've stripped the machine into it's basic parts. Back box is removed as are the legs and the whole lot has been shifted upstairs into the middle room. I'll now commence stripping down the backbox and the main cab in readiness for it being sanded back before being resprayed and new decals fitted.
Of course I won't be letting a sander near it until the new decals actually arrive but in the meantime i've got plenty to do with stripping it all down. Expect more pictures and updates in this thread soon.
Order for the new decals has been placed. So it's time to start getting things together. Alas my camera battery has just given up the ghost which means there's a lack of photos for now, but i'll get some up in the next day or two.
When I first got the Pin last year I did what I thought was a fairly comprehensive strip down and clean on it. But having only done the top of the playfield I quickly realised that my job wasn't quite as thorough as I might have thought; within just a week or two the playfield was absolutely filthy again. I've done a fair bit of work on it over the last year but it's still not enough to satisfy my OCD so you can consider what follows as to be a 'Shop Log Revisited'. Somewhere along the line i'm planning a full playfield strip so that I can give everything an absolutely thorough clean. At the same time i'm also looking to get the playfield damage fixed up; there's a guy who's posted on the Yahoo Group who did some really impressive work on a Creature and although mine is nowhere near as bad as that i'm sure he could improve on what little damage there is.
Who knows maybe i'll be tempted to take Newdos's lead and also have a go at clearcoating.........Let's see how brave I get.......
But first order of the day is to fix up the battered cabinet. It's had the back end replaced with a sheet of MDF which has done the job just fine but there was still a huge chunk missing from one corner which i'd deliberately put off repairing because I hadn't yet decided what to do about the artwork. Well now the decals are available it seems a perfect chance to get things done.
So a brief order of work will be:
Tonight i've taken about an hour and a half to start stripping the fittings from the cab. Quite amazing really just how much is in there and i've taken plenty of reference photos. I'll try to get some pictures up tomorrow showing how we're progressing. Of course I've taken the sage advice of the forum and i'm taking the chance to bag up the parts in zip loc bags with each being labelled so I immediately know what parts come from where.
When I first got the Pin last year I did what I thought was a fairly comprehensive strip down and clean on it. But having only done the top of the playfield I quickly realised that my job wasn't quite as thorough as I might have thought; within just a week or two the playfield was absolutely filthy again. I've done a fair bit of work on it over the last year but it's still not enough to satisfy my OCD so you can consider what follows as to be a 'Shop Log Revisited'. Somewhere along the line i'm planning a full playfield strip so that I can give everything an absolutely thorough clean. At the same time i'm also looking to get the playfield damage fixed up; there's a guy who's posted on the Yahoo Group who did some really impressive work on a Creature and although mine is nowhere near as bad as that i'm sure he could improve on what little damage there is.
Who knows maybe i'll be tempted to take Newdos's lead and also have a go at clearcoating.........Let's see how brave I get.......
But first order of the day is to fix up the battered cabinet. It's had the back end replaced with a sheet of MDF which has done the job just fine but there was still a huge chunk missing from one corner which i'd deliberately put off repairing because I hadn't yet decided what to do about the artwork. Well now the decals are available it seems a perfect chance to get things done.
So a brief order of work will be:
- Strip the entire cabinet of all fitments
- Sand down the cab using a random orbital sander to remove the existing artwork
- Remove the existing rear end which is made from MDF and replace with 18mm ply as per original spec
- Apply filler to get rid of damaged areas before sanding again (this includes that huge shark bite at the corner)
- Apply undercoat to cab
- Respray cab in blue (ditching the horrid gloomy black artwork - it means it's not original but oh well - it's a keeper for me anyway)
- Apply new decals
- Clean, polish and refit hardware including replacements where needed (new glass tracks, boris button, button housing etc.)
- Reinstate the original locking mechanism (Rotolock)
- Fit the new cord cup
Tonight i've taken about an hour and a half to start stripping the fittings from the cab. Quite amazing really just how much is in there and i've taken plenty of reference photos. I'll try to get some pictures up tomorrow showing how we're progressing. Of course I've taken the sage advice of the forum and i'm taking the chance to bag up the parts in zip loc bags with each being labelled so I immediately know what parts come from where.
Looks like you are going to be pretty busy.
Yeah, just a bit - but it keeps me out of trouble I guess. And it's killing time until we get a bigger place where I can fit more Pins in. ;-)
Oh, and I should perhaps add that this probably means me posting a LOT of questions in the next few weeks. So thanks in advance to those that do assist
Oh, and I should perhaps add that this probably means me posting a LOT of questions in the next few weeks. So thanks in advance to those that do assist
Ask away that's what this forum is all about.
Bit more progress tonight. I managed to get the coin door stripped off. Took a fair while as I also removed the PCB that handles coin registration and carefully labelled up the cables to make it easier when it comes to hook it back up again.
The majority of the loom that is in the cab is now free to be removed but I think i'm going to desolder the speaker before I do so. I don't really relish the idea of moving that little lot with a damn great speaker still on the end of it. Other than that I think the majority of the other components can stay connected for now.
Cable stand-offs have been removed and the transformer is loose in the bottom of the cab. It's the first time i've picked up the transformer on it's own - damned near gave myself a hernia - why the flip are they so heavy?
So just the speaker to desolder along with the knocker and then the loom can be finally removed. Only real job after that is to remove the leg brackets, the old braid and the serial number labels (i'll be extra careful doing those as I want to try to keep them for the rebuild).
A couple of interesting observations:
1. It looks like the machine has had a security bar across the front as some point. There's holes either side of the coin door but they'd been quite well filled and painted over; I only had a suspicion because the area felt rough when you moved your fingers over it. Sure enough now all the gubbins is out from inside the cab you can clearly see the two holes. Looks like they've been stuffed with tissue paper or something.
2. It looks like the front leg brackets are originals whilst the two at the back are new. The front ones don't seem very substantial at all so I may well end up changing them to match those used at the rear.
Photos to follow once I finally get the cab cleared out.
In readiness for rebuilding the back of the cabinet i've been asking various people for photos and measurements from their cabs so I can make mine as authentic as possible.
It's interesting to note that I need two further holes (in additional to the cord cup location) in order to achieve this.
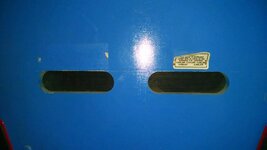
So, the next question is inevitably - does anyone know where I can pick up more of this 'mesh' material that needs fitting on the interior of the cab to cover the holes? Is that just regular speaker grill and is it a part I can source here in blighty?
It's interesting to note that I need two further holes (in additional to the cord cup location) in order to achieve this.

So, the next question is inevitably - does anyone know where I can pick up more of this 'mesh' material that needs fitting on the interior of the cab to cover the holes? Is that just regular speaker grill and is it a part I can source here in blighty?
Is that mesh plastic?
There is a plastics company here in Norfolk that has something similar. If you get stuck give me a shout and I will take a drive over to check what they have.
There is a plastics company here in Norfolk that has something similar. If you get stuck give me a shout and I will take a drive over to check what they have.
Yes I think it is mesh plastic. I've removed the speaker grille now and it's definately a plastic material. I'll try to get some photos and measurements from it later and figure out how much i'm going to need to the back of the cab.
In other news i've finally finished stripping the main cab down tonight. Ta da!!!!
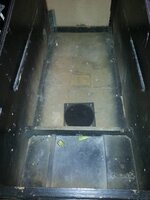
Of course it needs hoovering but the kids have gone to bed so that'll have to wait until tomorrow.
Since taking this i've also removed the speaker grille and the mountings for it. I thought they were fixed in place but a little waggling from the inside and I easily pushed them back through the bottom of the cab. Of course it needs a hoover out too but everything that needs stripping has been removed.
I've stuck the old braid in a cardboard box to be listed on eBay. It seems there's always people wanting to buy a pile of crap!!! ;-) (i'm joking btw).
Once the cab was stripped I upended it so I could get a better picture of the lovely lovely shark-bite.
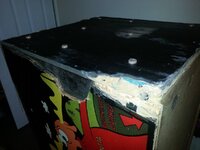
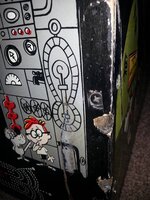
As you can see it's going to need some work to prepare it before I can fit new decals. My OCD was immediately set on edge when I noted that one corner has a more substantial leg bracket whilst the other 3 have the original, more flimsy mounts in place. I might have to do something about that.
A few nails and screws removed and the piece of MDF that was put in place originally is removed. Now you can really see that we need to do a little more work to make this sound.
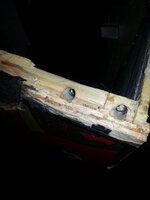
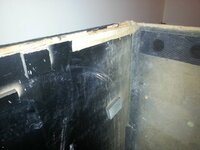
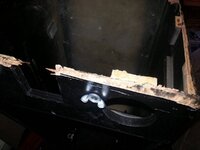
The section that sits below the backbox is in really bad shape. I haven't yet figure out if there is any way to remove it without knackering the cabinet but ideally the entire section needs to come out and be replaced. There's a couple of wedges underneath so I suspect it's held in place with nails. One for me to ponder I think.
The sheet of MDF i've removed will be replaced with 18mm ply but I think I also need to ensure that there's a 45 degree wedge in each corner to support the leg brackets. There's one present on one side but not on the other.
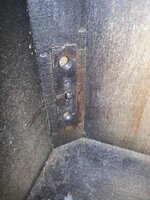
Whilst on the topic of the leg brackets i'm curious how the originals are held in place. I suspect that the corner wedges are held in place by these screws.
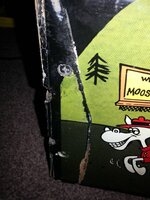
And the leg brackets are then screwed in from behind the wedge maybe?
So yeah, that's one job down. The back box still needs stripping and i'll be cracking on with that in the next day or two. I don't want to start doing anything too severe to the cabinet until the decals have turned up.
In other news i've finally finished stripping the main cab down tonight. Ta da!!!!

Of course it needs hoovering but the kids have gone to bed so that'll have to wait until tomorrow.
Since taking this i've also removed the speaker grille and the mountings for it. I thought they were fixed in place but a little waggling from the inside and I easily pushed them back through the bottom of the cab. Of course it needs a hoover out too but everything that needs stripping has been removed.
I've stuck the old braid in a cardboard box to be listed on eBay. It seems there's always people wanting to buy a pile of crap!!! ;-) (i'm joking btw).
Once the cab was stripped I upended it so I could get a better picture of the lovely lovely shark-bite.

As you can see it's going to need some work to prepare it before I can fit new decals. My OCD was immediately set on edge when I noted that one corner has a more substantial leg bracket whilst the other 3 have the original, more flimsy mounts in place. I might have to do something about that.
A few nails and screws removed and the piece of MDF that was put in place originally is removed. Now you can really see that we need to do a little more work to make this sound.


The section that sits below the backbox is in really bad shape. I haven't yet figure out if there is any way to remove it without knackering the cabinet but ideally the entire section needs to come out and be replaced. There's a couple of wedges underneath so I suspect it's held in place with nails. One for me to ponder I think.
The sheet of MDF i've removed will be replaced with 18mm ply but I think I also need to ensure that there's a 45 degree wedge in each corner to support the leg brackets. There's one present on one side but not on the other.
Whilst on the topic of the leg brackets i'm curious how the originals are held in place. I suspect that the corner wedges are held in place by these screws.


And the leg brackets are then screwed in from behind the wedge maybe?

So yeah, that's one job down. The back box still needs stripping and i'll be cracking on with that in the next day or two. I don't want to start doing anything too severe to the cabinet until the decals have turned up.
Top stuff!
Company is called walkers rubbers and plastics.
I love to buy crap on ebay
Company is called walkers rubbers and plastics.
I love to buy crap on ebay
the big leg bracket is a bally / williams one. One thing i will warn you about when replacing the end panel that redrilling all the leg bolt holes is a bitch. After having to redrill all 4 corners on firepower next time i have to do it im going to get a drilling jig made up
Good to see you have dived into the deep end and are treading water no problem at all.
Looking forward to the next installment.
Looking forward to the next installment.
I hadn't realised but the damage to the back of the cab didn't just extend to the back itself but it's also taken a fair chunk out of the right side of the cabinet too.
I was looking at it tonight and I noticed this.
This is the left side of the cabinet. There's a wedge mounted inside and as you can see there's a fair amount of wood behind it. In fact measuring (2nd picture) it's about 18mm.
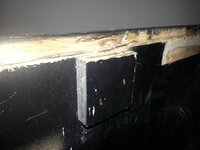
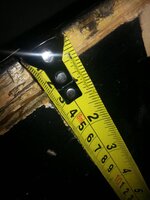
But then you compare it with the right side and there's nothing at all behind the wedge. So the lip that I presume the back should sit onto is totally missing. I presume this needs building back up before I can really fit the back in place as it should be?
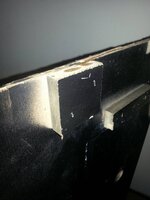
I'm also interested to know more about how the back should be fitted. I know it's meant to be 18mm ply but are the edges routed so that the mid-section sits further into the cabinet than the edges? And if so does anyone have any idea on to what depth they're routed?
Grateful for any tips on this one - it seems pivotal to me that to do a good job the wood work here really needs to be sound. Once the back is in place I should be able to fill the nasty gap in the artwork by building it up with filler before sanding the lot flush.
I was looking at it tonight and I noticed this.
This is the left side of the cabinet. There's a wedge mounted inside and as you can see there's a fair amount of wood behind it. In fact measuring (2nd picture) it's about 18mm.


But then you compare it with the right side and there's nothing at all behind the wedge. So the lip that I presume the back should sit onto is totally missing. I presume this needs building back up before I can really fit the back in place as it should be?

I'm also interested to know more about how the back should be fitted. I know it's meant to be 18mm ply but are the edges routed so that the mid-section sits further into the cabinet than the edges? And if so does anyone have any idea on to what depth they're routed?
Grateful for any tips on this one - it seems pivotal to me that to do a good job the wood work here really needs to be sound. Once the back is in place I should be able to fill the nasty gap in the artwork by building it up with filler before sanding the lot flush.
Decals have gone to be printed and should be ready for shipping next week. So it looks like they'll arrive whilst i'm away on holiday.
In other exciting news I had a delivery today. Or rather the Royal Mail turned up, stuffed a card through the letter box (without ringing or knocking) and then buggered off. The postage on a parcel was short 11p (yes, 11p) so now I have to go to the Post Office with £1.11 (the £1 is their fee for doing nothing) so I can find out what it is. But i'm guessing it's Pinball related.
Still mulling over how to best fixing up the woodwork. Luke has kindly said he'll measure the length of his Pin so I can figure out how the back fits and if it's meant to be rebated or not.
i know williams machines are mitred are DE games not?
That's the problem Rudi - i'm just not sure and i'd prefer to be sure before I start monkeying around with it.
My woodwork skills aren't sufficient to mitre it properly again - but I could certainly route out the edge of the ply if that's what's needed. It's just to what depth it needs routing, but if Luke can tell me the front to back measurement from his then I should be able to calculate the correct way to fit the new piece of ply based on that.
My woodwork skills aren't sufficient to mitre it properly again - but I could certainly route out the edge of the ply if that's what's needed. It's just to what depth it needs routing, but if Luke can tell me the front to back measurement from his then I should be able to calculate the correct way to fit the new piece of ply based on that.
That's all you need is a mitre but for your router. Maybe Daz or someone will shed some light
Baaah, it wasn't Pinball related. It was a birthday card for the missus that my mum posted before July 10th. No idea why it's taken them so long to send us a 'not enough postage' card. Unfortunately my mum didn't realise that postage is now calculated both on weight AND size and she was caught out by sending a large card with only a single class stamp.In other exciting news I had a delivery today. Or rather the Royal Mail turned up, stuffed a card through the letter box (without ringing or knocking) and then buggered off. The postage on a parcel was short 11p (yes, 11p) so now I have to go to the Post Office with £1.11 (the £1 is their fee for doing nothing) so I can find out what it is. But i'm guessing it's Pinball related.
Of course sods law dictates that I collect the card today and get home to find this.
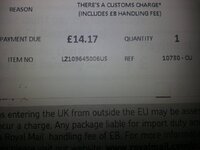
Doh!! The actual charge isn't so bad but Royal Mail want £8 for basically doing sod all apart from putting a card through my door. The cheeky b'stards.
Aaah well. That's the cord cup and plastic protector set as well as some new drop targets and decals arrived. Slowly gathering the bits needed for a rebuild. Hopefully I won't need anything else apart from the decals from the USA (I dread to think how much import tax i'll get stung for there).
Next job done. The back box is now fully stripped and ready for sanding and respraying. I won't be starting that until the decals turn up.
Here we have a naked backbox.....
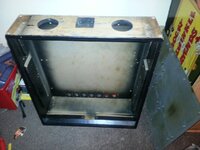
Apologies for the slightly blurry photo. And yes that beer mat was found in the cab. I'm not sure why but someone had stuffed it behind the sound board? I don't really understand why anyone would do that though? Answers on a postcard please......
Unfortunately the grille cover that goes over the holes at the top of the backbox suffered a bit of damage whilst being removed. The staples were well and truly lodged in place. Ideally I need to replace this now. Is it a stock part? Any clues on what it's known as?
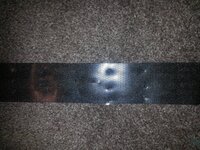
In other news i've also been pondering the woodwork required on the cab. Before refitting the back I need to fit the split and damaged wood which sits directly below the head. Having taken some measurements it would appear it's nowhere near as complicated as I first thought; in fact it's relatively easy if you have the right tools.
The whole section is a single piece of 18mm ply with the dimensions 55.6cm wide by 17.6cm deep. Aside from the holes that need cutting (2 x 10cm circles, 2 x 1.2cm circles and a rectangular piece in the middle) the only slightly complex part is that you need to ideally use a router to channel out 18mm from the left, right and back sides to a depth of 8mm. This then leaves you with 1cm sitting proud on the top of the cabinet. An additional strip of wood measuring 13mm by 24mm is then adhered to the front and this sits where the glass pushes up to once installed.
Now that i've figured out the logistics of making a replacement piece i'm a little less worried about taking a saw to the cabinet to remove the old section. Once that's all done and back in place I can look at how to best fit the back.
Here we have a naked backbox.....

Apologies for the slightly blurry photo. And yes that beer mat was found in the cab. I'm not sure why but someone had stuffed it behind the sound board? I don't really understand why anyone would do that though? Answers on a postcard please......
Unfortunately the grille cover that goes over the holes at the top of the backbox suffered a bit of damage whilst being removed. The staples were well and truly lodged in place. Ideally I need to replace this now. Is it a stock part? Any clues on what it's known as?

In other news i've also been pondering the woodwork required on the cab. Before refitting the back I need to fit the split and damaged wood which sits directly below the head. Having taken some measurements it would appear it's nowhere near as complicated as I first thought; in fact it's relatively easy if you have the right tools.
The whole section is a single piece of 18mm ply with the dimensions 55.6cm wide by 17.6cm deep. Aside from the holes that need cutting (2 x 10cm circles, 2 x 1.2cm circles and a rectangular piece in the middle) the only slightly complex part is that you need to ideally use a router to channel out 18mm from the left, right and back sides to a depth of 8mm. This then leaves you with 1cm sitting proud on the top of the cabinet. An additional strip of wood measuring 13mm by 24mm is then adhered to the front and this sits where the glass pushes up to once installed.
Now that i've figured out the logistics of making a replacement piece i'm a little less worried about taking a saw to the cabinet to remove the old section. Once that's all done and back in place I can look at how to best fit the back.
