What's new
Pinball info

Register a free account today to become a member! Once signed in, you'll be able to participate on this site by adding your own topics and posts, as well as connect with other members through your own private inbox!

Team TNA - The UK's Total Nuclear Annihilation Pinball Club

Yes, but It’s an OG TNA so I’m guessing they are original ones and haven’t done too badly 🙂
Did they have washers underneath them? Some original TNAs had pooling issues so some of us, including myself, bought some clear washers off Amazon, but these had a chemical reaction with the star posts causing them to become brittle and crack.

Posts and summary here:


Here’s what’s left of my posts. Removed 12 and 8 were trashed. All of these had the clear washers from amazon underneath. It’s possible that one or two were overtight, but I don’t think all were. One in particular was trashed within the reactor slings and that wasn’t overtightened. In fairness the ones with spooky’s black washers all seem fine, but I only received four of those so used clear elsewhere (spooky gave minimal to no guidance on this overall, so I figured more washers would be better). Anyway - just a heads up to anyone that is interested. I will be contacting spooky.

I heard back from spooky regarding the washers. Charlie told me that the clear ones are not ‘authorised wear prevention’ and that they are ‘absolutely causing a chemical reaction’. The ones they supplied (black) were apparently tested by Scott to make sure there was no reaction. So in a nutshell - if you put clear ones in then take them out or risk them shattering like mine.

Decided to remove my clear washers from the slings as the leaf switch was popping out quite frequently due to the increased height. 2 of the star posts had started to deteriorate, the one below was the worst one. There isn't any damage under them but I've put the thinner black washers that Spooky provided under the 4 inward facing sling star posts. They only sent me 6 washers so will use the other 2 for the ones each side of the grid.

Replacement star posts ordered.
 
Last edited:
Did they have washers underneath them? Some original TNAs had pooling issues so someone of us, including myself, bought some clear washers off Amazon, but these had a chemical reaction with the star posts causing them to become brittle and crack.

Posts and summary here:


There wasn’t any washers fitted but I have a feeling there may have been some fitted in the past because I found a bag of used discoloured clear ones that Matt gave me with the machine. That would explain the star posts looking so rough.

I have fit the spooky black rubber washers now under the new star posts 👍
 
I think you have been playing it non stop since it arrived and all those faults are perfectly acceptable
Welcome to the club - @RetroHeed i think the main page needs an update 😋

Where are you getting the screen upgrade from ?

The titan flipper rubbers haven’t gone down well on TNA’s. Mine lasted a couple hundred games if that and were toast. At present i’m running the original ones off my GZ and i’m several hundred games in with no marks
 
Strikethrough text marked up for Matt. @Tyke added.

Strikethrough text marked up for Jonathan, currently unsure who got Jonathan's TNA CE.

Pinball Mods Co website link added, under Accessories, Parts & Mods for the UV Kit.
 
I think you have been playing it non stop since it arrived and all those faults are perfectly acceptable
Welcome to the club - @RetroHeed i think the main page needs an update 😋

Where are you getting the screen upgrade from ?

The titan flipper rubbers haven’t gone down well on TNA’s. Mine lasted a couple hundred games if that and were toast. At present i’m running the original ones off my GZ and i’m several hundred games in with no marks

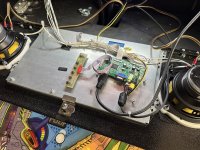
I’m using the same IPS screen and driver board I used on my Halloween. Amazon £70 all in. Handles the audio extraction from the HDMI and fits nicely into the stock metal bracket.

I dig the purple titans too much so I guess I had better stock up 🤣
 
I’m using the same IPS screen and driver board I used on my Halloween. Amazon £70 all in. Handles the audio extraction from the HDMI and fits nicely into the stock metal bracket.

I dig the purple titans too much so I guess I had better stock up 🤣
Titanasurus !!

Looking forward to seeing the refurb. If you have a moment could you post a link for the screen. Does it plug and play / fit the existing boards into it etc?
 
Great - Didn’t @Jason Catrine get it ?
No. It was a deal that allowed everyone to get what they wanted. Andy got TNA, Jonathan got my Wonka, and i then got some cash to put towards my dream game…..JJP POTC 😎 Picked it up today and I have to say it’s definitely worth the hype. The cannon shot to shoot from one ship to hit the other ship is really cool.

*edit - replied before reading the other comments and realised the TNA/Wonka deal has been mentioned.
IMG_5328.jpeg
 
No. It was a deal that allowed everyone to get what they wanted. Andy got TNA, Jonathan got my Wonka, and i then got some cash to put towards my dream game…..JJP POTC 😎 Picked it up today and I have to say it’s definitely worth the hype. The cannon shot to shoot from one ship to hit the other ship is really cool.

*edit - replied before reading the other comments and realised the TNA/Wonka deal has been mentioned.
View attachment 242089
Great stuff all, glad everything worked out for yous 👌
 
Here you go dude https://www.pinballinfo.com/community/threads/spooky-pinball-halloween.49554/post-539351

Yeah I’ll stick some pics up next week when it’s all finished 👍
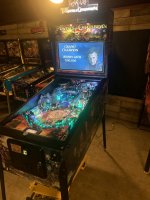
Just to say thanks for that. Im up and running on the new screen now. Have some updates to the install. Somewhere along the lines I was gifted Niels old screen from his garden clear out. I know he has the Original and such I found something I could do with it that was very effective with seating the newer smaller screen -
Let me explain
IMG_5720.jpeg

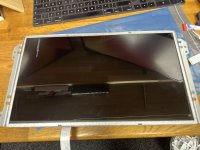
The OEM screen is fixed to the mount with 4 screws. The method shown by @Tyke and used by others is double tape or pads - this was my route too then I had a brainstorm.
So following @Tyke very helpful "how to" I went about the strip out. Spend ages fitting double sided tape and then did the follwin
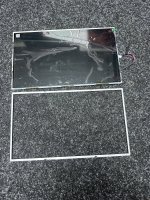
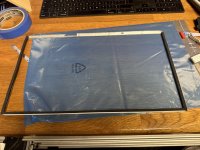
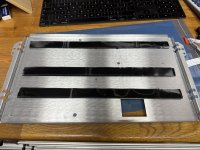
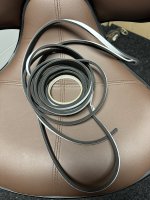
Removed the tape. Got Neils old screen and took off the metal frame that has the screw holes in it. Cut a notch for the video cable and reverse mounted it back into the mount over the new screen using 5mm draught excluder to cushion the edges and 3 strips of the sticky velcro @Ant-H showed me for use to stop the glass from scratching on the cabinet when sliding it in and out


I have all these rolls of stuff so I figured why not use them - Just noticed I have lost a couple phots of the draught excluder fitment but I think the spacing is shown in @Tyke post and I used what is shown in the photo bought from BQ -

IMG_5719.jpegIMG_5740.jpegIMG_5718.jpegIMG_5767.jpeg


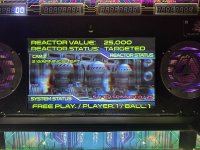
The difference is lovely - I have kept in the clear plastic , gave out a good clean. Can't see an issue with mine being there and also make me feel better about sticky fingers
Hopefully it's not just me that is noticing a much clearer display and more image than what was there before ? Especially the CALCULATING image . I don't remember that being green before ?

Anyways hope it helps should you upgrade


IMG_5759.jpegIMG_5760.jpegIMG_5762.jpegIMG_5763.jpegIMG_5764.jpeg
 
Last edited:
Just to say thanks for that. Im up and running on the new screen now. Have some updates to the install. Somewhere along the lines I was gifted Niels old screen from his garden clear out. I know he has the Original and such I found something I could do with it that was very effective with seating the newer smaller screen -
Let me explain
View attachment 242382

The OEM screen is fixed to the mount with 4 screws. The method shown by @Tyke and used by others is double tape or pads - this was my route too then I had a brainstorm.
So following @Tyke very helpful "how to" I went about the strip out. Spend ages fitting double sided tape and then did the follwin
Removed the tape. Got Neils old screen and took off the metal frame that has the screw holes in it. Cut a notch for the video cable and reverse mounted it back into the mount over the new screen using 5mm draught excluder to cushion the edges and 3 strips of the sticky velcro @Ant-H showed me for use to stop the glass from scratching on the cabinet when sliding it in and out


I have all these rolls of stuff so I figured why not use them - Just noticed I have lost a couple phots of the draught excluder fitment but I think the spacing is shown in @Tyke post and I used what is shown in the photo bought from BQ -

View attachment 242383View attachment 242384View attachment 242385View attachment 242388


The difference is lovely - I have kept in the clear plastic , gave out a good clean. Can't see an issue with mine being there and also make me feel better about sticky fingers
Hopefully it's not just me that is noticing a much clearer display and more image than what was there before ? Especially the CALCULATING image . I don't remember that being green before ?

Anyways hope it helps should you upgrade


View attachment 242389View attachment 242390View attachment 242391View attachment 242392View attachment 242393
Wow certainly looks hell oh a lot better than the poor viewing angle on the poor stock screen 👍

Thanks for sharing your install technique, this is something I will have to look into in the future I think.

Great post 👌
 
Added note that i don’t get any more pops from the speakers when turning on and off anymore. Because i fitted the amp and sound system it would make several loud pops when turning on and a big pop when i turned it off from the speakers and now its silent
😋
 
I'm very much in the owners club . Arrived at same time as my JP2 prem and TNA getting all the play . Awesome game . Getting feeling right flipper is overheating as losing power during the game , and I've not exactly got far yet ! Anyone had this ?
 
I'm very much in the owners club . Arrived at same time as my JP2 prem and TNA getting all the play . Awesome game . Getting feeling right flipper is overheating as losing power during the game , and I've not exactly got far yet ! Anyone had this ?
The right flipper seems to be haunted - Read some of my posts not that too old and see if anything there makes sense

I’ve been to hell and back with mine and i think @Jmac has a niggle on his too
Now mine is mint
 
I never had any issues with the rt flipper over heating. The button felt like it was sticking sometimes but I took it apart and gave it a clean and it seemed ok afterwards. Unless that was the same issue?
 
I never had any issues with the rt flipper over heating. The button felt like it was sticking sometimes but I took it apart and gave it a clean and it seemed ok afterwards. Unless that was the same issue?
The coil doesn't actually feel much hotter than the left one to be honest so might not be that but it starts off ok and then happens once the game is warmed up
 
The coil doesn't actually feel much hotter than the left one to be honest so might not be that but it starts off ok and then happens once the game is warmed up
I'd try cleaning up the button as above, but otherwise post in the Pinside thread - Scott (TheNoTrashCougar) is very active there and is sure to post some helpful advice :thumbs:

 
Back
Top Bottom