What's new
Pinball info

Register a free account today to become a member! Once signed in, you'll be able to participate on this site by adding your own topics and posts, as well as connect with other members through your own private inbox!

In Progress DE Star wars Project

If I have replaced transistors on coil circuits I just bench test with dmm with power off then put cpu back into machine and stay ready to switch off quickly if any coils lock on immediately on power up.
 
Last edited:
Sometimes on data east (and system 11) some coils will intermittently come on momentarily on power up and this is OK so long as they are not locking on.

Plus you should make sure the coils are not already fried before powering up.
 
Yeah I had a quick mechanical test when I first got the machine and all coils apart from the target reset visibly look good and all free to move etc.. but the target one is jammed so may have melted but will take a closer look shortly.

Also on DE games at which point can you test the fippers? (In test menu?) or need to start a game?

Iv ordered a bunch of the TIP122(coil) & TIP42A(lamp column) transistors from RS should have them tomorrow :)
 
Im talking about the plastic coil sleeves that should move in and out of the coil freely not just the metal plungers. If the coil sleeves don't push in and out freely it is a sign that the coil has overheated in the past and possibly damaged. I replace any coil where the sleeve will not move in and out freely.
 
Q1 bad as well on PPB board, explains why that kept locking on when 50v fuse was replaced but its main board transistor was one of the good ones. So many bad transistors on this game no wonder the coils not behaving correctly.
 
Blown transistors removed from pcb! Desoldering gun makes it nice and easy :D

Ready for replacements from RS components.

Will solder new ones back in once they arrive and fingers crossed no locked on lamps and mo locked on coils!
IMG_1191.webp
IMG_1192.webp
IMG_1193.webp
 
drop target coil deffo fried the insert was deformed, why the plunger wouldn’t go all the way in. Luckily I have a few spare new coils of that type so have swapped it over. Everything else looked ok. Whist under of noticed a broken switch wire which broke the switch matrix so explains why some switches did not work. I’ll solder that back tomorrow.

The transistors did not arrive today so hopefully tomorrow so can get those soldered back into the CPU board.
 
Looks like the CPU transistor repairs was a winner! (Still can’t believe how many was bad!!!)

All replaced :)
IMG_1206.webp
IMG_1205.webp
IMG_1204.webp
IMG_1203.webp

CPU lamps now perfect, no more locked column! And all coils / flippers / flashers behaving correctly!!! ( trough coil was not firing but luckily was just a broken off wire so easy fix)

Replaced the fried drop target coil and now that’s working good. Ah photo reminds me I forgot to solder the diode!!! Will do that tomorrow.
IMG_1200.webp

Also fixed the broken switch matrix wires now all switches (iv tested…) register.
IMG_1198.webp

Little video of the lamps
View attachment IMG_1208.mov


Not tested the spinning Death Star or R2D2 head yet (not sure how to?) But think mostly electrically good now. Will install back box lamp door back.

Next will be installing the pin2dmd and it’s dedicated 5v PSU I’ll install in cabinet and tap into the 250v after the cabinet switch.

Then will start to strip down the PF give it a good clean and replace rubbers and broken plastics etc…

Slowly getting there :)
 

Attachments

  • IMG_1199.webp
    IMG_1199.webp
    63.8 KB · Views: 2
  • IMG_1202.webp
    IMG_1202.webp
    166.9 KB · Views: 2
Put some balls in tonight to see if it would start / drain a game and all the mechs appear work ok, even saw the R2D2 head / Death Star spinning :)

Right orbit switch not working though! So will take a look at that.

Have started a strip down so can properly clean the pf / start replacing the broken plastics.

The sling lane posts were a bit of a nightmare with x2 having spinning locked tnuts!!! But got them out in the end and will replace the tnuts

Looking a bit naked!
IMG_1227.webp

box of parts :D
IMG_1228.webp
 
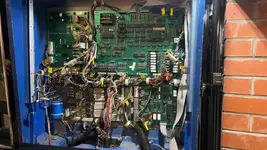
Reassembled a little more tonight :) 
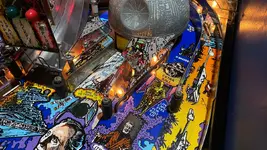
swapped over the R2D2 parts from the spares and put all the plastics around it back in.
IMG_1286.webp
IMG_1287.webp

Put back the ramp but its status lights plastic is held on one side using the plastic from the Death Star but this part was snapped. Luckily if you just twist it slightly it can be mounted onto the plastic mounting hex standoff. Seems like a good solution until replacement plastic is found.
IMG_1285.webp

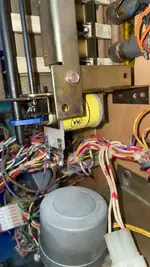
This lamp is playing up (all other lamps ok) it keeps lighting on 1-7 rows (goes off on row 8) checked diode and is ok (thought that might be issue) the lamp holder looks pretty grim so think it’s some short somewhere in there so will try replacing it.
IMG_1284.webp

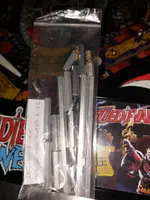
This plastic there is a spare n slightly better condition. But would need to drill and re rivet (I don’t have a rivet press as sold mine lol)

So have a few options @Tony let me know what you would prefer?
1) just stay with current plastic.
2) swap to other plastic but use m3 button
head screw.
3) swap to other plastic but send off to another member to rivet it.
IMG_1283.webp

The hex standoff offs / screws on the pops are all fecked so need to swap them out. Someone has tried to put in self tappers I think at some point messing all the threads up and most current screws are rounded off.

Almost there… end is in sight :D
 

Attachments

  • IMG_1288.webp
    IMG_1288.webp
    187.4 KB · Views: 8
Entirely up to you Russ, quite happy for you to just get it playing and enjoy it?
You’re doing a fantastic job it’s looking great
 
Last edited:
Lamp holder also needs riveting so might be a win win if that’s ok? :)

I have another new lamp holder but for under pf mounting style but can test to double check the holder is the issue :)
 
Back
Top Bottom