What's new
Pinball info

Register a free account today to become a member! Once signed in, you'll be able to participate on this site by adding your own topics and posts, as well as connect with other members through your own private inbox!

Cabinet Stencil Creation

AlanJ

Site Supporter
5Years
Joined
Dec 27, 2017
Messages
8,551
Location
Leeds, West Yorkshire
There are no paint stencils commercial available for my Bally gold ball, so this thread is about the journey of creating these.

I have no experience of doing this, graphics and artwork is not my forte - so I will need help please!

My understanding of the process is:
1. Scan the current artwork
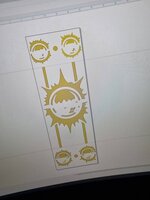
2. Stich the artwork images together
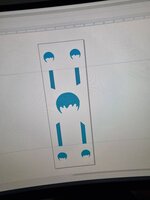
3. Clean the images up and make an outline image suitable for a cutter/plotter
4. Cut the stencils


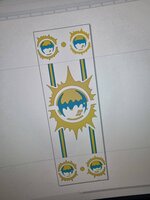
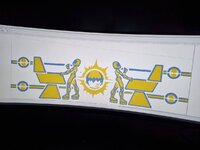
1. Scan the current artwork I tried a hand held scanner, but the results are not good, so I have bought a flatbed scanner that can be held up to the cabinet. here is the scan of the side art on one side of the backbox:

IMG_20210929_0014.jpgIMG_20210929_0013.jpgIMG_20210929_0011.jpgIMG_20210929_0009.jpg

I have scanned as .jpg files.

So, first question is how to stitch together? Ive no idea. I have Adobe Lightroom, Microsoft Paint and Inkscape. Help please?
 
For something as basic as that I would go more old school and trace what you have on to layout / tracing paper.

1. Draw on the tracing paper
2. Trim neatly the tracing paper - leaving holes where say the gold would be.
3. Transfer that to heavier paper.
4. Make the registration marks you need to line it up
5. Paint the white
6. Lay the heavier trimmed stencil ontop with the side pointing up, ie. on it's side.
7. Put something heavy on your heavy weight stencils
8. Aerosol on the paint

At least that way you get feathered edges where the paint bleeds through the way it did from factory. Self adhesive stencils will always result in a hard line.
I've seen a tutorial on the web with pictures, I just can't find it right now. I'll post it later if I can find it.
 
There is no easy way. You can merge the files using the photoshop. There is an option to do it automatically. After that U still need to manually redraw everything in vectors using illustrator or corelDraw. You won't get satisfying results with auto tracing.

P.s. I'm planning to start making and selling cabinet stencils. Let me know if U interested.
 
After a lot of messing about - Ive managed to extract the gold and blue to separate svg files:

gold.png

blue.png

This is just one of the 4 images I originally scanned. I managed to clean it up quite nicely

So, I now want to see if I can get the full scan done............
 
I'm planning on doing the same thing.

I bought a HP scanner from ebay, the see through one that is recommended on pinside threads

And I bought a silhouette cameo to cut the stencils. Can sort of stitch the images together in the software that comes with that. Then can draw the outlines for each layer over the top of the original scan and then remove the original layer. It can auto draw the cut lines really well if there is a strong colour difference.

I've not used it for any pinball stuff yet, but the kids have had loads of vinyl stickers for their rooms while I get used to the software.

20210929_183520.jpg
 
Cabinet sides done. Hopefully front and the backbox will be finished tomorrow. Eight ball deluxe next as I need to spray the cabinet that I'm restoring.

Stencils will be cut on special low strength glue, semi transparent vinyl. Delivered with transfer film and clearly marked, which set to be applied first.

Please let me know if anyone else is interested. Other titles can be also done.
 

Attachments

  • 16331208389167290206085198548200.jpg
    16331208389167290206085198548200.jpg
    75.9 KB · Views: 6
  • 16331208145721198551176129197789.jpg
    16331208145721198551176129197789.jpg
    74.9 KB · Views: 6
I use photoshop for much of this kinda stuff. You dont need the full on many £££££s version - I tried a trial of elements and didn't find anything I couldn't do with it.
If there is an automatic way of stitching together i've not found out - but doing it manually isn't so tough.
i grabbed your 4 photos, loaded them into PS removed the surrounding areas and merged them together. (I can make a step by step guide as to how I did this if its of interest)
A real quick stitch job gave me this. (I didnt try cleaning the edges up just joined em up)
rough stiching.jpg
The I used the magic want to grab the colours
BLooo
bloo.jpg
Gold
gold.jpg

The process took me maybe 40-60 mins. Obviously if I was looking to print them out I would spend a little time cleaning the edges etc - but you get the idea.
 
Backbox done
 

Attachments

  • 16331722118987768561257740507036.jpg
    16331722118987768561257740507036.jpg
    116.6 KB · Views: 4
  • 16331722295023298562484455151912.jpg
    16331722295023298562484455151912.jpg
    102.2 KB · Views: 3
  • 16331722389956479195782754162688.jpg
    16331722389956479195782754162688.jpg
    89.5 KB · Views: 4
Last but not least I loaded these into inkscape and did a trace on them - which lets you save them as .svg
 
Last but not least I loaded these into inkscape and did a trace on them - which lets you save them as .svg
And you gonna trace them with all the rubbish and imperfections unless you spend hours on cleaning them before. Also some of the colours must be sprayed on top of each other to avoid gaps.
Thumbs up for the effort but this is not the right way of doing it.
 
Good work chaps.. @AlanJ what colour are you intending using for the base? I'm looking at my original Gold Ball flyer which shows a bright neon red/cerise, obviously all long faded to various dirty pinks but imho always seemed a weird colour scheme from the get go.
 
Back
Top Bottom