What's new
Pinball info

Register a free account today to become a member! Once signed in, you'll be able to participate on this site by adding your own topics and posts, as well as connect with other members through your own private inbox!

All aboard for the Godzilla Hype Train!

  • Thread starter Thread starter Deleted member 2463
  • Start date Start date
I fixed mine on with quite thin double-sided tape and the ball plunge now seems to work 80-90% of the time (I've only played a few games so far)... I noticed some of those 3M tapes look quite thick which will make the plastic sit further out, @mplayfield what sort/thickness did you use?
hi Mark the one Colin sent me out had very thin tape already on.The other variants we tested (thicker)all proved worse so use the thinnest tape you can.
 
hi Mark the one Colin sent me out had very thin tape already on.The other variants we tested (thicker)all proved worse so use the thinnest tape you can.
If you are still getting rattles check the plunger rubber is hitting the ball dead centre as any side on the ball can produce spin . this can be adjusted in the cabinet
 
If you are still getting rattles check the plunger rubber is hitting the ball dead centre as any side on the ball can produce spin . this can be adjusted in the cabinet

I'll re-check this... there's a lot of left/right movement in the playfield when lowering it into the cabinet isn't there!
 
I'll re-check this... there's a lot of left/right movement in the playfield when lowering it into the cabinet isn't there!
Yes they used to fit spacers each side to centralise the playfield but not on gz . Probably get some though.
 
Has anyone had a set of replacements yet? Had an email from Stern a few weeks ago to say they were sending some over to the UK.
Just received a replacement coin door buttons unit to replace the ridiculously bad buttons that my GZ came with.

Now the buttons work as they should, without sticking or having to press multi is times to register.
 
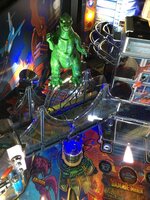
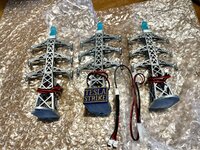
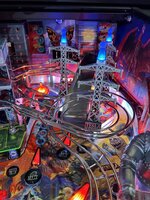
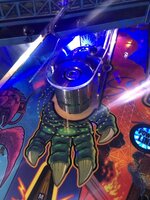
Was really frustrated by the fact that I couldn’t see the captive ball / target under the bridge properly. (If at all)
So with the help of ole Uncle Wobbles @Colywobbles I did this subtle but satisfying mod so that the ball and target is far more visible.
Also added a matching decal to the target....illuminated the target and ball with a comet 5 led blue strip....... 👊🏼😎
45800133-F9DC-4E4B-80EA-63B3D30B0197.jpegC56730B9-9F7E-4669-8F6E-3698C8FB9814.jpegA4E478A0-AE87-4DD9-86C8-1E90F19334C7.jpeg
 
Was really frustrated by the fact that I couldn’t see the captive ball / target under the bridge properly. (If at all)
So with the help of ole Uncle Wobbles @Colywobbles I did this subtle but satisfying mod so that the ball and target is far more visible.
Also added a matching decal to the target....illuminated the target and ball with a comet 5 led blue strip....... 👊🏼😎
View attachment 185291View attachment 185292View attachment 185293

I didn't know there was a target 🤣🤣
 
Just received a replacement coin door buttons unit to replace the ridiculously bad buttons that my GZ came with.

Now the buttons work as they should, without sticking or having to press multi is times to register.
did you have to report this problem to stern or can you ask for this from pinball heaven, i have the same problem
 
There is a thread on pinside explaining how to fix this issue, requires a bit of dismantling the button assembly but looked easy enough
 
There is a thread on pinside explaining how to fix this issue, requires a bit of dismantling the button assembly but looked easy enough
Do you have a link for those that only go there periodically - and when they get there, remember why?
 
No I don’t, just remember reading it when I first heard about the issue a while back. A quick search in the Godzilla owners thread should find it though 👍
 
No I don’t, just remember reading it when I first heard about the issue a while back. A quick search in the Godzilla owners thread should find it though 👍
No worries - had a bit of a look but got pee'd off before I found it. Not the end of the world.
 
No worries - had a bit of a look but got pee'd off before I found it. Not the end of the world.

After googling for less than a minute 😂:

For everyone with bad service buttons:

Three screws (ground strap, and two tiny black metal screws).

Take the unit off, unplug. (Plug is on tighter than you think, but it pulls off).

Use two small flatblade screwdrivers on the clips of the back side, gently pry the green circuit board up a little without deforming the black plastic clips.

Lift the green circuit board up a tiny bit at the connector end by prying with one of your screwdrivers, then insert your screwdriver to the side of the wedge at the end furthest from the connector. Pry the whole circuit board forward until the end clears the black wedge ramp at the end of the circuit board.

Continue to gently work the circuit board upward over the various black plastic clips with the screwdrivers and you'll get the green circuit board out.

Then the four buttons (Green, Red, Red, Black) will fall onto the floor. Pick them up. Hehe.

The circuit board has a translucent button rubber on top of it, gently pull this off, pulling the tiny pegs of translucent rubber out of the circuit board.

Clean the circuit board metal contacts that were under the buttons with 99% alcohol. Don't leave any lint or residue on the circuit board when you are done wiping it off.

Place the translucent button rubber piece back on the board, aligning the tiny rubber pegs. One by one, gently pull the pegs through the board until it the translucent button rubber rests flat on the circuit board.

I plugged the board back into the game at this point, and was amazed at how well the translucent button and green circuit board worked. I didn't have to clean the black surface of the inside of the translucent button cover with alcohol, but if you didn't get good results, now is a good time to pull it apart and clean the circuit board and maybe the black pads again with 99% alcohol.

After verifying that the button circuit board was working perfectly, I unplugged it from the pinball, and it was just a matter of loading the colored plastic buttons (Green, Red, Red, Black) back in the holder and popping the circuit board into the holder.

Plug the button unit back in. Put the assembled button unit back on the front door with the screws.

You now have perfectly working buttons.
 
Will Babycham or Hofmeister suffice for the alcohol button treatment or should I get some Jaeger in especially?

Can you Google that for me please @Andydn

Update: I poured Guiness on the buttons and it's not working at all 😡
 
After googling for less than a minute 😂:

For everyone with bad service buttons:

Three screws (ground strap, and two tiny black metal screws).

Take the unit off, unplug. (Plug is on tighter than you think, but it pulls off).

Use two small flatblade screwdrivers on the clips of the back side, gently pry the green circuit board up a little without deforming the black plastic clips.

Lift the green circuit board up a tiny bit at the connector end by prying with one of your screwdrivers, then insert your screwdriver to the side of the wedge at the end furthest from the connector. Pry the whole circuit board forward until the end clears the black wedge ramp at the end of the circuit board.

Continue to gently work the circuit board upward over the various black plastic clips with the screwdrivers and you'll get the green circuit board out.

Then the four buttons (Green, Red, Red, Black) will fall onto the floor. Pick them up. Hehe.

The circuit board has a translucent button rubber on top of it, gently pull this off, pulling the tiny pegs of translucent rubber out of the circuit board.

Clean the circuit board metal contacts that were under the buttons with 99% alcohol. Don't leave any lint or residue on the circuit board when you are done wiping it off.

Place the translucent button rubber piece back on the board, aligning the tiny rubber pegs. One by one, gently pull the pegs through the board until it the translucent button rubber rests flat on the circuit board.

I plugged the board back into the game at this point, and was amazed at how well the translucent button and green circuit board worked. I didn't have to clean the black surface of the inside of the translucent button cover with alcohol, but if you didn't get good results, now is a good time to pull it apart and clean the circuit board and maybe the black pads again with 99% alcohol.

After verifying that the button circuit board was working perfectly, I unplugged it from the pinball, and it was just a matter of loading the colored plastic buttons (Green, Red, Red, Black) back in the holder and popping the circuit board into the holder.

Plug the button unit back in. Put the assembled button unit back on the front door with the screws.

You now have perfectly working buttons.
Your google-fu's obviously better than mine - I got far too many dead end leads. Many thanks, will try it out
 
Got Godzilla Premium, great great game! only thing is that the ball keeps getting stuck in between the bridge quiet a lot.. is this a levelling adjustment fix or something I need to do on the bridge itself? any feedback appreciated!
 
do you mean the ball gets stuck on the bridge itself in the middle of the 2 halves of the bridge after shooting the right hand ramp or stuck on the playfield by the bridge ?
 
Got Godzilla Premium, great great game! only thing is that the ball keeps getting stuck in between the bridge quiet a lot.. is this a levelling adjustment fix or something I need to do on the bridge itself? any feedback appreciated!

If it’s the same issue mine had - where one half of the bridge sometimes catches on the other, preventing it from becoming level and the ball getting stuck at the lip until ball search releases - then you need to file down the plastics slightly.
 
do you mean the ball gets stuck on the bridge itself in the middle of the 2 halves of the bridge after shooting the right hand ramp or stuck on the playfield by the bridge ?
This - the ball gets stuck on the bridge itself in the middle of the 2 halves of the bridge

I am also seeing a bit of wear on the edges of the two plastic bridge parts and the plastic underneath - is this normal?
 
If it’s the same issue mine had - where one half of the bridge sometimes catches on the other, preventing it from becoming level and the ball getting stuck at the lip until ball search releases - then you need to file down the plastics slightly.
then you need to file down the plastics slightly.

- can you explain pls
 
Back
Top Bottom