Pinball info
You are using an out of date browser. It may not display this or other websites correctly.
You should upgrade or use an alternative browser.
You should upgrade or use an alternative browser.
Afterglow Nano - Group Buy - ** ££ payment time ££ **
- Thread starter stumblor
- Start date

Mine arrived today, many thanks Davey.
All I know one is going in Creature , the other I have yet to decide. First I need to work out how to get it up and running.
Cheers.
All I know one is going in Creature , the other I have yet to decide. First I need to work out how to get it up and running.
Cheers.
Fifty
Registered
Sorry, maybe I wasn't clear. Sorry if it seems like I'm being an ass.Yes mate all here:
https://github.com/bitfieldlabs/aggi
Arduino code, schematics, PCB designs, Bom etc...
I don't see the download for the .exe that launches the config tool in the https://github.com/bitfieldlabs/afterglow menu
[EDIT] I found it buried in the Instruction Manual.
https://github.com/bitfieldlabs/afterglow/wiki/Configuration-Software

Fifty
Registered
I'll probably upload a default Creech config after I figure it out. Anyone know how to submit a game to the game list? Creech currently isn't fetched when you click the globe icon in the config tool.
Oh I see what you mean now my apologies I didn't read your first post properly. To be honest I've not used the configuration software yet, I'm running my Afterglow board in creech on (what I now suppose to be) default settings. Let me know what you discover. I imagine new configs could be submitted as a pull request on github, but can always ask Christoph the designer if it's not clear.
Will do some reseat into that config tool over the next few days but let me know how you get on with it.
Will do some reseat into that config tool over the next few days but let me know how you get on with it.
Mine landed today Davey cheers and thanks for doing the cables pal
Sent from my CMR-W09 using Tapatalk
Sent from my CMR-W09 using Tapatalk
Fifty
Registered
You should really play around with it. If it's anything like the LED OCD config, and it looks like it is, then I think you'd really enjoy it. It's really nice to max out the LED for one insert, and tone down the brightness for another to even out the lighting levels. I enjoy just going through and labelling each insert light too.Oh I see what you mean now my apologies I didn't read your first post properly. To be honest I've not used the configuration software yet, I'm running my Afterglow board in creech on (what I now suppose to be) default settings. Let me know what you discover. I imagine new configs could be submitted as a pull request on github, but can always ask Christoph the designer if it's not clear.
Will do some reseat into that config tool over the next few days but let me know how you get on with it.
Mine arrived earlier in the week. Cheers
just have to work out what they do now...
just have to work out what they do now...
Stuck one in my MB tonight Davey, it makes a world of difference thanks for organising this.
Only Fish Tales left to do out of my machines now!
Only Fish Tales left to do out of my machines now!
Thanks Davey mine has arrived. Nicely packed.
A few more stamped Stumblors logos would of been nice
You know I'm going to literally cover your box next time
Davey my box arrived today with leads included your a super star thank you very much...will probably try and plug this in at the weekend :-D
Daft Question folks ..on the back of the Pin2DMD there is a 12v screw type terminal (Not used as i scotch lock crimped the plugs supplied) that appears to be free ...could the Afterglow board be driven from there?
Ive checked the terminals and its showing approx 14v on DMM
Cheers
Stef
Ive checked the terminals and its showing approx 14v on DMM
Cheers
Stef
Thats brill thanks for the diagram ")
Good Afternoon Chaps
Looking to try my afterglow board now and have done the following:-
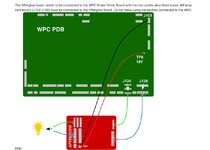
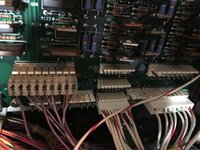
Unplugged 138 from the main board and inserted into Afterglow IN
Unplugged 135 from the main board and inserted into afterglow IN
Installed Afterglow 138 OUT into 138 Main Board
Installed Afterglow 135 OUT into 135 Main Board
Installed power connector Red to 18v Test Point on Main Board
Installed power connector Black to GND Test Point on Main Board (just beneath TP7)
I see from the diagram attached it suggests that plugs 133, 134, & 136 need to be plugged into the afterglow board is this correct as these plugs will attach to the OUT connectors on the afterglow board
just want to be sure before i boot TZ up
Thanks
Stef
Looking to try my afterglow board now and have done the following:-
Unplugged 138 from the main board and inserted into Afterglow IN
Unplugged 135 from the main board and inserted into afterglow IN
Installed Afterglow 138 OUT into 138 Main Board
Installed Afterglow 135 OUT into 135 Main Board
Installed power connector Red to 18v Test Point on Main Board
Installed power connector Black to GND Test Point on Main Board (just beneath TP7)
I see from the diagram attached it suggests that plugs 133, 134, & 136 need to be plugged into the afterglow board is this correct as these plugs will attach to the OUT connectors on the afterglow board
just want to be sure before i boot TZ up
Thanks
Stef
Attachments
Last edited:
Fifty
Registered
It would appear so based on the photo in the instructions.Good Afternoon Chaps
Looking to try my afterglow board now and have done the following:-
Unplugged 138 from the main board and inserted into Afterglow IN
Unplugged 135 from the main board and inserted into afterglow IN
Installed Afterglow 138 OUT into 138 Main Board
Installed Afterglow 135 OUT into 135 Main Board
Installed power connector Red to 18v Test Point on Main Board
Installed power connector Black to GND Test Point on Main Board (just beneath TP7)
I see from the diagram attached it suggests that plugs 133, 134, & 136 need to be plugged into the afterglow board is this correct as these plugs will attach to the OUT connectors on the afterglow board
just want to be sure before i boot TZ up
Thanks
Stef
https://github.com/bitfieldlabs/afterglow/wiki/Instructions

Excellent im ready to power up
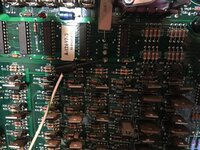
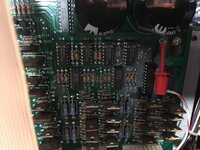
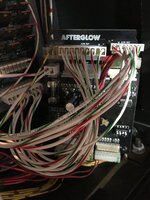
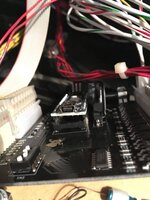
Houston we have a problem :-( I have some Gi but zero Attract
Looking closer i have figured out :-(
The nano board isnt installed into the rhs socket :-(
im guessing i will have to pull this out again and try and refit the nano
any tips or anything i should be aware of before i continue
cheers
Stef
Looking closer i have figured out :-(
The nano board isnt installed into the rhs socket :-(
im guessing i will have to pull this out again and try and refit the nano
any tips or anything i should be aware of before i continue
cheers
Stef
Attachments
caponian
Registered
Hi everyone. Uploading new lamp matrix labels for the configuration tool can only be done through github pull requests at the moments. Or just send your entry to me and I will upload it. The configuration hasn't been used a lot as far as I am aware. I am happy to get some input or suggestions.
Fifty
Registered
Use nice even pressure when you insert it. You don't want to bend the PCB. If you are taking it out use a back and forth rocking or wiggling motion and just go slowly. Be careful to align the pins with the socket. You don't want them folding over on you.Houston we have a problem :-( I have some Gi but zero Attract
Looking closer i have figured out :-(
The nano board isnt installed into the rhs socket :-(
im guessing i will have to pull this out again and try and refit the nano
any tips or anything i should be aware of before i continue
cheers
Stef
Hi everyone. Uploading new lamp matrix labels for the configuration tool can only be done through github pull requests at the moments. Or just send your entry to me and I will upload it. The configuration hasn't been used a lot as far as I am aware. I am happy to get some input or suggestions.
Hey Christoph, welcome to pinballinfo. Nice to have you here!

Fifty
Registered
caponian
Registered
The GI board is still under development. There is now a version of the board with integrated power supply. Some people at Flippermarkt have built prototypes but I have not gotten much feedback so far. I have a board myself but no matching pinball machine ATM@caponian So... Have you ever thought about starting up a group buy for AGGI?
")
Also, the group buy at Flippermarkt was done by someone else, and I don't know much about ordering populated boards from China...

Fifty
Registered
I'd like to have matching AG and AGGI in my Creech, but there is no way I can coordinate a group by from the other side of the pond. Shipping would kill any savings.
Fifty
Registered
Sounds like a project. That would be cool. Remind me... Is the BOM listed on Github?I'll do one at some point mate have no fear! In the meantime I can send you over a bare board?
Yep everything you need will be here
https://github.com/bitfieldlabs/aggi
BOM:
https://github.com/bitfieldlabs/aggi/blob/master/afterglow_gi_nano_ps/afterglow_gi_nano_ps_bom.csv
https://github.com/bitfieldlabs/aggi
BOM:
https://github.com/bitfieldlabs/aggi/blob/master/afterglow_gi_nano_ps/afterglow_gi_nano_ps_bom.csv