What's new
Pinball info

Register a free account today to become a member! Once signed in, you'll be able to participate on this site by adding your own topics and posts, as well as connect with other members through your own private inbox!

In Progress Adventures in Budget Restoration: 1978 Bally PARAGON

July 2014
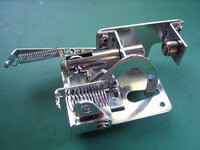
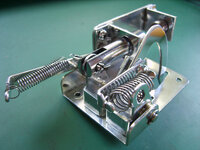
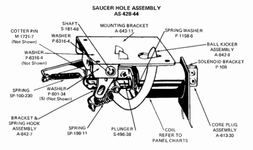
SAUCER KICKER #1 REBUILD
AS-428-44.png

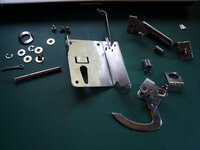
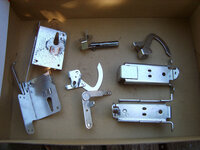
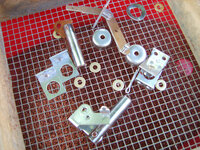
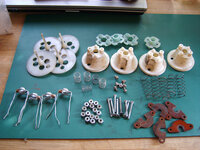
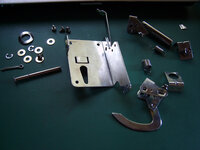
Not too tricky putting this back together other than faffing around with the brass spacer washers. Here's all the required parts to build as AS-428-44:
farm4.staticflickr.com_3865_14704815983_18951674ea_c.jpg

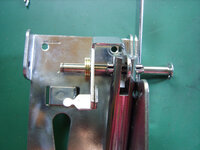
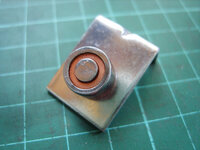
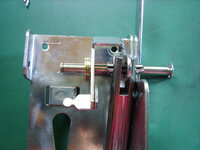
E-clip on one end of the shaft. Slide it in from the side and through the plunger bracket, then add 3 brass spacer washers:
farm4.staticflickr.com_3891_14498279969_4dafff18b2_c.jpg

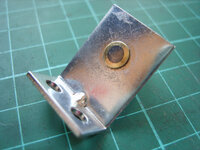
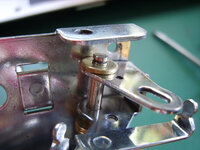
Next, line up the holes in the kicker arm and push the shaft through a bit more, then add 2 more brass spacing washers:
farm3.staticflickr.com_2919_14704815513_71e864f333_c.jpg

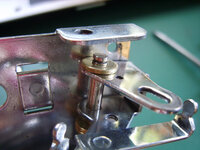
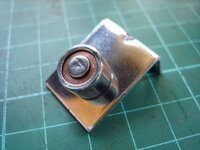
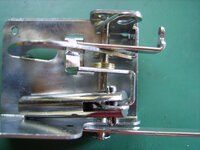
Overview of the shaft arrangement just before pushing it out the other side of the base-plate and fixing with another E-clip. A third E-clip fits mid-shaft to keep the kicker arm and plunger bracket shifted to one side (top in this photo):
farm4.staticflickr.com_3862_14498467887_8e1dbea928_c.jpg

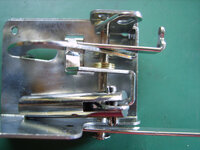
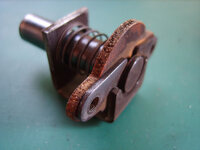
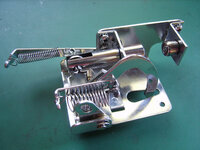
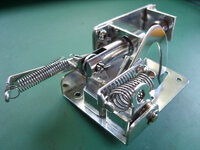
Re-fit the springs. The cotter pin through the rolled pin at the end of the plunger serves no other purpose that to provide an anchor point for the return spring:
farm4.staticflickr.com_3875_14498467767_4afc8eb96e_c.jpg

farm6.staticflickr.com_5595_14498282798_e5257f2b92_c.jpg

Job done! Two more to go...
 
Well done, certainly a great improvement from the starting point.
True dedication in bringing a machine back to its former glory.
 
July 2014
SAUCER KICKER #1 REBUILD

View attachment 8647

Not too tricky putting this back together other than faffing around with the brass spacer washers. Here's all the required parts to build as AS-428-44:

farm4.staticflickr.com_3865_14704815983_18951674ea_c.jpg

E-clip on one end of the shaft. Slide it in from the side and through the plunger bracket, then add 3 brass spacer washers:

farm4.staticflickr.com_3891_14498279969_4dafff18b2_c.jpg

Next, line up the holes in the kicker arm and push the shaft through a bit more, then add 2 more brass spacing washers:

farm3.staticflickr.com_2919_14704815513_71e864f333_c.jpg

Overview of the shaft arrangement just before pushing it out the other side of the base-plate and fixing with another E-clip. A third E-clip fits mid-shaft to keep the kicker arm and plunger bracket shifted to one side (top in this photo):

farm4.staticflickr.com_3862_14498467887_8e1dbea928_c.jpg

Re-fit the springs. The cotter pin through the rolled pin at the end of the plunger serves no other purpose that to provide an anchor point for the return spring:

farm4.staticflickr.com_3875_14498467767_4afc8eb96e_c.jpg

farm6.staticflickr.com_5595_14498282798_e5257f2b92_c.jpg

Job done! Two more to go...
I had to put sunglasses on to even look at the shininess in the pictures. Superb stuff.
 
Thanks @JT. and @replicas. I find it so pleasing after all the work cleaning and polishing the bits to put everything back together and end up with something that beautiful. The engineering that goes into pinball is quite fascinating! I know the parts probably didn't look like that when they were made but it's nice to still have it all original but better than ever before. It's much like classic car restoration or hot rodding. I totally get why people do that.

I was a bit miffed that tooth bit broke off but I'll fix it somehow. I thought about buying a used spare from US eBay but I dint give in that easily!
 
July 2014
TUMBLER TIME (AGAIN)

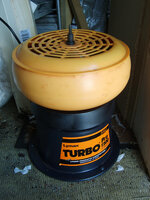
Finally got around to borrowing my mates Lyman Turbo 1200 PRO tumbler. Shocking as he only lives 2 minutes round the corner and this will be the third time I've had it! But this time will be different! I've stripped the playfield and everything is in pieces and bagged ready to do to.

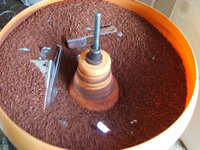
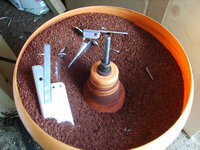
So, last night I set it up with a batch or pre-treated red-rouge crushed walnut shell media and chucked in all the parts for two slighshots and two saucer kickers. The only bits that didn't go in were the delicate slingshot return springs (they just get tangled and mangled), the plastics tips of the slighshot arms (and what a bugger it was removing the split pins holding them on) and all the small machine screws with integral star washers ('cos they just get clogged with the red rouge).

Had a peek this morning and stuff is looking shinier already. Will leave it going for another 24 hours will tomorrow morning...

farm4.staticflickr.com_3903_14520614310_b112057a68_c.jpg

No problem with dust so far. Not that it matters, you can see the state of my workshop floor! Maybe it's because the media is proper gun cartridge cleaning stuff and has been washed? I bet the pet-grade walnut for snakes and lizards is messier.

farm6.staticflickr.com_5580_14520844487_6a62af1be3_c.jpg

Round and round they go! I spy two slighshot brackets and two saucer kicker baseplates. They've been in overnight, so around 17 hours so far:

farm6.staticflickr.com_5584_14727145913_2179ae7eeb_c.jpg
 
Just went and had another look, so about 8 hours after I checked this morning. Most parts look pretty immaculate. Only the round area on the top of the saucer kicker base-plates where it is exposed by the hole in the playfield still looks dull (this area was really bad to start with). Most of the other parts I could pull now and then mirror buff them with the Dremel. The curved kicker arms and slingshot plungers look particularly good. Easily saved 3-4 hours manually buffing. I reckon it'll take about 30 minutes to an hour to clean off the rouge and do the final polish. Nice!

If I get time I'll start pulling pieces tonight but will leave the kicker base-plates in overnight.

Blimey! At this rate everything will be done by the end of the week!
 
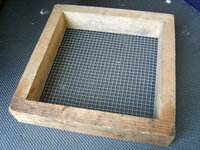
Just remembered I made this sieve for my wife to top off when planting seeds (she's a keen gardener). It's 9" square and has 5mm mesh which should be ideal for removing parts from crushed walnut media after tumbling!

farm4.staticflickr.com_3916_14686400316_a7e9077d13_c.jpg
 
U need to leave it in longer couple days atleast then u don't have to do any after work. I do 2 days in wallnut and 1 in corncob and flitz for a final polish
 
U need to leave it in longer couple days atleast then u don't have to do any after work. I do 2 days in wallnut and 1 in corncob and flitz for a final polish
Bewildering array of Flitz products... what do you use in particular? Flitz Liquid Polish added to the corn cob?

Okay, will take your advice ;) Will need to get some corn cob though... Just order 5kg of walnut today on eBay. Any good sources for the corn cob?
 
I it was flitz liquid tumbler additive I think I will check next time I'm up my mums as it's in the garage. Cob I got with the tumbler but most ammo reloading sites sell it
 
Ironically, that's not too far off the mark as I live about 3 miles away from the home of the NRA (National Rifle Association) over in Bisley, Surrey, and pass by fairly regularly. Their gun shop sells lots of tumbling media... :eek:
 
July 2014
TUMBLING RESULTS BATCH #1

So, the tumbler has been running since around 8pm Sunday night and around 8am this morning I checked on the progress and decided it was probably enough. So, total run-time for Batch #1 was around 36 hours. At this point I would have liked to follow @RudeDogg1's advice and do a day in corn cob but I haven't got any yet and can't see that I'll get any before the week is out. Next time...

Seems as though this media is pretty clean as very little dust has been produced and none has settled in my workshop:

farm3.staticflickr.com_2912_14715666662_a615783286_c.jpg

I removed the large parts by hand. Only the topsides of the saucer kickers (top left) haven't cleaned up completely but they were very grotty. It actually looks as though some kind of liquid may have made it's way in there at some point and caused some heavy oxidation:

farm6.staticflickr.com_5551_14715961315_5fdb148924_c.jpg

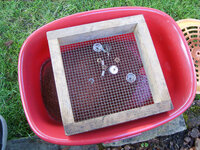
Time to try out my homemade sieve, which I rested on the top of spare cat litter tray:

farm4.staticflickr.com_3873_14529293720_90c7b33780_c.jpg

The sieve, with 5mm mesh, works perfectly! Only one small E-clip fell through and the others got hooked on the mesh. Everything else was just fine:

farm3.staticflickr.com_2895_14715662432_907b3ed292_c.jpg

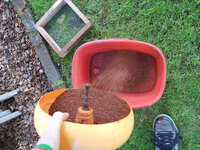
After removing all the parts I poured the media back and fourth a dozen times to remove as much dust as possible (it just drifts away in a gentle breeze) before starting the next batch of parts:

farm4.staticflickr.com_3864_14735828333_c149680ecb_c.jpg

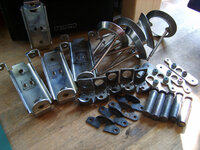
And here we are, the end result, lots of shiny parts with almost zero effort!

farm4.staticflickr.com_3873_14715960795_12644cd21b_c.jpg

This is what's going in next, lots of bits from the in-line drop-targets:

farm3.staticflickr.com_2928_14735828053_9f7df8c164_c.jpg

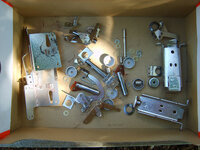
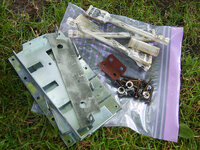
And here's the bits of the in-line drop-targets that aren't going in the tumbler. The metal plates are too large, some bits aren't metal and screws/bolts just get clogged with red rouge:

farm3.staticflickr.com_2912_14712784781_58259a32cb_c.jpg

So, here's what else is going into the next batch - pop-bumpers!

farm3.staticflickr.com_2903_14712784101_135c44f56e_c.jpg

I stripped everything down remembering to take lots of reference photos because I need to know, for example, that this is how a pop-bumper plunger, yoke and bracket go back together:

farm4.staticflickr.com_3861_14715664542_880b773665_c.jpg

I seem to have nearly enough parts to rebuild 5 pop-bumpers. These are the parts that are going into the tumbler, but I think I'll have to leave the rings and brackets until Batch #3 (the bracket standing up and the back I polished ages ago by hand with just Autosol, so no need for that to go in but I'll redo it with the Dremel):

farm4.staticflickr.com_3849_14529303179_99d30b1216_c.jpg

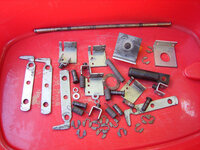
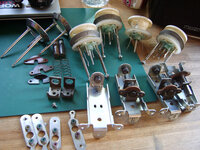
And, again, here's what I decided to not put in the tumbler from the pop-bumpers. The plastic skirts are being replaced with new and the bodies will be cleaned in the ultra-sonic bath then Novus'd. Springs just get mangled in the tumbler and frankly I can do a much better job by hand. The lamp holders don't seem to polish at all in the tumbler and just get clogged with red rouge; same with the bolts, screws and nuts. No point tumbling fibreglass board either ;)

farm4.staticflickr.com_3836_14715958285_4faccf6316_c.jpg

Just quickly I thought I'd take a look at the finish achieved in Batch #1. Here's a couple of photos showing a slingshot end stop fresh out of the tumbler:

farm4.staticflickr.com_3872_14715958005_7e5f3b96f0_c.jpg

farm3.staticflickr.com_2928_14715663112_0f8b2c3229_c.jpg

All the dirt has gone and the oxidation too. Perfectly serviceable and if this was for my VECTOR I'd refit it just like that. But PARAGON is going to the next level, so after just a couple of minutes (instead of the usual 5 or 10) with the Dremel fitted with 1" felt wheel and some green steel polishing compound here's the final result that I'm looking for:

farm3.staticflickr.com_2918_14529302699_880a21fdfe_c.jpg

farm3.staticflickr.com_2899_14713574214_c0b7e6262a_c.jpg

farm3.staticflickr.com_2940_14713573954_99257c3b85_c.jpg
 
Nice work.

So do you think a tumbler and a dremel is sufficient to polish up most of the larger stuff you've got?

I'm still sat on the fence what to grab at the moment. Part of me is tempted by the manliness of a bench-mounted polishing wheel whilst another side of me thinks a dremmel and tumbler might be a better way to go.....

Well... I'd say if you're going the whole hog then you need everything! But it depends how far you want to take it. For a lot of the large/larger parts you definitely need either a bench-grinder or drill-mounted polishing kit. I can't imagine how long it would take to do items such as the coin door, lock down bar or side rails with a Dremel! That would be like purgatory.

I started with a tube of Autosol and some wet'n'dry paper. You could do everything with just that, but that would also take forever. Next I got the drill-mounted polishing kit and really sped things up and achieved better results. But you can't do really small parts like the coil end stop in my previous post. It's just too small to hold and get anywhere near a buffing wheel (remember I clamp my drill into a vice to make a bench-polisher). So, next came the Dremel to solve this problem. The Dremel fitted with felt wheels achieves as awesome finish. Probably about as good as you can get on steel. But it takes a long time if you're starting with dirty/oxidised/corroded parts. And that, as I have just discovered, is where the tumbler makes it's mark. I don't think it can achieve the same high-level finish as hand polishing but it does take out 90% of the effort! Just chuck all the bits in and forget it for 2 days! The just a little light work to get the final finish.

I still think the drill-mounted polishing kit is the way to go for pinball, because you can clamp it to make a bench-grinder polisher, but it's easier to clamp big pieces like the lock down bar and then work the drill over them. I can't imagine try to hold a coin and work that up against a bench polisher!
 
Daauuum! Thats some shiny shizzle!

Awesome work :thumbs:

I need to find an excuse on how much my wife needs a tumbler.... :hmm:
 
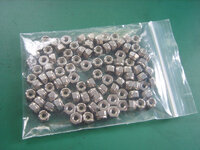
I've hatched a plan to reduce the chances of the screws on the flipper coil brackets working loose by fitting Nyloc nuts. I eventually worked out that I needed UNC #8-32 which are #8 32tpi (teeth per inch) coarse thread. My thinking runs along the lines of the Pin-Logic "Bally Bolts" kit, http://pin-logic.com/black-bally-buttons.shtml, and I may eventually go the whole hog and get some of those fancy cap bolts too.

farm6.staticflickr.com_5579_14813260774_91890f14dc_c.jpg
 
I nyloc'd all the mech bolts on fp
Have you done this before? Assuming FP hasn't been back together long enough to tell if it makes a difference? I've only got (and ever had) two pinball machines (both with 4 flippers) and all of them had either loose, missing or snapped screws holding the coil brackets. On Vector where a screw had fallen out the coil bracket had sheared in half along the right-angle bend, probably because it was being hammered at an angle and flopping about all over the place.
 
Makes no difference atall all the more modern ones use nylocs instead of them flimsy little nuts
I'm assuming FP is FirePower and that makes it a Williams? I'm not familiar but guessing it would have different flipper mechs to Bally's of the time? On the Bally flippers everything is just fixed using machine screws that self-tap into pre-drilled holes in the baseplate. There are no original nuts. The Pin-Logic "Bally Bolts" are one solution to the seemingly constant problem of the 4 screws holding the coil brackets always working loose. I'm sure my adding Nylocs will solve 90% of the problem. The only other improvement I can see would be to replace the machine screws with high-tensile cap bolts that could be done up really tight!
 
August 2014
FLIPPER COILS

Unsoldered the flipper coils and EOS switches from the playfield loom this morning, as it's time to clean them up ready for re-fitting to the restored flipper mechs.

So here's what came off (I've already restored one flipper back in January 2014 and that had an original Bally coil):

farm4.staticflickr.com_3907_14858090312_c727900bf6_c.jpg

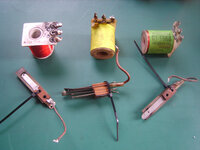
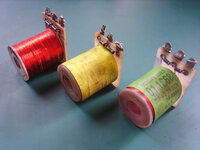
EOS switches have been zipped tied together as they pretty much fall apart once unscrewed from the mounting bracket. No prizes for spotting we have a traffic-light coloured selection of different coils! I did a little homework on my coil knowledge, so here's what I learnt about Bally AQ-25-500 / 34-4500 coils:
  • The code X-YY-ZZZZ tells you about the coil where X is the layout of the connection lugs, YY is the AWG (American Wire Gauge) of the wire and ZZZZ is the number of turns.

  • There are two sets of numbers so there are two sets of wire - two coils wrapped onto a single bobbin.

  • 25 AWG is 0.455mm diameter and has a resistance of 0.106Ω per meter at room temperate.

  • 34 AWG is 0.160mm diameter and has a resistance of 0.856Ω per meter at room temperate.

  • 25-500 is 500 turns of 25 AWG wire and would be about 3.64m long. By my calculations this should give a resistance of about 3.18Ω.

  • 34-4500 is 4,500 turns of 34 AWG wire and would be about 13.83m long. By my calculations this should give a resistance of about 318 Ω.

  • This era of Bally uses +43VDC to drive the coils.
farm6.staticflickr.com_5558_14855363521_c56a964a9e_c.jpg

From left to right:

(left) A real Bally coil but with the white plastic bobbin I suspect this is a later replacement (and because the soldering was cr@p). Markings are "BALLY C-815-1" but I assume that's a part number for the bobbin itself. Coil wrapper has disappeared so no official identification. Resistances look good at 3.4Ω and 303Ω. Diodes are 1N4004.

(middle) Eeek! Imposter! Plain wrapper. No identifying numbers just the marking "R.P. PRODUCTS". Resistances are 3.9Ω and 198Ω. Mmm... not so good. Using my new digital Vernier calliper I can measure it's wrapped with 25 and 34 AWG wires but for the resistance to be as low as 198Ω it's either faulty or only has about 2,500-2,750 turns of 34 AWG. Basically, it's the wrong coil! Diodes are 1N4003.

(right) A "QUALITY COILS" replacement. The bobbin is marked "WICO 56-3223", Wico being the manufacturer. The wrapper clearly shows this as "REF AQ-25-500 34-4500" with the Quality Coils part number being "01-1668". All I know is QC used "01-" as the prefix for Bally coils. Resistances also look good at 3.5Ω and 305Ω. Diodes are 1N4004.

Those 1N4003 diodes are rated up to 200V, which might not be high enough to withstand the kick-back voltage when the coil is deactivated. 1N4004 is rated for 400V which is great, but I am going to replace everything with 1N4007 (rated for 1000V) as I have hundreds of them!

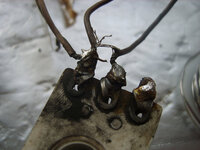
Some very shoddy soldering:

farm6.staticflickr.com_5580_14858091002_a5e1dd784c_c.jpg

:eek:
 
Not that it'll make any difference but 1n4005-7 have a different junction capacitance than the 1n4001-4.

Id' stick in 1n4004s but if you have loads of 1n4007s, I'd just use them too.
 
I tried to remove the flipper bats off mine the other day. But could I undo the ****ing screws?? Could I ****!!!:mad:
So basically , I gave up:rolleyes:
 
Not that it'll make any difference but 1n4005-7 have a different junction capacitance than the 1n4001-4.

Id' stick in 1n4004s but if you have loads of 1n4007s, I'd just use them too.
I've got RECTRON 1N4007s and the junction capacitance is uniform across the entire 1N4001-07 range at 15 pF typical. All other characteristics are the same, including package size. The only variation is the voltage rating.

http://www.mouser.com/ds/2/345/1n4001-1n4007-10465.pdf
 
Back
Top Bottom