What's new
Pinball info

Register a free account today to become a member! Once signed in, you'll be able to participate on this site by adding your own topics and posts, as well as connect with other members through your own private inbox!

Mirco Rad Cals?

VeeMonroe

Site Supporter
Joined
Aug 4, 2021
Messages
2,802
Location
London
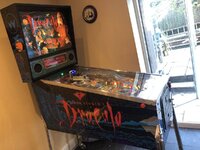
I’ve got a vague plan of re-decaling my Fish Tales.

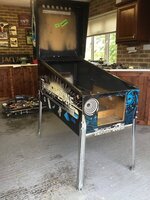
The cab is in good condition, but the artwork is faded to yellow (I understand this is common with FT).

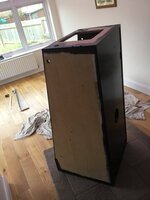
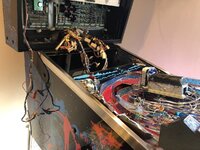
I was dissuaded from doing this because I have no woodworking experience and thought that, regardless of how good the cabinet was, I’d still have whitewash the cabinet. Also, I’d read re-decaling was easy to mess up.

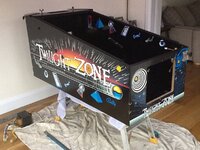
I’ve just found that Mirco offer thick glossy decals that you can put straight over the old artwork. This Rad Cal technology is apparently used by JJP for their new pins.

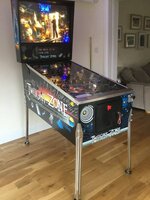
When I Googled, I noticed a bunch of huffing and puffing about ‘bodge jobs‘ and ‘not doing it properly’ by using the Rad Cals. However, I personally like the glossy finish on the pictures I’ve seen (MM) and don’t see the point spending ages p****g around prepping a cabinet where the only problem is faded art.

I wondered if anyone had applied Rad Cals to a 90s Bally/Williams cab? How it had come out? And if they had any tips?
 
This was me half way through a BSD restoration. I wanted to keep the bolts exposed rather than under the Rad Cals. They are super tough - the main issue are the holes for the flipper buttons.

I would recommend but it it really important to get the placement right first time.
 

Attachments

  • BF17B3FA-E635-4411-A1E6-1129A904B286.jpeg
    BF17B3FA-E635-4411-A1E6-1129A904B286.jpeg
    149.5 KB · Views: 54
  • 3C0D24B9-CA3A-49EC-B521-6C8F76C6099A.jpeg
    3C0D24B9-CA3A-49EC-B521-6C8F76C6099A.jpeg
    169.8 KB · Views: 50
I should have said that you need to sort out any rounded corners with filler and probably respray the black bits first so Rad Cals are not wood work free.
 
I should have said that you need to sort out any rounded corners with filler and probably respray the black bits first so Rad Cals are not wood work free.
I'm comfortable doing small amounts of woodwork as I spent several days filling and prepping a set of reclaimed pine doors.

However... Paul, who we hired to decorate the room afterwards, said that he spent a day fixing my prep work - so I'd prefer minimal woodwork and for it to show as little as possible!
 
The problem with this stuff is you learn as you go. I’ve done one with normal decals - loads of extra work sanding the cab smooth. I prefer Rad Cals especially since colour screen, pinsound, LEDs, silicone rubbers etc aren’t original so I’m not worried about the pimped up glossy look.
 
The problem with this stuff is you learn as you go. I’ve done one with normal decals - loads of extra work sanding the cab smooth. I prefer Rad Cals especially since colour screen, pinsound, LEDs, silicone rubbers etc aren’t original so I’m not worried about the pimped up glossy look.
Yeah :) My Fishy already has LEDs, a colour screen, silicone rubbers, a Brian Allen LE back-glass, and I've got all the parts for a reproduction fish topper. I also plan to add a lighted speaker panel, and powder coat the armour/legs/lockdown bar in sparkly lime green!

So, yeah, anyone who prefers their FT to be nostalgic 90s is going to be spitting blood before I *start* decaling anything...!!!!! 😈
 
I’ve only ever replaced the decals on my T.Z, it’s very important that the cabinet is perfect before the decals are put on otherwise it will show every mark that you didn’t notice when in bare wood.
if your going to to it, do it the right way so you don’t regret it.
Good luck
 

Attachments

  • C0C86BA5-2E0D-4CDA-B78B-D1C28BC846AE.jpeg
    C0C86BA5-2E0D-4CDA-B78B-D1C28BC846AE.jpeg
    125.6 KB · Views: 27
  • 69093729-1EFE-4CD3-92A8-0A31EF1B8041.jpeg
    69093729-1EFE-4CD3-92A8-0A31EF1B8041.jpeg
    67.3 KB · Views: 27
  • 52F16A4C-B379-4B22-A09E-10B3B041CBC6.jpeg
    52F16A4C-B379-4B22-A09E-10B3B041CBC6.jpeg
    169 KB · Views: 27
  • 15A6E70C-146A-4707-98FB-C0E87FEDE908.jpeg
    15A6E70C-146A-4707-98FB-C0E87FEDE908.jpeg
    97.5 KB · Views: 26
Did you use standard decals or Rad Cals?
I’ve only ever replaced the decals on my T.Z, it’s very important that the cabinet is perfect before the decals are put on otherwise it will show every mark that you didn’t notice when in bare wood.
if your going to to it, do it the right way so you don’t regret it.
Good luck
u
 
Like most of mirco products not very good I did a mm in them the image was a bit blurry but the worst thing was the lightning round the launch button was a million miles off and looked poor I did bring it up with mirco and got the answer of the launch button was in the wrong place and it was in tolerances it’s also very tight when you put the lockbar on and I had to do a bit of messing about with the flipper switches due to the thickness of the radicals I wouldn’t youse them again I just stick to original decals from a proper distributor
 
The BSD was spot on with the launch button etc. I was thinking Rad Cals for my Whirlwind but I’ll do some extra research now. I decided CPR for the playfield after similar research on Micro.
 
Yeah :) My Fishy already has LEDs, a colour screen, silicone rubbers, a Brian Allen LE back-glass, and I've got all the parts for a reproduction fish topper. I also plan to add a lighted speaker panel, and powder coat the armour/legs/lockdown bar in sparkly lime green!

So, yeah, anyone who prefers their FT to be nostalgic 90s is going to be spitting blood before I *start* decaling anything...!!!!! 😈

It's not theirs, though, it's yours. If they're that vexed, they can pay whatever you name for it, and return it to stock. I can't bear originality fiends.
 
The BSD was spot on with the launch button etc. I was thinking Rad Cals for my Whirlwind but I’ll do some extra research now. I decided CPR for the playfield after similar research on Micro.
What I’ve read about Mirco playfields matches what you and @CHRIS B PINBALLS have put here. It’s a bit hit and miss. Some people have a great experience. Some people find the manufacturing tolerances and product quality isn’t up-to-scratch, and the owner of the company doesn’t seem willing to deal with that.

Given it sounds like the decals are similar to the playfields, I’m unsure what to think. Going by my experience restoring pine doors, I can fill and smooth chips in a cabinet, such that a thick glossy panel looks dreamy, but I can’t prep smooth enough for a paper decal… :(

There are a couple of chips on my cab (and an original Williams sticky price label), but - mostly - it’s just very very faded.

3FF91AC3-63E0-47E6-AB24-4A45EB71E576.jpeg
 
You have to get your corners real good before using RadCals. Also the bottom edge of the cab. If they overlap the edges they are sharp! I would use a router after application and clean the edges up.

On MM by the way - on legit bally/williams decals - the Launch button and the shield are not positioned right. I am shocked that the start button is not in the middle of the shield and the launch in the middle of the white graphic. If I was to do a MM I would simply fill the launch button and cut it afterwards as the shield in my mind should have the start button in the middle. Why has nobody altered this in photoshop?

Radcals save you an AWFUL lot of prep. Plus you do not have to remove side rails. It is up to you if you want to hide the side bolts. They are also VERY tuff but do scratch!
 
I've done both and the Radcals are a zillion times easier to do and get a perfect finish. I still sanded my old cab clean, filled and sanded, filled and sanded, and then sprayed around the edges just the same as with normal decals, but it was probably wasted effort as the radcals just go on and cover almost anything beneath without showing it. Definately a great way to decalling first time round. Positioning them is really not hard. Just take your time and when you are happy with the position then clamp them down at one end so they cant move, and peel and stick from the other end. Simples!
 
I seriously considered rad cals before doing my WW. The only thing that put me off was the very glossy look. To me they suit newer DMD games with detailed art better than older games.

Vinyl decals amplify any imperfection, I did mine in lockdown and really took my time as I was bored with nothing better to do and theres still a couple of imperfections visable through the decal.

Not trying to put you off vinyl decals but they require a lot of prep to look good.
 
Last edited:
So does this all mean that Rad Cals can actually be installed on a machine with the Backbox boards and Playfield still installed??

Where are we all getting these from (out of interest!)

Cheers!
 
So does this all mean that Rad Cals can actually be installed on a machine with the Backbox boards and Playfield still installed??
I hoped so… I can’t take the playroom/kitchen/diner out of commission and I have two kids under six - so, everything has be done on the pins while the smaller one is either asleep or at his granny’s*

*Otherwise, he tries to stick his head inside the coin door…

Where are we all getting these from (out of interest!)
I assumed from Mirco?

 
So does this all mean that Rad Cals can actually be installed on a machine with the Backbox boards and Playfield still installed??

It’s a playfield out job in my opinion. I can’t imagine lining the Rad Cals up or making holes for bolts etc with the playfield in. The adhesive is really sticky - you’ve got to get it right first time.

I took all the boards and playfield out so I could move everything around plus re spray bits outside.
 
Back
Top Bottom