What's new
Pinball info

Register a free account today to become a member! Once signed in, you'll be able to participate on this site by adding your own topics and posts, as well as connect with other members through your own private inbox!

Kings & Queens shocking!

PUP

Site Supporter
5Years
Joined
May 13, 2015
Messages
401
Location
Southport
Hi
I found out that my K & Q is pumping out 83VAC on the lock bar and 43VAC on the side rails.
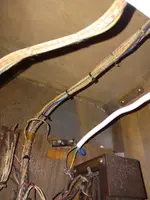
Checked the plug, earth wire is connected. I have had this once before on my magic city when someone had replaced the mains wire but got the live & neutral wires the wrong way round inside the game. The mains wire has been replaced on this game also but its not clear which way round inside the game the live/neutral should be.
Can someone confirm if this is correct, and if so what to try doing next to make it safe.
Blue going to fuse, brown going directly to transformer.
Thanks, Andy
 

Attachments

  • 20250222_155228.webp
    20250222_155228.webp
    87.7 KB · Views: 47
Great, thank you. Will change it round in the game. I checked the plug but that was correct. Ta 😊
 
The bare live also seems very close to the earth terminal, or is that the live terminal with the earth connected!!
 
Was it like that when you got it Andy?

Rule of thumb always check earth is sound from the plug to all the metal parts on a pin.
 
It was yes, bought from a well known person. Anyhow, thankfully nothing happened and il make sure to change them around and check it again before my meet 👍
 
On those old gottliebs you should properly ground the game. Run a wire from the transformer's frame to the back end of the metal side rails. Run another wire from the front end of the side rail to the coin door and lock down bar. Lastly, run a wire from the coin door to the other side rail.
 
What I do is to correctly wire the mains plug, and fit a 5 amp fuse. Put the brown wire to the fuse holder, blue neutral to transformer. Strip the mains lead so that the earth wire is long enough to reach the front of the motor board and cut the blue and brown wires back to then connect to the fuse and transformer. It makes for a neater job and you tie that into the main wiring harness terminal on up to the front of the motor board and terminate to a connector block. Then run another earth from there and up to the coin door. Use good connectors and shake-proof washers to give a good connection. ( That allows you to remove the motor board for servicing without having to strip the earth circuit out.) I tin all my connections throughout as well, but that's just my choice.

There is no physical link from the coin door to the lock bar carrier or side rails but earth it if you feel the need to for peace of mind. You could also put heat shrinks onto the metal flipper rods as well so as to isolate the 24v circuit off the flipper switches but again, their insulation fish paper, if in good state, would stop any leakage. . Once you have done that, put a meter ,set to ohms, and put one end on the earth pin on the plug, and onto the door to make certain you have a circuit.

But more importantly, if you are getting a shock off the door, then check the fish-paper insulator on the start/replay button because that actually touches one side of the 115v line when depressed to start a game so if that has failed, you will get a shock off it. I always inspect that and replace if necessary.
 
I always re earth my EMs ensuring an earth braid is stapled around the inside and attached by lugs to the leg brackets, coin door and that i have good contact between coin door box, lock down mech and bar. It terminates at the transformer ground, which then goes to the earth of the supply cable. The way i see it, they knew less about safety in those days than they do now. Having all touchable metalwork at the same potential and connected to earth, reduces the risk to the player. Always check for continuity between Earth plug Pin and extraneous conductive parts mentioned earlier, should be negligible resistance. All my pins run of RCBOs, so any sniff of improper leakage would trip the RCD element. It also means that will pass a PA Test, which most shows carryout.

I always 100% strip my pins, right down to taking apart the contacts - so that i can tumble and clean. It is also a great way to visually check everything as you go, so you see the broken solder joints, shorted solder blobs on contacts, bodge jobs etc. I did not start out this way though

Always, Always take loads of pictures as you go. I am not good enough to strip down and put back together from memory. And back up you pictures. I use an old digital camera - i guess a phone would be just as good as long as you put them in an album. But i am always dropping the camera and have filthy hands...

This was one did for Jon M for a charity things a few years back. It was at PinFest last year and previous years.


JB
 
Back
Top Bottom