What's new
Pinball info

Register a free account today to become a member! Once signed in, you'll be able to participate on this site by adding your own topics and posts, as well as connect with other members through your own private inbox!

Flipper alignment Q - modern Stern

Matt BRU

Registered
5Years
Joined
Jan 18, 2016
Messages
58
Location
Oxford
My right flipper is a touch lower than the left - see image attached. It's clearly a bit low and angles down from where that small alignment hole is and indeed not quite inline with the inlane guide (the image doesn't demonstrate this that well)

How easy it is to adjust this myself? Any pointers much appreciated.
 

Attachments

  • 20161112_092750.jpg
    20161112_092750.jpg
    161.1 KB · Views: 23
My right flipper is a touch lower than the left - see image attached. It's clearly a bit low and angles down from where that small alignment hole is and indeed not quite inline with the inlane guide (the image doesn't demonstrate this that well)

How easy it is to adjust this myself? Any pointers much appreciated.

Not owned a stern yet but if it's the same as bally/williams i find the best way is to slacken the nut off half a turn and push up the flipper. Then i use a straight block to push the flipper down so it's level with the return lane and hold it while i tighten up the nut. (I find a sliding bevel with the blade removed works well as a block). It usually sits spot on with the alignment hole when done. I've tried using a pin in the hole to align the flipper and it never seemed to work properly.
 
Not owned a stern yet but if it's the same as bally/williams i find the best way is to slacken the nut off half a turn and push up the flipper. Then i use a straight block to push the flipper down so it's level with the return lane and hold it while i tighten up the nut. (I find a sliding bevel with the blade removed works well as a block). It usually sits spot on with the alignment hole when done. I've tried using a pin in the hole to align the flipper and it never seemed to work properly.
Thanks Darren, I assume it's obvious which nut to use? It's one of those things where it doesn't affect play and works perfectly, just it's been bugging me that they are not alligned, so I think i'll give it a go! Thanks for the pointers.

Anyone else on here done this on a Stern? Be good to know if it is the same across manufacturers.
I'll find out tomorrow when i pick my first stern. It's pretty obvious. It clamps onto the flipper spindle. I'd use the correct size ring spanner though so you don't slip off
 
I'll find out tomorrow when i pick my first stern. It's pretty obvious. It clamps onto the flipper spindle. I'd use the correct size ring spanner though so you don't slip off
First Stern tomorrow? You must be well excited. What are you going for?
 
Iron Man. Not really seen eye to eye with sterns before, but going to give it a go. It's a stepping stone towards buying a brand new TWD as they just don't come up for sale.
 
How does it effect gameplay?

Disabling the top post makes the lane skillshot an actual skillshot but does mean the ball doesn't end up in that pops as much....I've left it enabled on mine.

Setting the Monger to Hard means you need more spinner hits to light all of the letters in "MONGER" and also means you can only start it by hitting the middle shot (rather than the middle or either orbit). This is a must change setting for me and all IM's should be like this :)
 
It'll beat you into submission. Simple, brutal, brilliant... and very addictive. Cracking audio too.

Disable the top post and set Monger to 'Hard' - do it now & save yourself the inevitable hassle of doing it later.
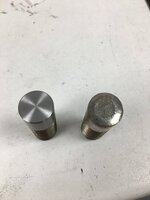
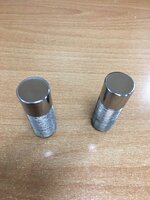
Just got all the small issues on mine sorted. Prettied up the magnet cores at work today.

Before and after machining.
IMG_7846.JPG

After polishing.
IMG_7847.JPG
 
Back
Top Bottom