What's new
Pinball info

Register a free account today to become a member! Once signed in, you'll be able to participate on this site by adding your own topics and posts, as well as connect with other members through your own private inbox!

Custom Mods - The DIY approach

bluejonny

Site Supporter
10 Years
Joined
Jul 21, 2011
Messages
279
Location
Southampton, UK
Hi Everyone

I do enjoy adding mods to my machines, and had been buying them of late. On my ST:TNG I really wanted the Borg figurine but at some £80, I thought that was far too much.

SO, I have just done my own which I will be installing this week. Total cost:

Figurine off eBay: £7.60
LED: .99p
Wire: free
Plastic stand: free

I'll put some photos up later, but this could be an interesting topic as I experiment further. Happy to share instructions if you like what you see... is there a MODs section?

Cheers

B J
 
Hi bj,
We are with you on this one, been doing diy mods for years now. ( some a lot better than others!) working on a slimer interactive topper for a customer at present. Just done a few mods for BAYWATCH. A mod section would be a cool idea.. I second that.
 
I wish I had the balls/knowhow/time to make a sttng topper. I've looked on ebay for a large enterprise ship from the next gen and there are loads but committing too buying the right one the right size has put me off! Maybe your borg dude will inspire me again!
 
I will be working on a cool kit with full fancy lighting soon which I will do for other people that's starwars tho but I could do Star Trek
 
I am happy to share my experiences as I experiment. I am just in the process of adding light to the "start mode" hole on ST:TNG and once that's done I will probably then add another to the other one. To light this hole has cost nothing. A bulb holder I had already, a diode and an LED...

I also want to use some of that EL wire as well for the wireform, but so far I am a bit confused on what you need to power it. It seems to be 12V DC, and I think you can get a 12V DC adaptor with a standard plug on it, and I guess that is the safest way without buggering about with the boards. I think dropping a four bank plug extension into the bottom of the machine is the way to go, but again happy to be told differently.

I'd be happy to put up instructions and photos, but as you say it probably needs its own section. Maybe Paul can add a new section?

Cheers

jon
 
You need to tie it into the GI other wise it'll always be on.
So it'll be on in video mode and on in the intro to borg multi ball,that would be crappy.

I put the light in the start mode scoop.
I didnt like it so took it out.
the flexi headed leds work well for scoops
 
FB_IMG_1466419850077.jpg
I also want to use some of that EL wire as well for the wireform, but so far I am a bit confused on what you need to power it.

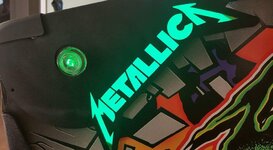
I've added EL Paper to my Met, to light both the cut out side rails as well as where the Apron cards go (just waiting on some custom cards).
You need a 12V feed into an invertor, which then goes straight to the EL paper/wire. Very simple.
All details can be found on the website : http://elpanelandtape.co.uk/el-inverters/

You need to match the inverter to the amount of wire/paper you are going to use, as they do have a workable range which must be adhered to.
 
  • Like
Reactions: JT.
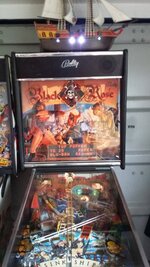
I'm making my own topper for Black Rose. I bought a NIB Playmobil Pirate Ship (£25 off Gumtree) going to drill out the cannons and insert led's which will be linked into the broadside cannon light.
 
Back
Top Bottom