Hi everyone
Not sure if anyone is interested, but I'll share here how I make new plastics when I have some that are broken and replacements cannot be found or are unavailable.
So just a few notes before we get started. I am using things you can buy online, a graphics program and a home printer. As you can imagine whilst results are good they won't ever replace screen printed versions and some purists may reject this approach completely.
So this is a just a good way to replace a plastic if you aren't worried about it not looking absolutely perfect. However with determination, trial and error, you can get good results. This works for me, and to be honest unless you were looking for this reproduction, I doubt you would even notice. If anyone has suggestions on improvements then please feel free to ping me!
What you'll need:
Original Plastic - (not absolutely essential, but nice to have)
Design of the image to be applied to the plastic
Graphics program such as Photoshop or Fireworks
MS Publisher or Word to print
Polycarbonate sheet maximum 3mm depth
Jigsaw (table version better)
File
Sharpie pen (or another permanent type marker)
Self adhesive translucent printer paper
Ink Jet printer (that can reverse print)
Sharp scissors
Sharp knife or blade
Sharp drill bit
Can of primer paint in white or grey
Patience!
So for this tutorial, let's focus on a plastic from TIME MACHINE, one of my restoration projects.
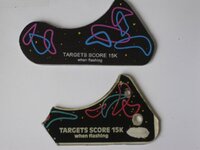
1) If you have the original plastic, that's a start. This is one from Time Machine for the left sling. As you can see it has cracked on the smiley face area, and also has the usual bottom corner missing.
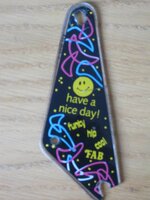
If you don't then it makes the process a little more tricky, but if you have say the opposite slingshot and it's the same size you will be good to go. The first thing to do is to cut out a new sling shot from some polycarbonate sheet. This can be obtained freely through eBay, but to be honest I found a local supplier and bought an "offcut". It was a roughly 1m by 1m sheet, 3mm depth and cost me £10. Polycarbonate is strong and also flexible. Steel balls do not easily break polycarbonate!
2) Using your slingshot plastic, draw around it directly onto the plastic covering of the polycarbonate sheet. Use a thin nib permanent marker or something like it so it doesn't rub off when you handle it. Where my sling plastic is broken, I used the other end of the plastic to get the approximate shape. If you have the right hand plastic available of vice versa then I would use that to get the right size as long as they are identical.
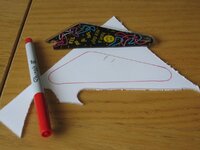
3) Now you need to cut your plastic out. I use a table jig saw with a round blade, which means turning corners is quite easy. Follow your lines as well as you can, but don't worry too much about rough edges or slightly proud lines. You can file that down very easily to get the right shape.
Once you have the shape, leave the covering on to protect the plastic until you are ready to apply your graphic. What's important now is make your graphic and ensuring it fits.
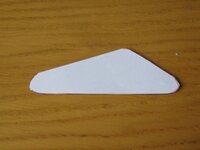
4) What I do now is scan the image in using a flatbed scanner (I have one built into my printer). Don't worry about resolution here, it's just to get the outline shape of the image. Once you have the scan, import it into your chose graphics program. 9 times out 10 the image will be rendered at the actual size. This means you can trace the outside of the image (using a pen tool within your program) so you end up with a wire frame of your plastic.
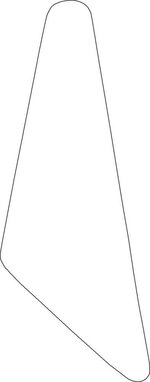
5) Now you have your wireframe, you can start filling it with graphics of your choice or if you are feeling creative design your own. For my Time Machine I elected to recreate the original slingshot image with some minor changes. I use Fireworks for a lot of design work. The learning curve is not as steep as programs like Photoshop, it's less complicated, and whilst it may lack lots of bells and whistles, it's still a pretty powerful program.
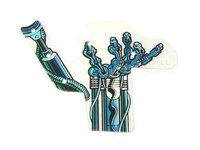
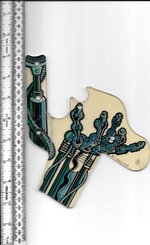
So this is my design (left) compared against the original (right):
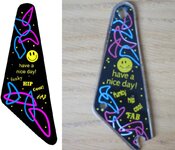
Obviously I have made some changes but it retains the look of the original.
6) Once you are happy with your image, I then print it out on normal paper, cut it out and see whether a) it fits and b) whether I need to make adjustments. In this case I was pleased with the output.
Now it's time to print it out on specialist paper. The paper I use is an inkjet compatible translucent gloss finish, polyester sheet available from print shops online for about £8 for 10 sheets. (A note about this way of doing it. If you look at any pinball plastic, the image is usually under the plastic not stuck to the top of it. You can get better result in terms of quality if you print on to sticky back white vinyl. However, you image is sat ON top of the plastic and therefore to some may look odd.)
Some important notes I feel work best.
i) Export your image as a high quality JPG and then drop it into Word or Publisher. Why? Because I find it so much easier to manipulate the image to the correct size! Just grab a corner and resize.
ii) Do a couple of test prints on plain paper. NB Either use the program to "mirror" the image or the printer. You need to print it backwards.
iii) Make sure your inkjet printer can print on specialist papers - most can - and in the preferences when you go to print ensure you select Semi-Glossy as the output.
iv) Check your image is mirrored (or use the printer settings) and click print.
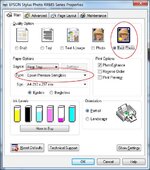
7) Once you have your output, leave it to dry for at least 15 minutes. Handling or touching the image may remove some of the print. After it has dried, carefully cut it out using sharp scissors, rounding off corners and ensuring you have good clear lines.
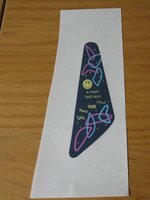
8) Now once you have your cut out, overlay it a few times on your plastic just to make sure you are happy with it. Some graphics are clear around the edges, so in theory your image will be 1 or 2mm in from the edge of the plastic. Once you are happy with your image, remove the backing tape of the plastic and also the image and apply to THE REVERSE SIDE. So, in other words flip your plastic and apply the graphic to the underside.
9) Try and remove the air bubbles if you have any, but don't use your finger directly. Instead cover it with a bit of paper and press down trying not to move the paper as it may inadvertently scratch the ink. Now when you flip your plastic over you should be able to see the image through the plastic. Now don't worry, it won't look brilliant because we have not applied a backing of any sort. You'll notice if you put your new slingshot on white paper, it will look very different!
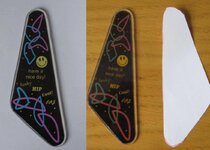
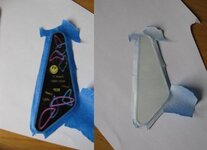
I still have some work to do on this image, but you can see the plastic on the left is on white paper, the image on right isn't. So we need to do something about that.
10) If you have a plastic where the outer edge needs to be clear, apply a bit of masking tape around the edge as we are now going to spray the back of the plastic with a white or grey primer. The reason we use primer is because it is thin and allows like through from underneath (so your GI still shines through the plastic). Apply a thin layer of paint to the slingshot back - don't overdo it here. Best advice is two very thin coats. Anything thicker and your GI will no penetrate the plastic. Once sprayed leave to dry.
11) Once the plastic has had time to dry, you'll need to drill holes where the posts come up through. Be careful here and make sure you use a really sharp drill bit. Blunt ones can rip the image away from the plastic. Best tip here is overlay the old plastic and mark the holes or place it on your playfield and make where the posts will come through. You can decide which way you want to drill but I press to come through the back of the plastic as then you reduce the risk of damaging your image.
12) When you holes are drilled, and you are happy with the end result, you can then install your plastic into your machine.
(I haven't installed my new plastic yet as Time Machine has been stripped. I have had to spend time repairing the timewarp ramp which was a real challenge as it was complete broken at the ramp entrance, but early results look very, very promising!!)
I hope this helps fellow pinballers!! Let me know what you think.
Cheers
Bluejonny
Not sure if anyone is interested, but I'll share here how I make new plastics when I have some that are broken and replacements cannot be found or are unavailable.
So just a few notes before we get started. I am using things you can buy online, a graphics program and a home printer. As you can imagine whilst results are good they won't ever replace screen printed versions and some purists may reject this approach completely.
So this is a just a good way to replace a plastic if you aren't worried about it not looking absolutely perfect. However with determination, trial and error, you can get good results. This works for me, and to be honest unless you were looking for this reproduction, I doubt you would even notice. If anyone has suggestions on improvements then please feel free to ping me!
What you'll need:
Original Plastic - (not absolutely essential, but nice to have)
Design of the image to be applied to the plastic
Graphics program such as Photoshop or Fireworks
MS Publisher or Word to print
Polycarbonate sheet maximum 3mm depth
Jigsaw (table version better)
File
Sharpie pen (or another permanent type marker)
Self adhesive translucent printer paper
Ink Jet printer (that can reverse print)
Sharp scissors
Sharp knife or blade
Sharp drill bit
Can of primer paint in white or grey
Patience!
So for this tutorial, let's focus on a plastic from TIME MACHINE, one of my restoration projects.
1) If you have the original plastic, that's a start. This is one from Time Machine for the left sling. As you can see it has cracked on the smiley face area, and also has the usual bottom corner missing.

If you don't then it makes the process a little more tricky, but if you have say the opposite slingshot and it's the same size you will be good to go. The first thing to do is to cut out a new sling shot from some polycarbonate sheet. This can be obtained freely through eBay, but to be honest I found a local supplier and bought an "offcut". It was a roughly 1m by 1m sheet, 3mm depth and cost me £10. Polycarbonate is strong and also flexible. Steel balls do not easily break polycarbonate!
2) Using your slingshot plastic, draw around it directly onto the plastic covering of the polycarbonate sheet. Use a thin nib permanent marker or something like it so it doesn't rub off when you handle it. Where my sling plastic is broken, I used the other end of the plastic to get the approximate shape. If you have the right hand plastic available of vice versa then I would use that to get the right size as long as they are identical.

3) Now you need to cut your plastic out. I use a table jig saw with a round blade, which means turning corners is quite easy. Follow your lines as well as you can, but don't worry too much about rough edges or slightly proud lines. You can file that down very easily to get the right shape.
Once you have the shape, leave the covering on to protect the plastic until you are ready to apply your graphic. What's important now is make your graphic and ensuring it fits.

4) What I do now is scan the image in using a flatbed scanner (I have one built into my printer). Don't worry about resolution here, it's just to get the outline shape of the image. Once you have the scan, import it into your chose graphics program. 9 times out 10 the image will be rendered at the actual size. This means you can trace the outside of the image (using a pen tool within your program) so you end up with a wire frame of your plastic.

5) Now you have your wireframe, you can start filling it with graphics of your choice or if you are feeling creative design your own. For my Time Machine I elected to recreate the original slingshot image with some minor changes. I use Fireworks for a lot of design work. The learning curve is not as steep as programs like Photoshop, it's less complicated, and whilst it may lack lots of bells and whistles, it's still a pretty powerful program.
So this is my design (left) compared against the original (right):

Obviously I have made some changes but it retains the look of the original.
6) Once you are happy with your image, I then print it out on normal paper, cut it out and see whether a) it fits and b) whether I need to make adjustments. In this case I was pleased with the output.
Now it's time to print it out on specialist paper. The paper I use is an inkjet compatible translucent gloss finish, polyester sheet available from print shops online for about £8 for 10 sheets. (A note about this way of doing it. If you look at any pinball plastic, the image is usually under the plastic not stuck to the top of it. You can get better result in terms of quality if you print on to sticky back white vinyl. However, you image is sat ON top of the plastic and therefore to some may look odd.)
Some important notes I feel work best.
i) Export your image as a high quality JPG and then drop it into Word or Publisher. Why? Because I find it so much easier to manipulate the image to the correct size! Just grab a corner and resize.
ii) Do a couple of test prints on plain paper. NB Either use the program to "mirror" the image or the printer. You need to print it backwards.
iii) Make sure your inkjet printer can print on specialist papers - most can - and in the preferences when you go to print ensure you select Semi-Glossy as the output.
iv) Check your image is mirrored (or use the printer settings) and click print.

7) Once you have your output, leave it to dry for at least 15 minutes. Handling or touching the image may remove some of the print. After it has dried, carefully cut it out using sharp scissors, rounding off corners and ensuring you have good clear lines.

8) Now once you have your cut out, overlay it a few times on your plastic just to make sure you are happy with it. Some graphics are clear around the edges, so in theory your image will be 1 or 2mm in from the edge of the plastic. Once you are happy with your image, remove the backing tape of the plastic and also the image and apply to THE REVERSE SIDE. So, in other words flip your plastic and apply the graphic to the underside.
9) Try and remove the air bubbles if you have any, but don't use your finger directly. Instead cover it with a bit of paper and press down trying not to move the paper as it may inadvertently scratch the ink. Now when you flip your plastic over you should be able to see the image through the plastic. Now don't worry, it won't look brilliant because we have not applied a backing of any sort. You'll notice if you put your new slingshot on white paper, it will look very different!

I still have some work to do on this image, but you can see the plastic on the left is on white paper, the image on right isn't. So we need to do something about that.
10) If you have a plastic where the outer edge needs to be clear, apply a bit of masking tape around the edge as we are now going to spray the back of the plastic with a white or grey primer. The reason we use primer is because it is thin and allows like through from underneath (so your GI still shines through the plastic). Apply a thin layer of paint to the slingshot back - don't overdo it here. Best advice is two very thin coats. Anything thicker and your GI will no penetrate the plastic. Once sprayed leave to dry.

11) Once the plastic has had time to dry, you'll need to drill holes where the posts come up through. Be careful here and make sure you use a really sharp drill bit. Blunt ones can rip the image away from the plastic. Best tip here is overlay the old plastic and mark the holes or place it on your playfield and make where the posts will come through. You can decide which way you want to drill but I press to come through the back of the plastic as then you reduce the risk of damaging your image.
12) When you holes are drilled, and you are happy with the end result, you can then install your plastic into your machine.
(I haven't installed my new plastic yet as Time Machine has been stripped. I have had to spend time repairing the timewarp ramp which was a real challenge as it was complete broken at the ramp entrance, but early results look very, very promising!!)
I hope this helps fellow pinballers!! Let me know what you think.
Cheers
Bluejonny
Last edited:


